Enter/Update all employee information such as name, address,
exemption information, special deductions, etc. From here you
can also view pay information for this specific employee.
- From the Main Menu, select Contacts -> Employees -> New or Edit Employee.
- If you selected New Employee, your screen should look similar to the 2nd screen.
- If you selected Edit Employee, your screen should look similar to this:

- To Edit an existing employee, select an Employee Name from the pull-down list and click on the
 Edit button. Edit button.
- To Add a new employee, click on the
 Add button. Add button.
- Whether adding or editing, your screen should look similar to this:
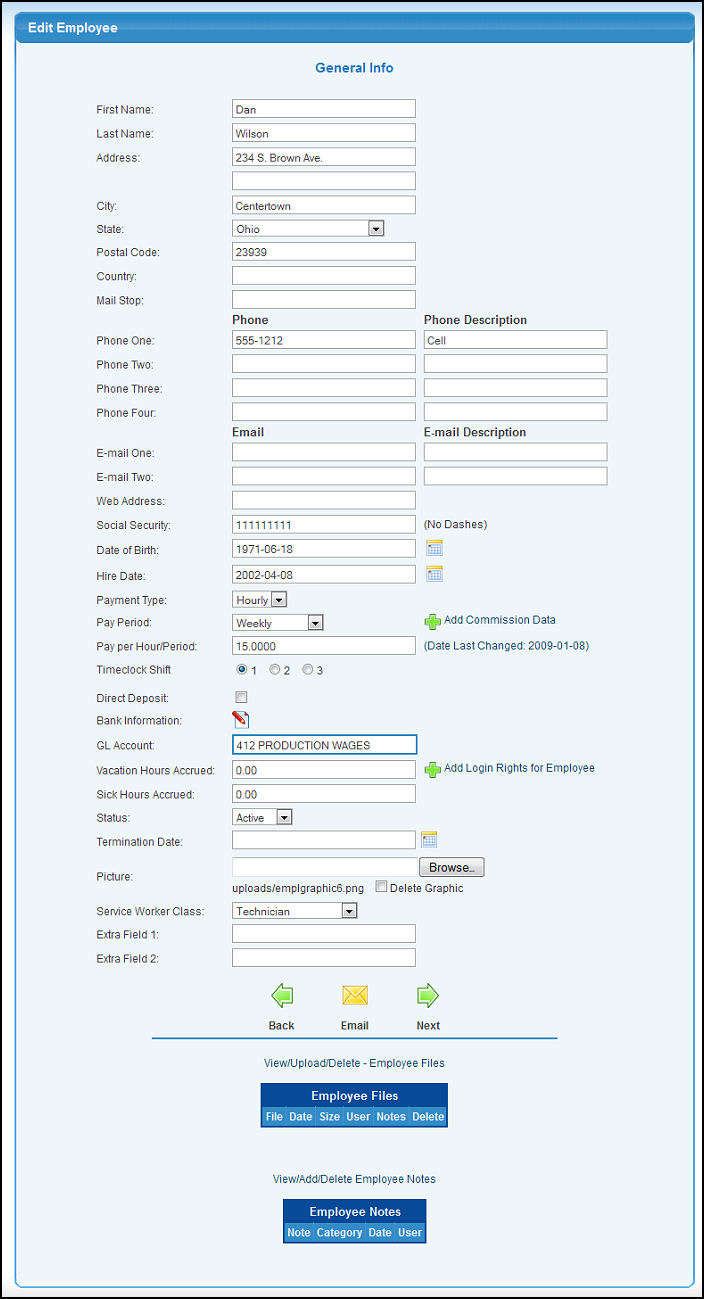
- Edit any or all the information in the following categories:
- Name (First/Last): Enter the First Name (and middle initial) in the first box and the Last Name in the next box.
- Address, City, State, Postal Code, Country, and Mail Stop: Enter mailing address information. This will be the address used for payroll checks and W-2 forms. Verify this address is a valid mailing address.
- Phone / Phone Description: Each employee can have up to 4 phone numbers, so there is also a description area to indicate what that phone is (ie: Cell, home, office, parents, etc.).
- E-mail / E-mail Description: Each employee can have up to 2 email addresses, so there is also a description area to indicate what the e-mail address represents (for example, Personal, Business, etc.).
- Web Address: If the employee has a web page, enter the web address here.
- Social Security: Enter the social security number WITHOUT any dashes between number groups.
- Date of Birth: Enter the employee's data of birth in YYYY-MM-DD format. You can either enter the date manually or click the
 Calendar button to select the date from a calendar. Calendar button to select the date from a calendar.
- Hire Date: Enter the date on which employee begins working. This date is used in determining vacation rate, seniority, etc. You can either enter the date manually or click the Calendar button to select the date from a calendar.
- Payment Type: Select Hourly or Salary from the pull-down list.
- Pay Period: Select how often the employee is paid. You can choose weekly, bi-weekly, monthly or semi-monthly.
- Add Commission Data: This ties the employee into a salesman record so commission data can be passed back to Payroll. To create this tie, click on the Add button.
- Pay per hour/period: If an hourly worker, then enter the hourly pay. If a salaried worker, enter the salary for each period.
- Date Last Changed: Click on this link to see a Payroll Wage History for this employee. Your screen should look similar to this:
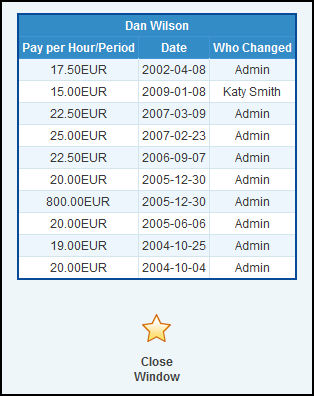
- To return to the Employee Update screen, click on the Close Window
 button. button.
- Timeclock Shift - Select a radio button to indicate which shift this person is working.
If your company pays by piecework their is an add on available that allows you to track employees work.
- Direct Deposit: Check this box if this employee will be paid via Direct Deposit. For further instructions on setting up Direct Deposit, see the Direct Deposit topic in the Related Topics section at the bottom of this Help screen.
- Bank Information: If this employee will be paid via Direct Deposit, click on the Edit button to edit/add this employee's Bank Information. For further instructions on setting up Direct Deposit, see the Direct Deposit topic in the Related Topics section at the bottom of this Help screen.
- GL Account: Choose the expense account in the General Ledger that this employees wages should post. Enter the GL Account, Name or any portion of the number, name or description to see a drop-down list of matching account numbers. Highlight the account to enter it into the field. A space bar will bring up ALL accounts valid for this field, HOWEVER this is not recommended due to limitations on the length of the list that can be viewed. Note: this account can be changed in the Log Hours screen if wages need to be charged to a different account on occasion.
- Vacation Hours Accrued: Enter the number of Vacation Hours this employee has available. This field will update automatically each pay period based on the formula you entered in the General Factors screen of Payroll Setup. It will reduce every time vacation is used. However, you can manually override this figure (useful during the initial setup of NolaPro).
- Add/Edit Login Rights for Employee: This ties the employee into a login record, so changing name, etc. information in one place automatically changes it in another. Also, in order to have the attached picture show up on the home page for this employee, this information must be entered. Note: This section will only show if you are logged in as an administrator or supervisor.
- Sick Hours Accrued: Enter the number of Sick Leave Hours this employee has available (see notes about vacation accrued).
- Status - Active or Inactive: An active employee will show up on the list when logging hours, an inactive one will not. BOTH active and inactive will show up on reports, W-2s etc.
- Termination Date: Date when employee was marked as inactive. This can be changed here.
- Photo: Attach a photo to appear on various payroll lists and on welcome home page when this employee logs in. Use the Browse button to find the file. When a picture has been attached, you will see this photo at the top of the page when editing the employee file.
- Service Worker Class: Pick a class from the drop-down list IF this employee logs time to service orders.
- Extra field #1 and #2: This field may or may not show, and the prompt text will be based on what you entered in the GENERAL FACTORS part of setup. These two extra fields can contain anything you feel might be useful to attach to each employee record.
- View/Update/Delete - Employee Files: You can attach pictures, documents, etc. to each employee(sales contracts, agreements, tax forms, etc.). See the Attaching Files topic in the Related Topics section to see how this is done.
- View/Add/Delete Employee Notes: This will appear if the Employee Notes add-on is active. You can attach notes to each employee. See the Attaching Notes topic in the Related Topics section to see how this is done.
- To continue editing the employee's information, click on the
 Next button. Your screen should look similar to this: Next button. Your screen should look similar to this:
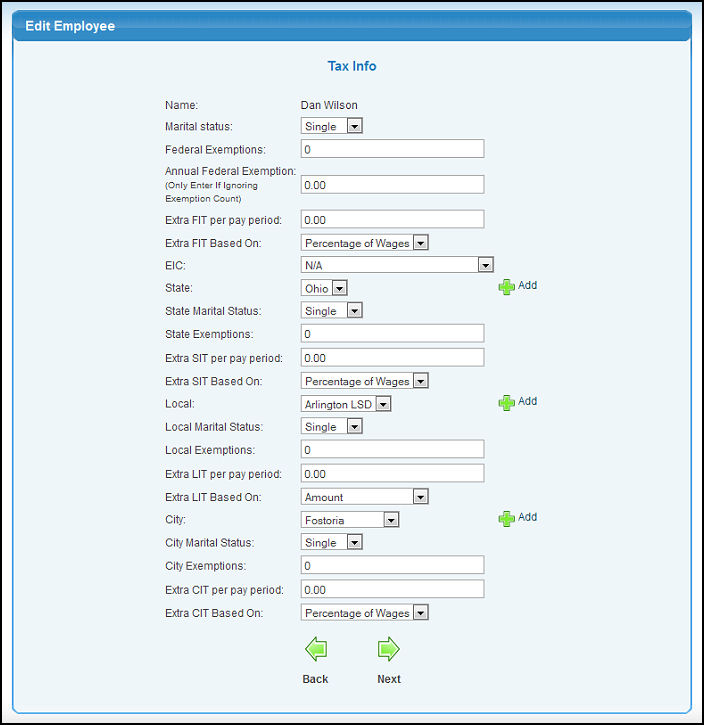
- Edit any or all the information in the following categories:
- Federal Information
- Marital Status: Select correct status from the pull-down list.
- Federal Exemptions: Enter the number of FEDERAL exemptions claimed on W-4 form.
| SPECIAL EXEMPTION CATEGORIES |
|---|
| Exemption Entry | What Effect |
|---|
| Actual exemptions+30 | No FUTA
No Medicare
No FICA |
| Actual exemptions+50 | No Medicare
No FICA |
| Actual exemptions+70 | No FUTA |
| 96 | No Federal Taxes
No FUTA |
| 97 | No Federal Taxes
No FICA
No Medicare
No FUTA |
| 98 | No Federal Taxes
No FICA
No Medicare |
- Annual Federal Exemptions: Useful for locations outside the US that enter federal exemptions differently, such as Canada. Enter an amount here and the previous federal exemptions field will be ignored.
- Extra FIT per pay period: Enter the amount of additional federal income tax to be withheld per pay period.
- Extra FIT based on: If an additional amount of federal tax is to be taken, select whether the Extra FIT per Pay Period represents a Percentage of Pay, Percentage of Tax or a Fixed dollar amount.
- EIC: Select whether the EIC tax is not applicable (N/A) or if based on Single, Married with Spouse having a Certificate, or Married with Spouse NOT having a Certificate.
- State Information
- State: Select the state for tax purposes (if any) from pull-down list. State tax tables are entered in Payroll -> Tax Tables -> Tax Table Add/Update or you could create a New State tax at this time by clicking on the Add button.
- State Marital Status: Select correct status from the pull-down list.
- State Exemptions: Enter the number of exemptions claimed on the employee's state income tax claim form.
| SPECIAL EXEMPTION CATEGORIES |
|---|
| Exemption Entry | What Effect |
|---|
| 98 | No Tax
No State Unemployment |
| 99 | No Tax |
- Extra SIT per pay period: Enter the amount of additional state income tax to be withheld per pay period.
- Extra SIT based on: If an additional amount of state tax is to be taken, select whether the Extra SIT per Pay Period represents a Percentage of Pay, Percentage of Tax or a Fixed dollar amount.
- Local Information
- Local Tax: Select the local tax district (if any) from the pull-down list. Local tax districts for tax purposes are entered in Payroll -> Tax Tables -> Tax Table Add/Update or you could create a New Local tax district at this time by clicking on the Add button.
- Local Exemptions: Enter the number of exemptions claimed for local taxes.
| SPECIAL EXEMPTION CATEGORIES |
|---|
| Exemption Entry | What Effect |
|---|
| 98 | No Tax |
- Extra LIT per pay period: Enter the additional local income tax to be withheld per pay period.
- Extra LIT based on: If withholding additional local income taxes, select method of calculation from pull-down list Percentage of Pay, Percentage of Tax or a Fixed dollar amount.
- City Information
- City: Select city (if any) from pull-down (cities or tax purposes are entered in Payroll -> Tax Tables -> Tax Table Add/Update) or you could add a New City tax district at this time by clicking on the Add button.
- City Marital Status: Select correct status from the pull-down list.
- City Exemptions: Enter the number of exemptions claimed for
city taxes.
| SPECIAL EXEMPTION CATEGORIES |
|---|
| Exemption Entry | What Effect |
|---|
| 98 | No Tax |
- Extra CIT per pay period: Enter the additional city income tax to be withheld per pay period.
- Extra CIT based on: If additional city income tax is to be withheld, select method of calculation from pull-down list Percentage of Pay, Percentage of Tax or a Fixed dollar amount.
- If you have ADDITIONAL Taxes defined, then you need to check the box next to the name if this employee is to have those taxes apply, and enter the number of exemptions for this type of tax.
- To continue editing the employee, click on the Next button. Your screen should look similar to this:
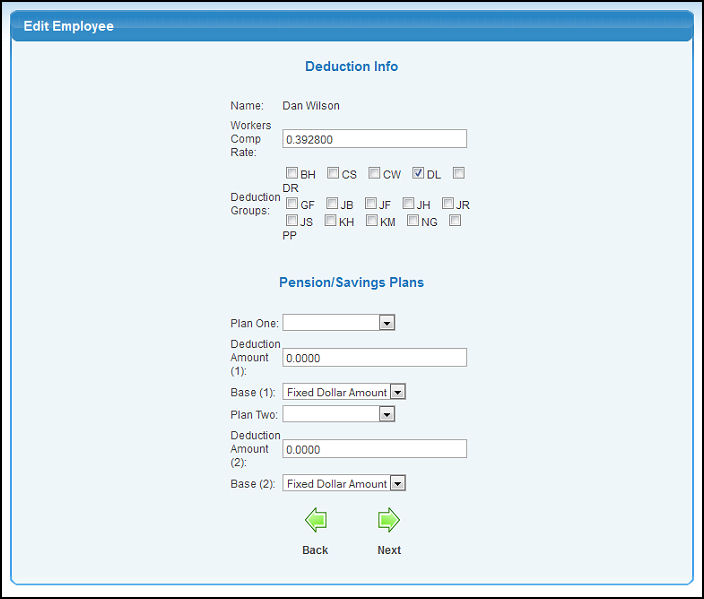
- Edit any or all the information in the following categories:
- Workers Comp Rate: Enter the Percentage rate for workmans compensation to be contributed by company for this type of employee.
- Deduction Groups: Check the box next to any groups that this employee belongs to.
- Pension/Savings Plans: If you have entered any of these plans in Setup, they will be displayed here.
- Plan One (or Two): Select a plan from the pull-down list.
- Deduction Amount: Enter the Deduction amount.
- Base: Select if the amount is a fixed dollar amount or a percentage of wages.
- To finish editing the employee and SAVE your changes, click on the Next button. Your screen should look similar to this:
- To return to edit another employee or add a new employee, click on the
 Back button Back button
|