In order to generate payroll direct deposit files that can be processed by your bank you will need to enter information in two main areas. The system needs information about your company's bank and the banks of your employees.
- To enter in information about your bank do the following:
- From the Main Menu, select Admin -> Setup - Payroll -> Checking Accounts.
- Select the Bank Account or add a new one that will be used for direct deposit transactions. You should see a screen simliar to the one shown below:
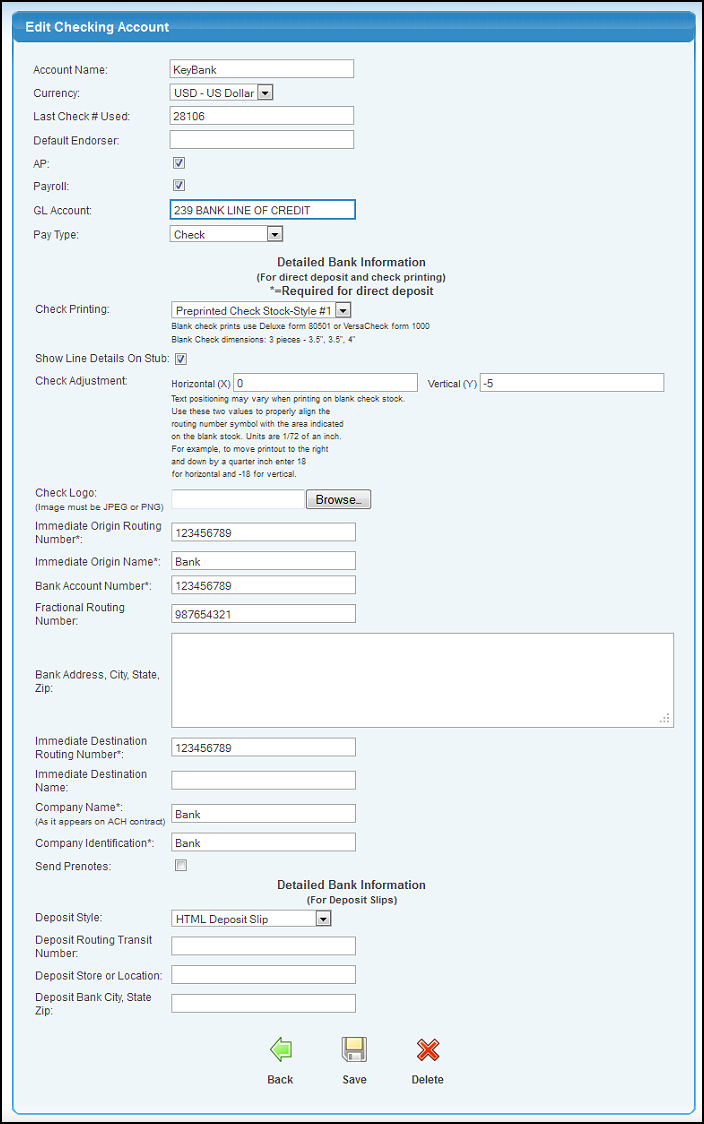
- Move down to the section labeled "Detailed Bank Information". To get Direct Deposit working properly you will need to complete at least the starred fields (you can obtain this information from your bank):
- *Immediate Origin Routing Number - The routing number of your bank
- *Immediate Origin Name - The name of your bank
- *Bank Account Number - The account number at this bank from which funds will be drawn
- Fractional Routing Number - (not necessary for direct deposit) Used when printing checks on blank check stock
- Bank Address, City, State, Zip - (not necessary for direct deposit) Used when printing checks on blank check stock
- *Immediate Destination Routing Number - The routing number of the Federal Reserve Bank that will handle the transaction
- Immediate Destination Name - (not required) The name of the Federal Reserve Bank that will handle the transaction
- *Company Name - The name of your company as it appears on the ACH contract
- *Company Identification - This is typically your company's tax ID number
- Send Prenotes - (not required) A prenote is a zero dollar transaction for an employee that just verifies that the routing and account numbers are valid. By checking this box you will force employees with new direct deposit bank information to have a prenote transaction ran on their account before regular deposits are made. A standard check will be printed for this employee during any week that a prenote is sent out. Once a prenote has cleared, you must mark on the employee's bank information page that the prenote was OK for this routing and account number. After this the employee's pay will be direct deposited into his or her account. If a routing number, account number or account type (savings or checking) is changed for a person, a new prenote transaction will automatically be created for the next week to test the new numbers and the employee will receive a regular check. A new prenote will also be issued if the employee changes banks. If Send Prenotes is not checked, no prenotes will ever be sent. Employees will immediately begin receiving pay via direct deposit.
It is generally required that you obtain written authorization from employees before you may execute electronic fund transfers to or from their bank accounts. You may create your own authorization form, or you can use NolaPro's template form by going to Admin -> Setup - Payroll -> Direct Deposit Auth.
To enter information about your employees' banks, select Contacts -> Employees -> Edit Employee . Select an employee. To configure direct deposit for the person enter information in the following fields:
- Direct Deposit - Check this box if the person wants pay direct deposited (click the Next button to save your changes.)
- Bank Information - Click the edit button to enter bank details. Starred items are required.
- Bank Name - Name of the employee's bank
- Bank Address, City, State, Zip, Phone, Contact Name - (not required) Bank contact info useful if there are problems with transactions
- *Bank Account Type - Either checking or savings
- *Bank Routing Number - The routing number of the employee's bank
- *Bank Account Number - Account number into which employee would like pay deposited
- Prenote OK - Check this box if a prenote transaction was sent successfully for this bank account. If your company bank account requires that prenotes be successful before pay is deposited (Admin -> Setup - Payroll -> Checking Accounts), you must check this box after a clear prenote in order for the employee to receive funds on the next pay cycle.
After the required banking information has been entered you can now create a direct deposit file. Your bank will provide information on how to submit this file to them so that it can be processed and your payroll distributed.
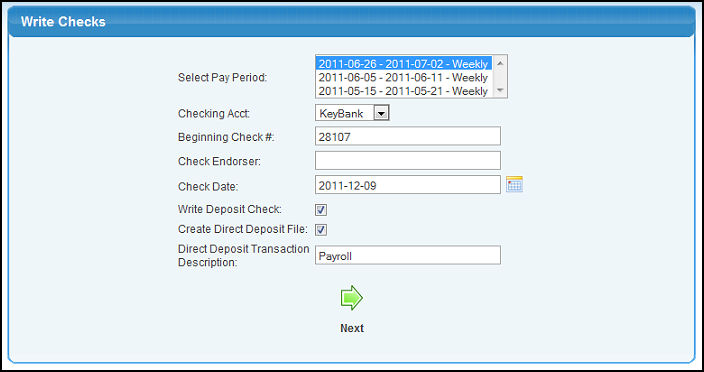
- Enter hours and calculate payroll as normal.
- Go to Write Checks (Payroll -> Calculations/Checks -> Write Checks).
- Be sure the box labeled Create Direct Deposit File is checked.
- Enter text in the box Direct Deposit Transaction Description . This phrase will show up on employees' bank statements. You can enter a default value for this box by going to Admin -> Setup - Payroll -> General Setup.
- Click Next to write checks and/or a direct deposit file. (It is OK to have some employees receiving checks and some using direct deposit. All will be processed at the same time.)
- Click the printer icons to print checks or direct deposit stubs.
- Click the download button to access the direct deposit file. This will open up the ACH Report. You can also get here by going to Reports -> Payroll -> Direct Deposits.
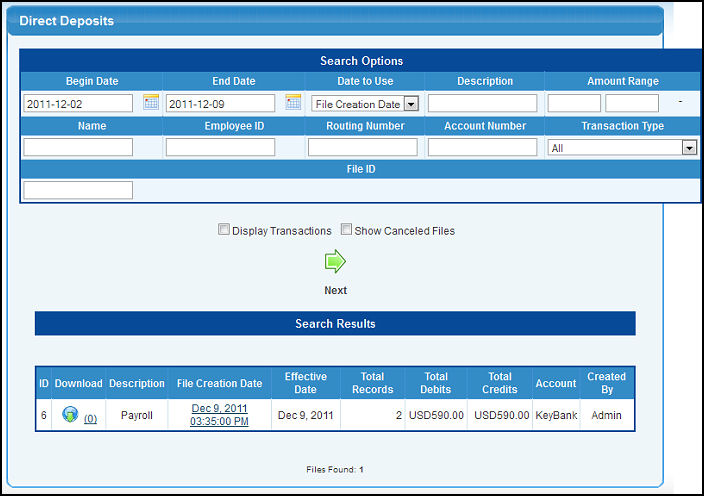
- Click the download button in the column labeled Download.
- Transmit the file to your bank following their specific instructions.
|