Enter Inventory Items or miscellaneous parts to Fulfillment Orders or Service Orders. Inventory Item activity is reflected in the Inventory module. Pricing and cost information for non-inventory items can be entered.
- This screen is accessed from the Main Menu through Orders -> Service Orders -> New Order or Edit Order.
- In the Order Add/Edit process, you will see a screen similar to this:
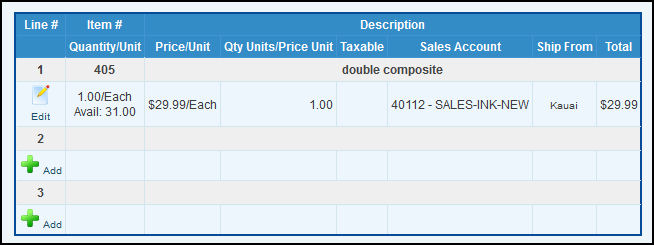
- When you first come to this screen when adding a new order, there will be 10 lines with nothing entered. To enter information into each line, you must click on the
 Add button under the line number. Add button under the line number.
- To EDIT an existing line item, click on the
 Edit button under the line number. Edit or Add will bring up a detail screen which looks like this: Edit button under the line number. Edit or Add will bring up a detail screen which looks like this:
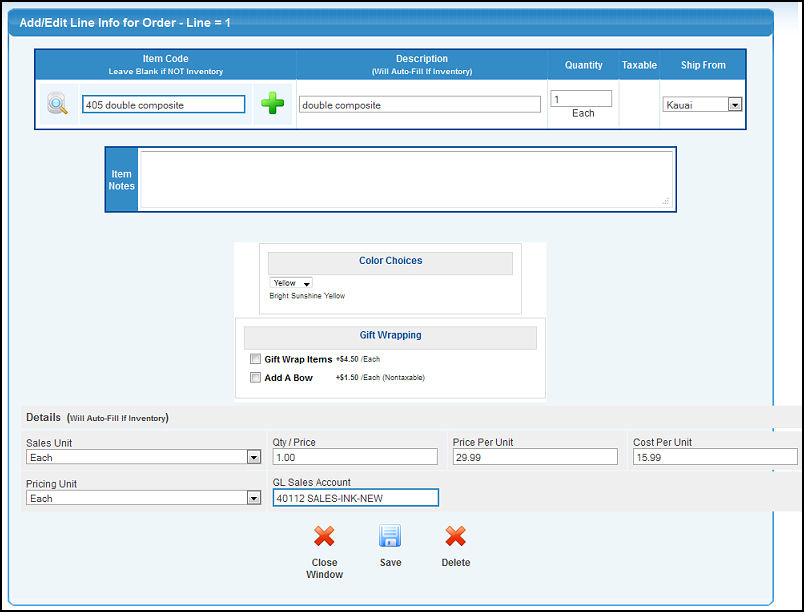
This entry screen is divided into two sections. If you are selecting an inventory item, then you need only fill in the TOP section above the words "BELOW ENTRIES ARE FOR NON-INVENTORY ONLY". If Item Options are attached to this Inventory Item, the choices will be displayed below the Item Notes section (as shown in this example). See Item Option Groups in the Related Topics section for instructions on using Item Options. If it is NOT an inventory item, you MUST fill in the QUANTITY, TAXABLE and SHIP FROM from the top section, then all data in the bottom part.
- Item Code: Leave this blank if NOT from inventory. Enter the code or description (or any part of these) to bring up a matching entry list, or use the
 Lookup button to find the item you want. To add a new inventory item click on the Add button. See Item Add/Update for information on adding new items to inventory. The system will retrieve all the information about pricing, costs, etc. that are in the BOTTOM portion of the input (when you SAVE). However, if you are Editing an inventory item, you can over-ride the usual price, etc. Lookup button to find the item you want. To add a new inventory item click on the Add button. See Item Add/Update for information on adding new items to inventory. The system will retrieve all the information about pricing, costs, etc. that are in the BOTTOM portion of the input (when you SAVE). However, if you are Editing an inventory item, you can over-ride the usual price, etc.
- Quantity: This MUST be filled in for inventory AND non-inventory items.
- Taxable: If checked, tax will be charged on this item. The entry for this will default to the customer default tax status. You may see a Taxable checkbox or taxing districts listed depending on your company's taxing procedures. See Customer New/Edit and Company Options in the Related Topics section below for more information.
- Ship From: If you have multiple locations, and you want to ship some items from one location and some from another, you will need to select a location from the drop-down box. The location will default to the one selected when the order was started, so if all items are from the same location you should be able to ignore this selection (it will already be right).
- Item Notes: Notes entered here can further define information about the item. These notes DO show on the invoice later on.
ITEM OPTIONS:
Item Options shown are Color Choices and Gift Wrapping. Any costs associated with an Option are displayed here and will be added to the Order Total. Note: The Item Options selected will have an abbreviation (YL for Yellow Color Choice in this example) that will appear next to the Inventory Item ID. This makes it easy to see which options have been chosen by looking at the Inventory ID. (Example "sg-100YL" is the sg-100 inventory item with a color choice of Yellow).
NON-INVENTORY ITEMS:
- Description: A description of the item sold.
- Sales Unit: The unit name for the SALES quantity.
- Pricing Unit: The unit name for the PRICE Quantity.
- Qty Units/Price Unit: The conversion factor between PRICE and SALES unit (how many of the sell units are contained in the price unit. EX: Sell by Each, price by Dozen. Number of sell units (each) per price unit (dozen) is 12).
- Price per Unit: Price per SELL unit. Following our example above, price per dozen.
- Cost per Unit: Cost per SALES unit.
- GL Sales Account: General Ledger account to post the sales amount for this item. This account will default to the customer or item sales account depending on how this is specified in setup.
- Click on the
 Close Window button to close the window and NOT save your changes. Close Window button to close the window and NOT save your changes.
- Click on the
 Save button to save the entries you have made. And if this is a new inventory item being selected, the costs/prices/descriptions will be looked up. Save button to save the entries you have made. And if this is a new inventory item being selected, the costs/prices/descriptions will be looked up.
- Click on the
 Delete button to delete the line item displayed. Delete button to delete the line item displayed.
|