- From the Main Menu, select Inventory -> Inventory Items -> Edit Item.
- Your screen should look similar to this:
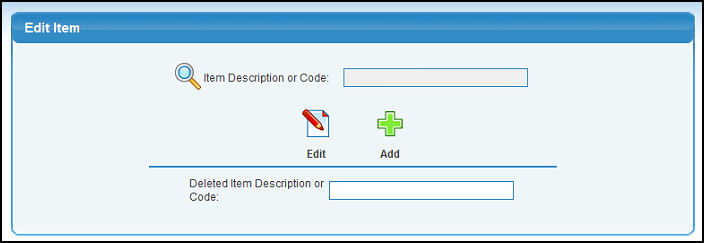
- Item Description or Code: Enter Item Name (or any portion of the name) to bring up a drop-down of possible matches. If you want to search by description, type of item, vendor, category, etc., use the
 Lookup button for detailed searches. Lookup button for detailed searches.
- Click on the
 Edit button to edit this item. Edit button to edit this item.
- Deleted Item Description or Code: If the item you are searching for can't be located (or to undelete an item deleted in error), enter the item in this box and click the edit button.
- Your screen should look similar to this:
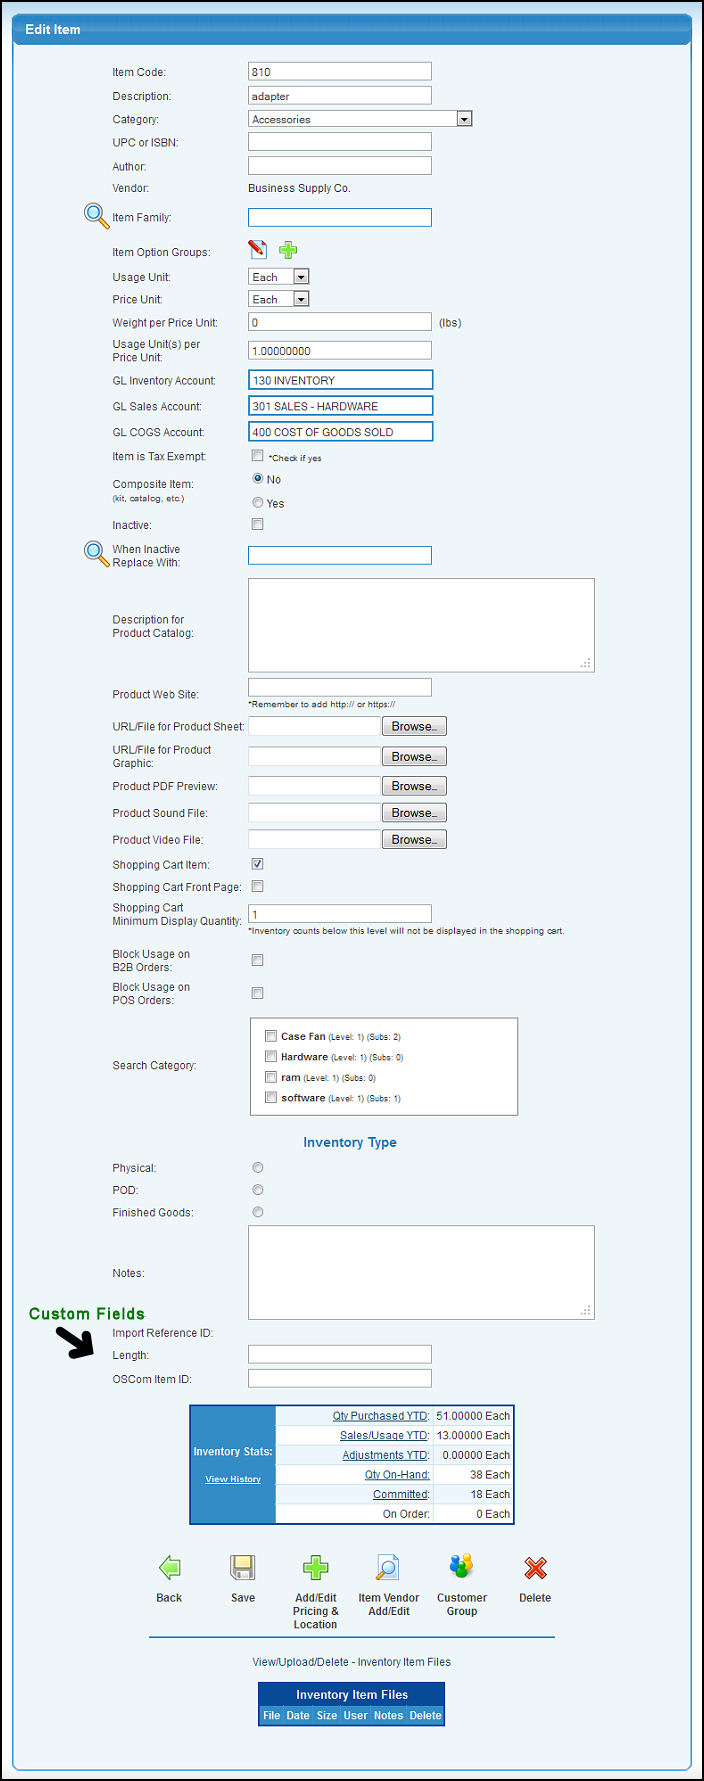
- Enter the information shown below.
- Item Code: Identifying code (part number).
- Description: Full description of the Inventory Item.
- Category: Select the appropriate Item Category of product from the pull-down list. NOTE: Item Categories are created under Inventory Setup. Item Categories allow you to group your Inventory Items in logical groups such as Paper Products, Hardware, Printer Supplies, etc.
- UPC or ISBN: This will be a part of the auto-suggest search field: The ISBN Number or the UPC Code.
- Author: Author Name for items such as tapes, CD's, movies, music, etc.
- Vendor: When editing, you do not enter this at this time, but it is displayed for informational purposes. When Editing you will use the button at the bottom of the page to add or update vendor information for this item.
- Item Family: Enter an item family into the first box (or a portion of the name) to bring up a drop-down of possible matches. If you would like to make the current item a sub-item or child of another product, then enter the parent or main item in this box. The Item Family relationship is used in the shopping cart so that only the parent item shows up in shopping cart search pages, but going to the details page will list all of the child items. You can then enter a quantity to purchase for each child item. This is most useful when you have many similar products, but you don't want to have each one of them show up separately on shopping cart search pages. You might also want to investigate Item Options which will let you set selectable categories for your products like size, color, etc.
The Item Family relationship is also used in the Inventory Item Breakdown screen. You can enter a parent item to break down and on the following page will be a listing of all of the child item possibilities you can create from the main item. An example would be having a log as a parent item. Child items would be all of the board lengths that you sell from the main log.
- Item Option Groups: Either edit or add a group. For more information, see Item Option Groups in the Related Topics section at the bottom of this screen.
- Usage Unit: Select a unit name from the pull down list. This is usually the smallest usage unit. Pricing unit can be different, but all your inventory counts will be in usage units. NOTE: Usage units are entered in Admin -> Setup Inventory -> Sales/Pricing Unit Name.
- Price Unit: Select a unit name from the pull down list. This is the unit for pricing. (An example might be usage unit of EACH, with a pricing unit of DOZEN). NOTE: Price units are entered in Admin -> Setup Inventory -> Sales/Pricing Unit Name.
- Weight per Price Unit: Used for freight calculations, this is the weight of one of the pricing units.
- Usage Unit(s) per Price Unit: How many usage units are contained in each price unit. This is used for converting pricing quantities to usage quantities. If usage and pricing units are the same, this should be a 1 (one).
- GL Inventory Account: Enter the General ledger asset account number (or part of the number) or type the name (or part of the name) to lookup the account. The Inventory system will increase this account when purchasing, decrease it when selling.
- GL Sales Account: Enter the General ledger sales account number (or part of the number) or type the name (or part of the name) to lookup the account. This account is the Default GL Sales account for posting to General Ledger.
- GL COGS Account: Enter the General ledger cost of goods sold number (or part of the number) or type the name (or a part of the name) to lookup the account.
- Item is Tax Exempt: Place a checkmark in this box if your Item is Tax Exempt.
- Composite Item: Click on YES if this item is composed of other inventory items (an assembled piece, or a kit). See the Update BOM Definitions in the Related Topics section below for instructions on using this feature.
- Inactive: When an item should no longer be sold, mark it as INACTIVE.
- When Inactive Replace With: If the item is no longer active and you want the system to automatically substitute with a different item on any future orders, enter the replacement item name (or a partial name) to get a drop-down of possible matches.
- Description for Product Catalog: For use when creating a product information sheet. If this description will be viewed with a Web browser, remember to enter the HTML formatting necessary for proper display.
- Product Web Site: Enter the web site associated with this product. Be sure to precede the URL address with "http://" or "https://".
- URL/File for Product Sheet: If you want to point to a file providing the information for the product bulletin. Click the Browse button to locate the desired file.
- URL/File for Product Graphic: For the Shopping Cart, you can select a picture that will be displayed on the Shopping Cart for this item. Click the Browse button to locate the desired file. Check the box below the graphic to delete it from this item.
- Product PDF Preview: For the Shopping Cart, a link to this file will show on the product info page for this item.
- Product Sound File: For the Shopping Cart, a link to this file will show on the product info page for this item.
- Product Video File: For the Shopping Cart, a link to this file will show on the product info page for this item.
- Shopping Cart Item: Check this box if this Item will be available on the Shopping Cart.
- Shopping Cart Front Page: Check this box to have this item display on the front page of the shopping cart.
- Shopping Cart Minimum Display Quantity: Inventory counts below this level will not be displayed in the Shopping Cart. This allows you to keep Items low in inventory from displaying in the Shopping Cart.
- Block Usage on B2B Orders: Check this box to block the item from being used on B2B orders.
- Block Usage on POS Orders: Check the box to block the item from being used on POS orders.
- Search Category: Select all Item Search Categories that apply to this Item. See Item Search Categories in the Related Topics Help section for use of this feature. Click on the name of the category to see Level 2 categories.
- Inventory Type: Select one of the three types: POD (Produce on Demand), Physical (Raw materials), Finished goods (ready-to-sell item). The on-hand quantity for POD items are not tracked since they are "produced on demand".
- Notes: Notes about this item.
- OSCom Item ID: This is an example of a custom field that can be defined by the administrator.
- Width x Length: For NolaPrint - size of the item.
- MWT: For NolaPrint - the M weight of the stock.
- Caliper: For NolaPrint - the thickness of each piece of stock.
- Inventory Stats:This is current information about this item. You can click on any of the quantities to see the details about those numbers. "Committed" represents items for which orders have been placed, but have not yet shipped. You can also click on VIEW HISTORY to see a month-by-month breakdown of purchases and sales.
- View/Upload/Delete - Inventory Item Files: Click on Attaching Files in the Related Topics section of this Help screen for instructions on using this feature.
- To return to the previous screen WITHOUT saving your changes, click on the
 Back button. Back button.
- To delete an Item, click on the
 Delete button. Delete button.
- To save your changes, click on the
 Save button. Save button.
- To add new or edit locations (and stocking information), click on the
 Add/Edit Pricing & Location button. See the Add/Edit Pricing & Location for an Item section below for instructions on using this feature. Add/Edit Pricing & Location button. See the Add/Edit Pricing & Location for an Item section below for instructions on using this feature.
- To add/edit Components on a Composite Item, click on the
 Add/Edit Component button (this button only appears when Composite Item is set to YES). This is where you attach the components making up the Composite Item. See the Add/Update Component List for an Item section below for instructions on using this feature. Add/Edit Component button (this button only appears when Composite Item is set to YES). This is where you attach the components making up the Composite Item. See the Add/Update Component List for an Item section below for instructions on using this feature.
- To specify vendor(s) for this item and the prices these vendors charge for this item, click on the
 Item Vendor Add/Edit button. Item Vendor Add/Edit button.
- To fill in Item GROUP information for this item, click on the
 Customer Group button. Customer Groups allow you to specify special pricing for specific groups of customers. Customer Group button. Customer Groups allow you to specify special pricing for specific groups of customers.
Selecting Item Option Groups for an Item
Item Option Groups can be attached to an Inventory Item to give the customer choices when ordering the item. Examples are Color Choices, Motor Sizes, Gift Wrapping options, or other related Inventory Items that may be used with this item.
- Click on the Item Option Groups button from the Item Add/Update screen. Your screen should look similar to this:
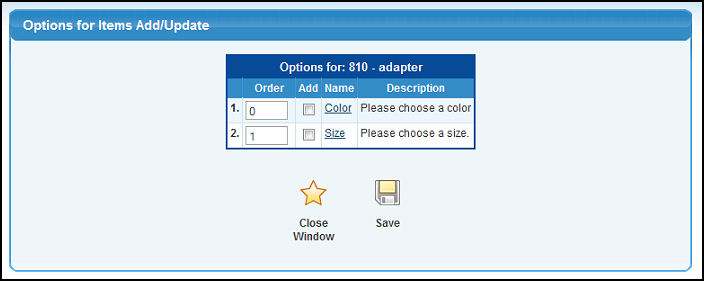
- All Item Option Groups defined in Inventory Setup will be displayed. See Item Option Groups in the Related Topics Help Section for further information on defining Item Option Groups.
- Order: Enter the position number in the list where you want this group to display.
- Add: Check this box to select this Item Options Group.
- Name: Name of the Item Options Group. Click on the Name to view Items Options Group details.
- To save your changes, click on the Save button.
- To return to the Item Add/Update screen, click on the
 Close Window button. Close Window button.
Locations are attached to an Item to identify its physical location and ship-point. Stocking levels, reorder points, pricing levels and current quantities on-hand are available on this screen.
- Click on the Add/Edit Pricing & Location button on the Item Update screen. Your screen should look similar to this:
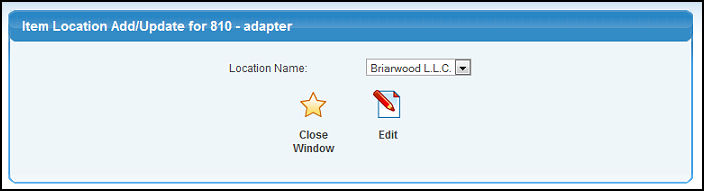
- Select the Location from the pull-down list. If you only have one location you will not see this screen and will instead be taken to the following screen.
- Click the Edit button. Your screen should look similar to this:
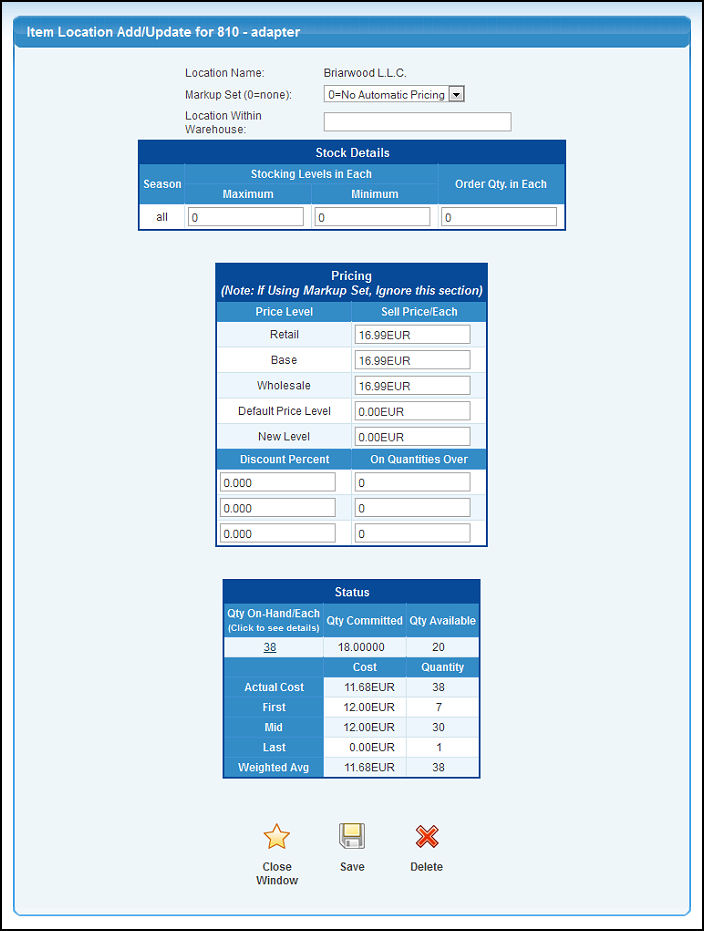
- Make any necessary changes to the data.
- Markup Set: If you want the selling price to be calculated automatically based on the purchase cost, you will want to use a markup set. These are set up under Inventory Setup. If you leave this entry as 0=No Automatic Pricing, then prices MUST be entered under the Price Level/Sell Price section further down on the screen.
- Location Within Warehouse: Enter the Bin/Shelf or other location description where this item is located in the warehouse. This value will show on your Physical Inventory Report.
- Stocking Levels: For each season (you can specify up to four selling seasons during which stocking levels can vary), you can indicate the Maximum stocking level, the Minimum stocking level, and the Reorder Quantity.
- Sell Price/Each: For each pricing level (defined under inventory setup) you can have a selling price. However, if you use a markup set to automatically calculate these prices, you will NOT enter anything here.
- Discount Percent / On Quantities Over: In order to allow for discounts on larger sales, enter the percentage of discount, and the break-point for when this new discount kicks in.
- Status: This is information about THIS LOCATION ONLY (on the main item screen it covers ALL locations. Click on the Quantity On-Hand/Each to see the transactions representing this number. First/Mid/Last are PURCHASE costs and quantities.
- To return to the Item Add/Update screen WITHOUT saving your changes, click on the Close Window button.
- To save your changes, click on the Save button.
- To delete the location information (only available if editing), click on the Delete button.
Create a list of parts that make up this kit, catalog or assembly.
- Click on the Add/Edit Component button on the Item Update screen. Your screen should look similar to this:
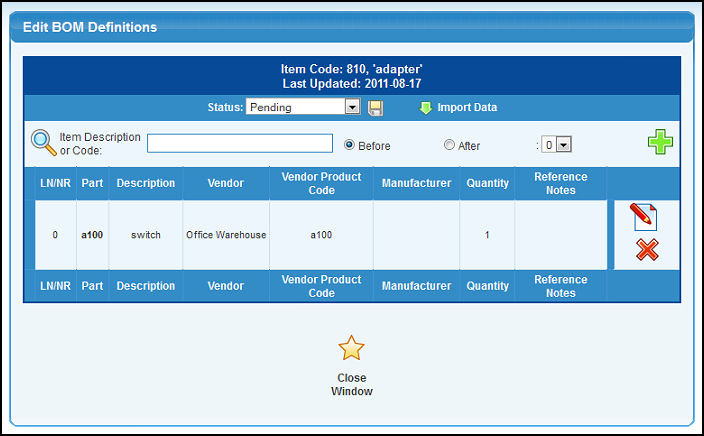
- Status: To change the status, select the status desired from the drop-down list, then click on the Save button next to the status. Unless the status is set to ACTIVE, you cannot create build orders for this item.
- Import Data: To import this component data from another system, click on the IMPORT DATA button and follow the Import File Column Format list for importing fields in the proper order.
- Add Items to this list:
- Item Description or Code: Enter the Item Description (or any portion of the name) to bring up a drop-down of possible matches. If you want to search by type of item, vendor, category, etc., use the Lookup button for detailed searches.
- Before/After: Select whether this new component should be inserted BEFORE or AFTER row # XX. Click the
 Add button to insert the new item. Add button to insert the new item.
- Delete Items from this list:
- Delete: Click the Delete button to remove an item from the list.
- Edit Items on this list:
- Edit: Click on the Edit button to put that line item into edit mode.
- Vendor: Select a vendor to be used when building this composite item.
- Vendor Product Code: The product code used by this vendor for this item.
- Manufacturer: Select a specific manufacturer (brand) required when creating this composite item.
- Quantity: Number of pieces of this item to be used for each composite item.
- Reference Notes: Special Instructions, for example placement instructions.
- Save: When the edit is complete, click on the Save button to finalize the edit.
- To return to the Item Add/Update screen, click on the Close Window button.
NOTE: Build orders cannot be created for items still in "Pending" status.
- Click the Item Vendor Add/Edit Button. Your screen will look similar to this:
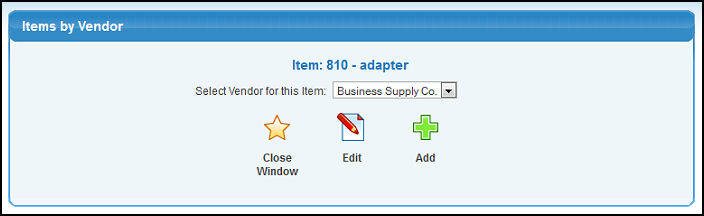
- Select an existing supplier from the drop-down list and click the Edit button, OR to add a new supplier for this item, click on the Add button. The screen will change to something similar to this:
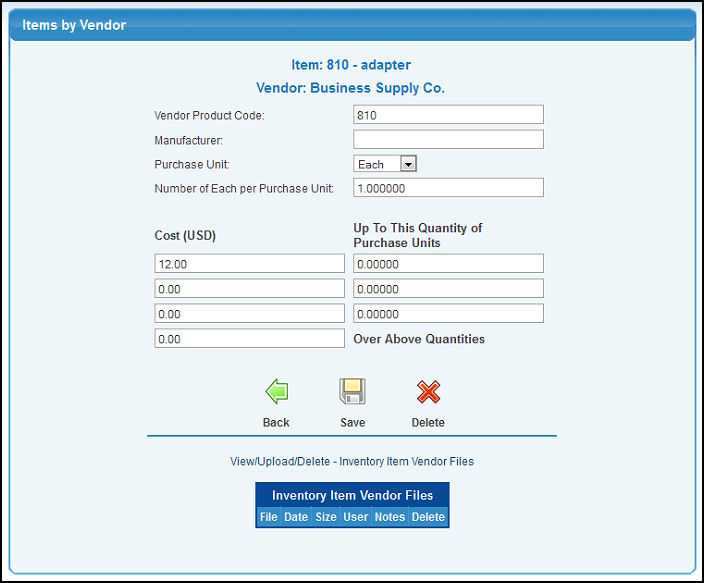
- Enter the following information:
- Vendor Product Code: The part number the vendor uses (used when writing purchase orders to this vendor).
- Manufacturer: The Manufacturer or Brand if that is important for this item.
- Purchase Unit: Select a unit name from the drop-down list (ex: stock in each, price by the dozen, purchase by the gross).
- Number of Each per Purchase Unit: Needed to do the conversions when purchasing.
- Cost - Up to this Quantity of Purchase Units: Usual prices charged by this vendor at different quantities purchased.
- Cost - Over Above Quantities: Price charged by this vendor if you purchase more than any of the quantities listed above.
- Click the Back button to return to the previous screen.
- Click the Save button to save the new item.
- If updating, you can click on the Delete button to delete this vendor as a supplier of this item.
Customer Groups
Customer Groups provide a way of giving special item-by-item pricing for special groups of people. Not all items need to be associated with the group. Only those items associated with a group will use the special pricing for any customer belonging to that group.
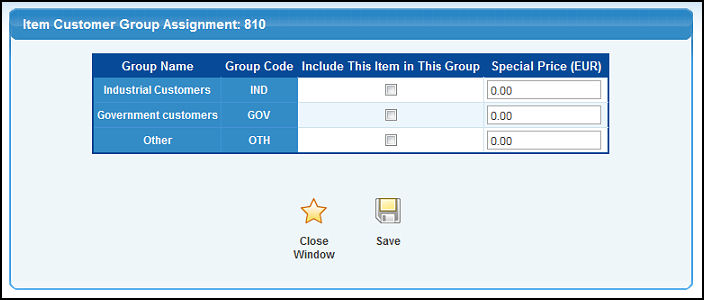
All Customer Groups defined in Billing Setup will be displayed.
- Include This Item in This Group: Check the box next to the groups for which this item has special pricing.
- Special Price: Enter the special price for this group.
To save your changes, click on the Save button.
To return to the Item Add/Edit screen, click on the Close Window button.
|