Item Option Groups allow you to define groups such as Color Selections, Accessories, Special Handling, etc. that are attached to your inventory items during the ordering process. Within a Group are the various Options a customer can select when they place the order.
- From the Main Menu, select Admin -> Setup - Inventory -> Item Option Groups.
- Your screen should look similar to this:
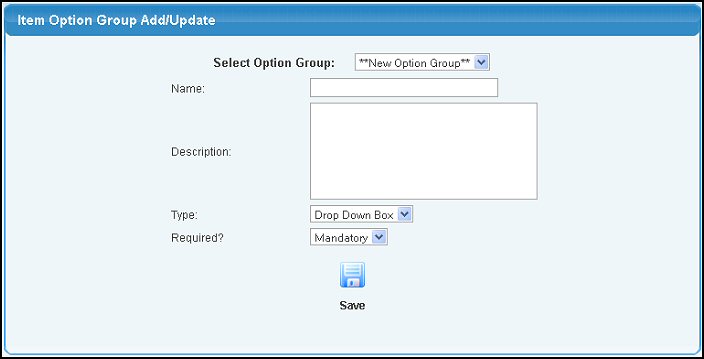
- To ADD a new Group, choose **New Option Group** from the Option Group pull-down box and proceed to step 5.
- To UPDATE an existing Group, select a Group from the pull-down box. Any Options already on file will display below the Edit Options button.
- Enter or Update the following fields:
- Name: Enter the name of your new ITEM OPTION GROUP.
- Description: Enter the description of the group.
- Type: Select from the pull-down box the type of box the customer will use to select this item. Your may choose from Drop-down Box, Radio (button), Checkbox, or Text.
- Required?: Select Mandatory or Optional. Mandatory requires the user to make a selection before the order can be finalized.
- To save your new Group and return to the Add/Update screen, click on the
 Save button. Now you can finish building your Item Option Group. You will see a screen similar to this: Save button. Now you can finish building your Item Option Group. You will see a screen similar to this:
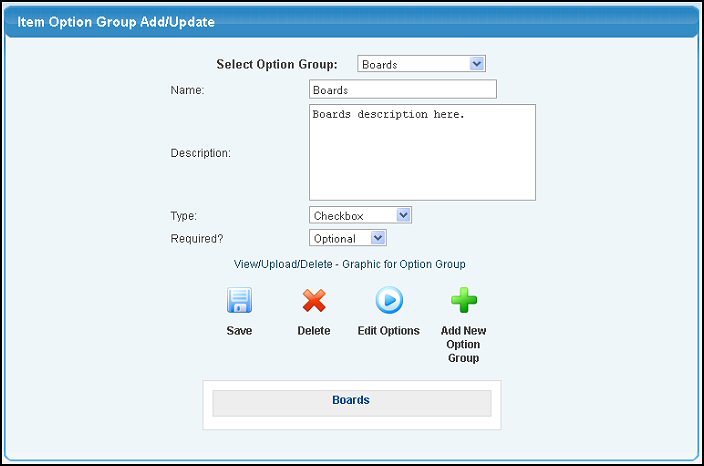
- View/Upload/Delete Graphic for Option Group - See Attaching Files in the Related Topics Section below to learn how to attach a graphic file to your Group.
- Click on the
 Edit Options button to continue building your Group and it's associated choices. Edit Options button to continue building your Group and it's associated choices.
- To SAVE your group, click on the Save button.
- To DELETE your group, click on the
 Delete button. Delete button.
- Clicking
 Add New Option Group will take you to the main screen to create another group. Add New Option Group will take you to the main screen to create another group.
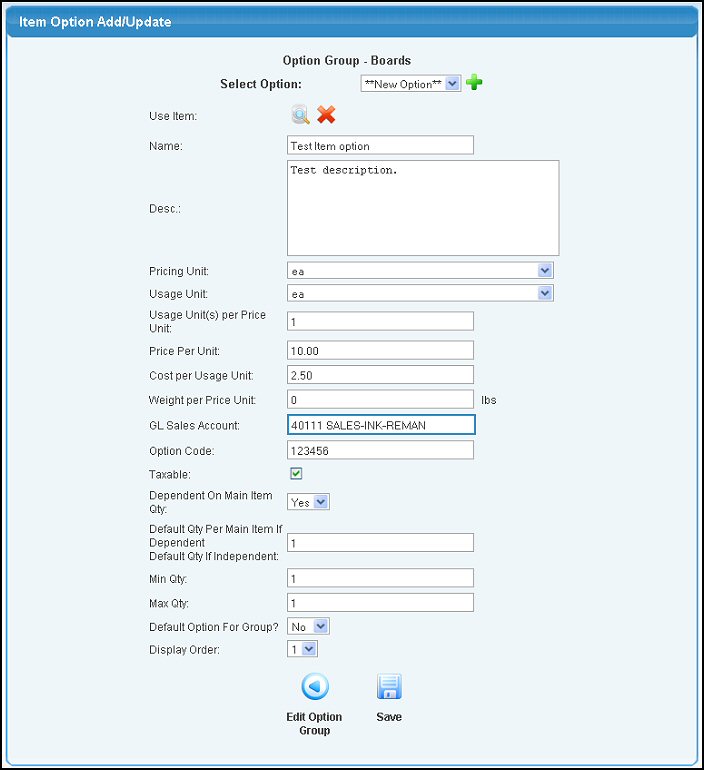
- After selecting the Edit Options button, you will see a screen similar to this:
- Enter data into the following categories:
- Select Option: Select an existing Item Option from the pull-down box or click on the Add button to add a New Option. Options set as the Default Option for this Group will be highlighted in blue.
You can add a new Option from a copy of an existing Option. Select the Option in the pull-down box and click on the  Copy button. Enter a Name for the Option, make any changes desired and Save. Copy button. Enter a Name for the Option, make any changes desired and Save.
- Use Item: If the Option is an Inventory Item, enter the Item ID here. click on the
 Lookup button to search the Inventory file. To remove an Inventory ID from the Option, click on the Remove button. Lookup button to search the Inventory file. To remove an Inventory ID from the Option, click on the Remove button.
- Name: Enter the name of the Option. This text is used in the drop-down box, radio button and checkbox. DO NOT put a number in front of this description as seen in the Select Option drop-down list. The number entered later in the Display Order box will be displayed in front of this text.
- Desc.: Enter a detailed description of the Option. This text will be displayed to fully describe the purpose and uses of this Option.
- Pricing Unit: Select a unit name from the pull down list. This is the unit for pricing. (An example might be usage unit of EACH, with a pricing unit of DOZEN). NOTE: Price units are entered in inventory setup. If the Option is an Inventory Item, the Item's Pricing Unit is used.
- Usage Unit: Select a unit name from the pull down list. This is usually the smallest usage unit. Pricing unit can be different, but all your inventory counts will be in usage units. NOTE: Usage units are entered in inventory setup. If the Option is an Inventory Item, the Item's Usage Unit is used.
- Usage Units per Price Unit: How many usage units are contained in each price unit. This is used for converting pricing quantities to usage quantities. If usage and pricing units are the same, this should be a 1 (one). If the Option is an Inventory Item, the Item's Usage Units per Price Unit is used.
- Price Per Unit: Enter the selling price per unit. If the Option is an Inventory Item, the Item's Selling Price per Unit is used.
- Cost per Usage Unit: Enter the cost per Usage unit here. Be sure the number you enter represents the Cost per the Usage Unit entered above. For example, if your Usage Unit is M (per 1000), be sure to enter the Cost per 1000 not the cost of a carton. If the Option is an Inventory Item, the Item's Cost is used.
- Weight per Price Unit: Used for freight calculations, this is the weight of one of the pricing units.
- GL Sales Account: Default GL Sales account for posting to General Ledger.
- Option Code: Enter a code to represent this Option. This code will be shown behind the Inventory ID to designate which options have been chosen by the customer. For example, if RI is the Option Code on Inventory ID "sg-001", choosing this option would result in this item being displayed on orders, invoices and statements as "sg001RI".
- Taxable: Check this box if the Option is taxable.
- Dependent on Main Item Qty: Select Yes if the number of units ordered depends on the number of the Main Item units ordered, No if the quantity ordered does not depend on the number of the Main Item ordered.
- Default Qty Per Main Item If Dependent/Default Qty If Independent: Enter the quantity of this item that must be ordered when ordering one(1) unit of the Main Item. If "Dependent on Main Item Qty" is set to No, then enter the default number of units you want to display on the screen.
- Min Qty: Enter the minimum number of units that can be ordered.
- Max Qty: Enter the maximum number of units that can be ordered.
- Default Option for the Group: Select Yes, if you want this item to be automatically selected when the screen displays. For example, using the CheckBox type of Group, a checkmark will be in this box when first entering the screen.
- Display Order: Enter the number representing the position of this Option in the drop-down box, checkbox list, or radio button list.
- View/Update/Delete - Graphic for Option: See Attaching Files in the Related Topics Section below to learn how to attach a graphic file to your Group. If a graphic has already been selected, it will be displayed above this link.
- To return to the previous screen WITHOUT SAVING your changes, click on the
 Edit Option Group button. Edit Option Group button.
- To SAVE your changes, click on the Save button.
- To DELETE this Option, click on the Delete button.
|