- From the Main Menu select Admin -> Setup Receivables -> Company Options. Your screen should look similar to this:
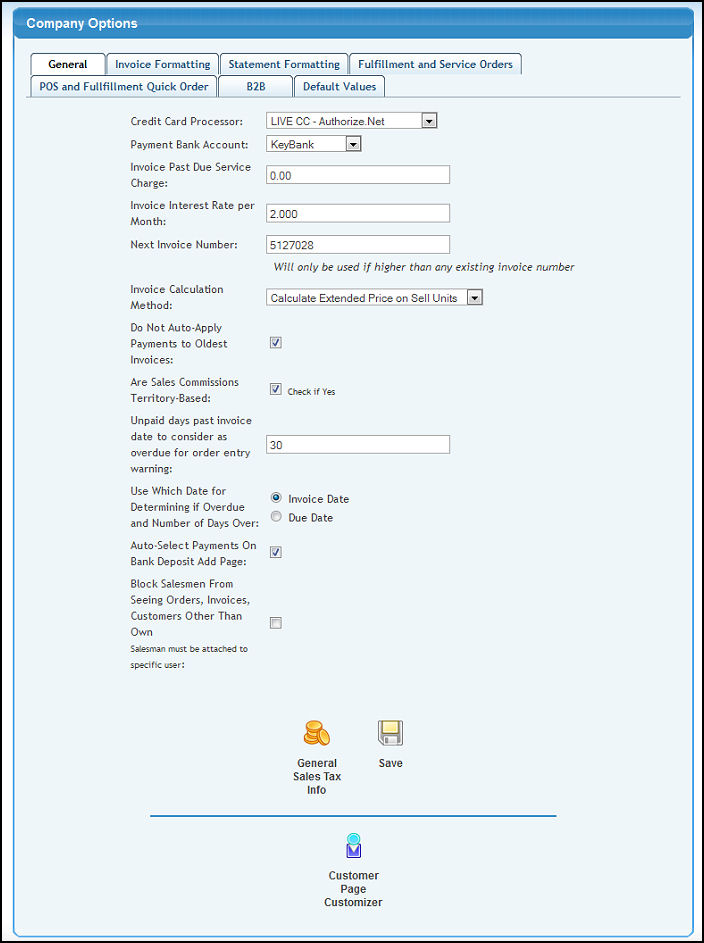
Note the tabs across the top of the screen. This allows you to access different Company Options sections. Saving in one section will save changes made in all sections.
- Credit Card Processor: If you accept credit cards in payment, you will need to select which processor to use. If you select MANUAL, then that assumes you will be running the credit card through an unattached device. If you select one of the services showing, then credit cards will automatically process through that account.
- Payment Bank Account: Select which bank account payments should post to by default.
- Invoice Past Due Service Charge: The standard
charge to apply to an open invoice when payment is not received by the due
date. NOTE: This is assessed when running "Calculate Interest".
- Invoice Interest Rate per Month: This is an
additional charge applied to an open invoice every 30 days once overdue (until it is paid).
- Next Invoice Number: Will only be used if higher
than any existing invoice number.
- Invoice Calculation Method: You have two options here. Calculate extended price based on sell unit, or Calculate extended price based on price unit. If you use a large conversion number between price unit size and sell unit size, you may prefer the rounding that takes place to be better with one method than the other.
- Do Not Auto-Apply Payments to Oldest Invoices: If checked, payments entered will NOT be automatically applied against the oldest invoices.
- Are Sales Commissions Territory-Based: If you are selling wholesale, and your distributors have territories and you base their commissions on where they sell the product, you will want to check this box.
- Unpaid Days Past Invoice to Show Overdue Order Entry Warning: Enter the number of days past the INVOICE date to start displaying and printing Overdue warning messages, if the invoice has not been paid.
- Use Which Date for Determining Days Overdue: Select either Invoice Date or Due Date.
- Auto-Select Payments On Bank Deposit Add Page: Check this box to automatically select all payments on the Bank Deposit Add page.
- Block Salesmen From Seeing Orders, Invoices, Customers Other Than Own: If you have the Limit Salesman Access add-on you can choose to block salesmen from seeing others' orders, invoices and customers.
- Click
 General Sales Tax Info to enter information specific to sales taxes and how they are applied. Please see the end of this topic for more information. General Sales Tax Info to enter information specific to sales taxes and how they are applied. Please see the end of this topic for more information.
- Click the
 Save button to save your changes. Save button to save your changes.
- Click
 Customer Page Customizer to bring up that screen (if you have this add-on). Please see Customer Page Customizer in the Related Topics Section at the bottom of this screen for more information. Customer Page Customizer to bring up that screen (if you have this add-on). Please see Customer Page Customizer in the Related Topics Section at the bottom of this screen for more information.
Invoice Formatting
- Selecting the Invoice Formatting tab should produce a screen similar to the following:

- Invoice Format: You have a number of options here: To print the entire invoice via the computer output, or to skip the header with your company name and logo -- as you would if you are using pre-printed stock.
- Invoice Format for Unit Price: Select from the drop-down whether you want to see the unit price column on the invoice or not. Select Show Unit Price and Comparison Price to include a Price Level column to show your customers their savings.
- Comparison Price Level: If you choose to show a comparison price level on your invoice, select the price level to print from this drop-down box.
- Show Notes at Bottom: If you want the invoice notes to appear under the main invoice information (to the left of the totals), check this box. Otherwise notes will appear right before the item listing.
- No Bar Code on Invoice: If you do not want the Invoice bar code to print on your invoices, place a checkmark in this box.
- No Boxes on Invoice Ship To, Sold To, etc.: Normally, boxes surround the Ship To Address, Sold To Address and Notes on the standard NolaPro invoice. Place a checkmark in this box to remove these boxes from these fields.
- Invoice and Statement Date Format: Choose which date format to be used.
- If you are using a preprinted format for your invoices, then you need to attach a pdf version of the preprint and attach it so that when emails of invoices are sent, it will still look good. Do that by clicking on "View/Upload/Delete - Background PDF File For Emailed Invoices" text.
- Click General Sales Tax Info to enter information specific to sales taxes and how they are applied. Please see the end of this topic for more information.
- Click the Save button to save your changes.
- Click Customer Page Customizer to bring up that screen (if you have this add-on). Please see Customer Page Customizer in the Related Topics Section at the bottom of this screen for more information.
Statement Formatting
- Selecting the Statement Formatting tab should produce a screen similar to the following:
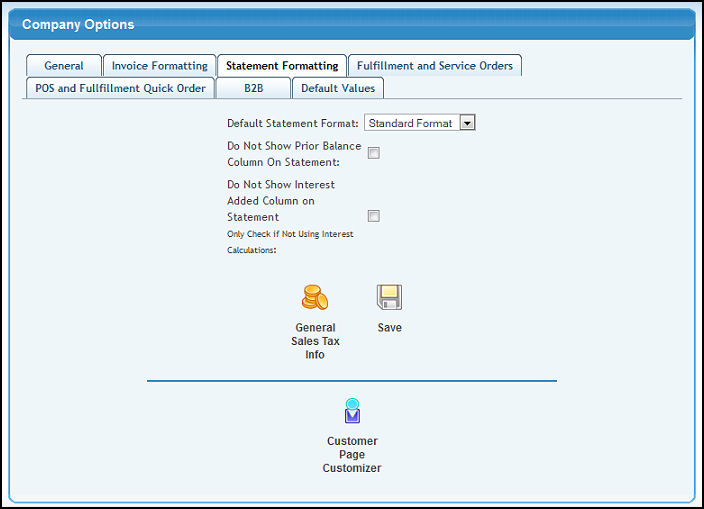
- Default Statement Format: You have two options here. Standard, which is more like a balance forward detail, and Simplified, which only shows currently open invoices.
- Do Not Show Prior Balance Column On Statement: Check this box if you do NOT want to see this column.
- Do Not Show Interest Added Column On Statement: Check this box to not see this column, but ONLY if you are not using interest calculations in NolaPro.
- Click General Sales Tax Info to enter information specific to sales taxes and how they are applied. Please see the end of this topic for more information.
- Click the Save button to save your changes.
- Click Customer Page Customizer to bring up that screen (if you have this add-on). Please see Customer Page Customizer in the Related Topics Section at the bottom of this screen for more information.
Fulfillment and Service Orders
- Selecting the Statement Formatting tab should produce a screen similar to the following:
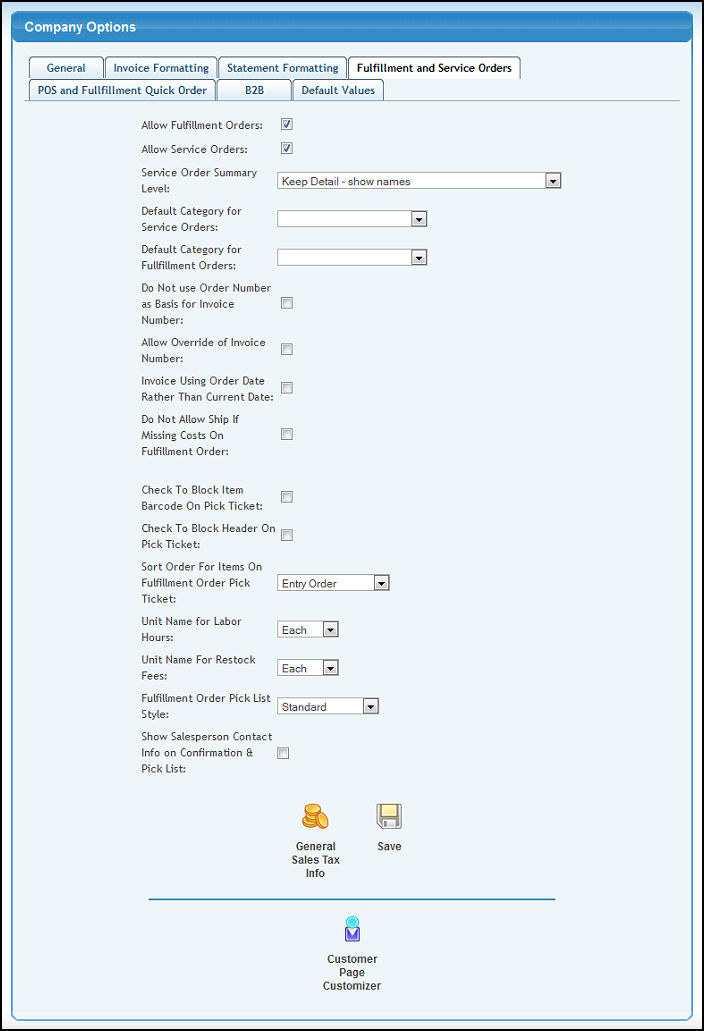
- Allow Fulfillment Orders: Check this box if you want to have fulfillment orders show on your menu.
- Allow Service Orders: Check this box if you want to have service orders show on your menu.
- Service Order Summary Level: Select from Maximum Summary (groups by Rate), Keep Detail - Show Names, Keep Detail - No Names.
- Default Category for Service Orders: In order to speed up order entry, you can set a default Sales Category for Service Orders. If you DO select one, then when you begin an order, that is the Category that will be pre-selected.
- Default Category for Fulfillment Orders: In order to speed up order entry, you can set a default Sales Category for Fulfillment Orders. If you DO select one, then when you begin an order, that is the Category that will be pre-selected.
- Do Not Use Order Number as Basis for Invoice Number: Check this box to TURN OFF using the Order Number as a basis for assigning an Invoice Number. If boxed is not checked, Next Invoice Number will be used to assign Invoice Numbers.
- Allow Override of Invoice Number: If you have the Invoice Number Override Add-on you can check this to override your invoice number. When invoicing a screen will appear asking you to either enter an invoice number or a computer assigned number will be used.
- Invoice Using Order Date Rather Than Current Date: Check this box if you want the order date to become the invoice date when completing an order. Unchecked, the date of the invoice will be the date the order is completed.
- Do Not Allow Ship If Missing Costs On Fulfillment Order: Check this box to prevent fulfillment orders from being shipped that have missing costs for any of the items.
- Check To Block Item Bar Code On Pick Ticket: Place a check mark in this box if you do NOT want the Item Bar Codes to Print on the Order Pick Ticket. The bar code for the pick list itself will still print at the top of the document.
- Check To Block Header On Pick Ticket: Place a check mark in this box if you do NOT want the Company name and address and logo to print as a header on the Order Pick Ticket.
- Sort Order For Items On Fulfillment Order Pick Ticket: Select the order of the items you want to print on the Pick Ticket from the list shown in the drop down box. You can choose to sort by Item Code before printing or print in the order the items were entered on the order. You will also see the items in this order on the Pick Ticket screen before printing the PDF file.
- Unit Name for Labor Hours: Select the unit name for Labor Time (hours, unit, etc.) from drop-down list.
- Unit Name for Restock Fees: Select the unit name to be used when charging restock fees.
- Fulfillment Order Pick List Style: Select the column layout you want to see on your Pick List. Choose from Standard or Alternate Style 1 in the dropdown box. Standard format lists the Quantity to Ship on the right of the form and the Alternate Style 1 lists Quantity to Ship to the left of the Item Code.
- Show Salesperson Contact Info on Confirmation & Pick List: Checking this box will display salesperson contact information on confirmation & pick lists.
- Click General Sales Tax Info to enter information specific to sales taxes and how they are applied. Please see the end of this topic for more information.
- Click the Save button to save your changes.
- Click Customer Page Customizer to bring up that screen (if you have this add-on). Please see Customer Page Customizer in the Related Topics Section at the bottom of this screen for more information.
POS and Fulfillment Quick Order
- Selecting the POS and Fulfillment Quick Order tab should produce a screen similar to the following:
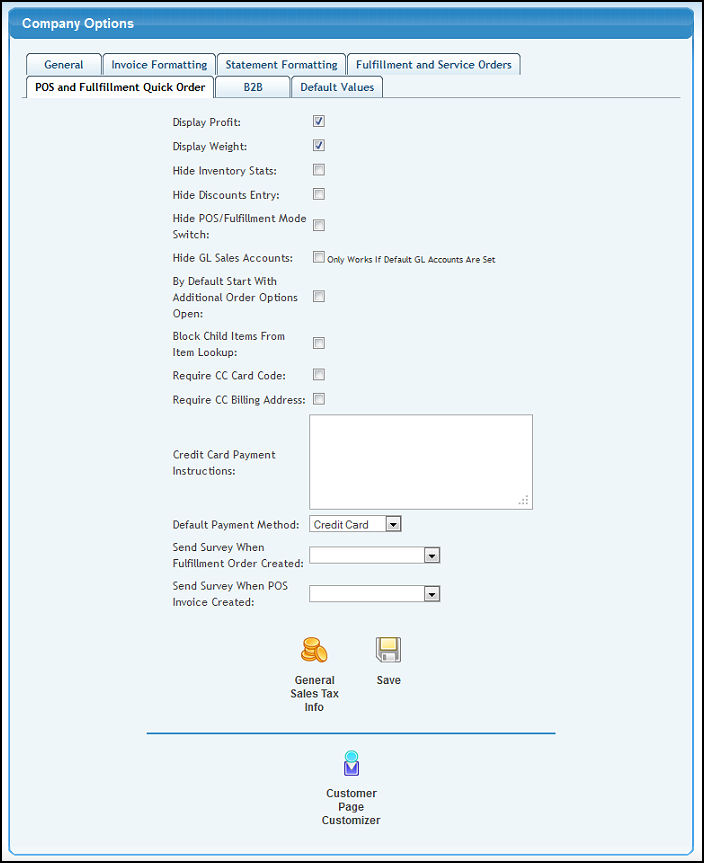
- Display Profit: Check this box to display profit on the POS/Fulfillment order page.
- Display Weight: Check this box to display item weight on the POS/Fulfillment order page.
- Hide Inventory Stats: Check this box to hide inventory stats on the POS/Fulfillment order page.
- Hide Discounts Entry: Check this box to hide the discounts field on the POS/Fulfillment order page.
- Hide POS/Fulfillment Mode Switch: Check this box if you do not want the option to switch between POS and Fulfillment mode on the POS page.
NOTE: Using the POS button above the menu will bring up POS mode. Clicking on New/Edit Order from Orders -> Item Orders will bring it up in Fulfillment mode.
- Hide GL Sales Accounts: Check this box to hide GL sales accounts from the POS and Fulfillment Quick Order screens. This will only work if you have default GL accounts set.
- By Default Start With Additional Order Options Open: Check this box to have the additional order options section open by default on the POS and Fulfillment Quick Order screens.
- Block Child Items From Item Lookup: Placing a check in this box will block items from the POS item lookup that have an Item Family defined on the Item New/Edit screen.
- Required CC Card Code: Check this box to require the CC Card Code when entering credit card payments.
- Require CC Billing Address: Check this box to require a credit card billing address when entering credit card payments.
- Credit Card Payment Instructions: Enter any instructions you would like to appear when entering credit card payments.
- Default Payment Method: Select the payment method to be the default on the POS/Fulfillment order page.
- Send Survey When Fulfillment Order Created: If you have the Survey Manager add-on activated, you can choose a survey to send from the drop-down menu. See Survey Manager in the Related topics section at the bottom of this screen for more information.
- Send Survey When POS Invoice Created: If you have the Survey Manager add-on activated, you can choose a survey to send from the drop-down menu. See Survey Manager in the Related topics section at the bottom of this screen for more information.
- Click General Sales Tax Info to enter information specific to sales taxes and how they are applied. Please see the end of this topic for more information.
- Click the Save button to save your changes.
- Click Customer Page Customizer to bring up that screen (if you have this add-on). Please see Customer Page Customizer in the Related Topics Section at the bottom of this screen for more information.
B2B
- Selecting the B2B tab should produce a screen similar to the following:
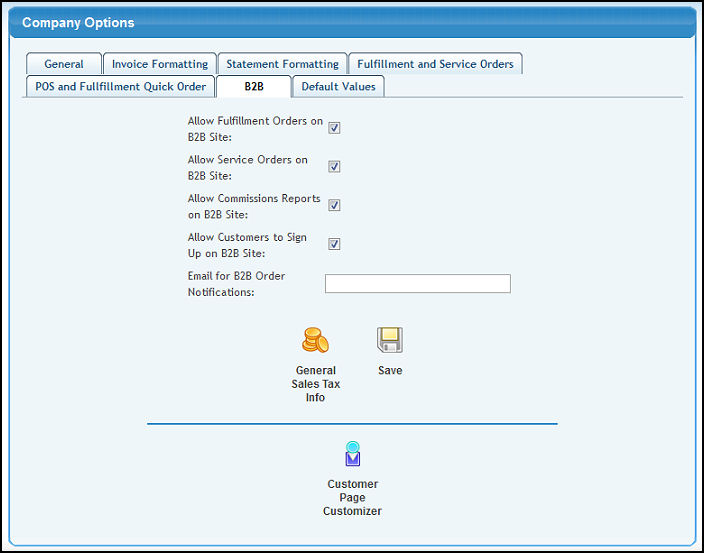
- Allow Fulfillment Orders on B2B Site: Check this box if you want Fulfillment Orders to be entered on your B2B Site.
- Allow Service Orders on B2B Site: Check this box if you want Service Orders to be entered on your B2B Site.
- Allow Commissions Reports on B2B Site: Check this box if you want Commission Report to be viewable on your B2B Site.
- Allow Customers to Sign Up on B2B Site: Check this box if you want Customers to be able to sign themselves up on the B2B Site.
- Email for B2B Order Notifications: This is who the email will be sent FROM when emails are generated from the B2B Site.
- Click General Sales Tax Info to enter information specific to sales taxes and how they are applied. Please see the end of this topic for more information.
- Click the Save button to save your changes.
- Click Customer Page Customizer to bring up that screen (if you have this add-on). Please see Customer Page Customizer in the Related Topics Section at the bottom of this screen for more information.
Default Values
- Selecting the Default Values tab should produce a screen similar to the following:
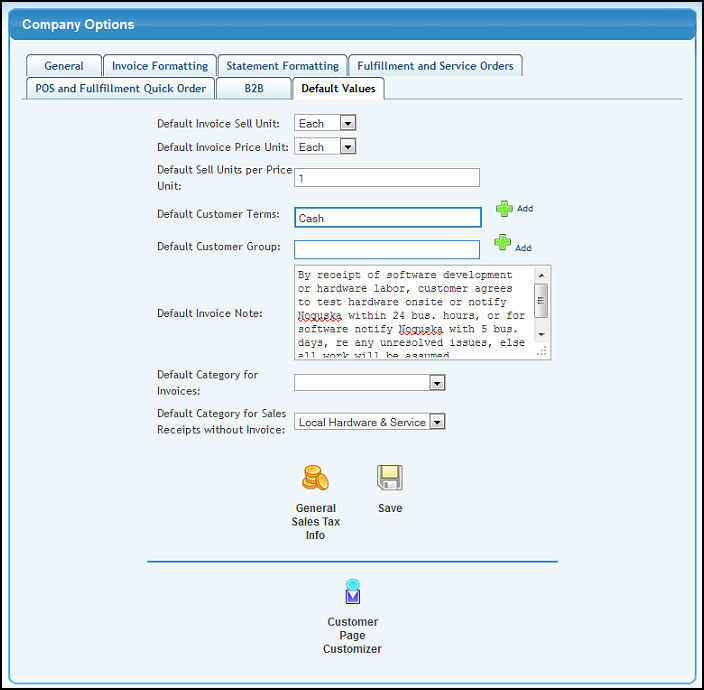
- Default Invoice Sell Unit: In order to speed up order and invoice entry, you can set a default sell unit name. If you DO select one, then when you begin an invoice, that is the unit name that will be pre-selected.
- Default Invoice Price Unit: In order to speed up order and invoice entry, you can set a default price unit name. If you DO select one, then when you begin an invoice, that is the unit name that will be pre-selected.
- Default Sell Units per Price Unit: In order to speed up order and invoice entry, you can set a default number of sell units per price unit. If you DO select one, then when you begin an invoice, that is the conversion that will be pre-selected.
- Default Customer Terms: Enter a customer term (or a portion of the term) to bring up a drop-down of possible matches. Click on the
 Add button to enter in a new customer term. When entering new customers, this term will be applied unless you over-ride it. Add button to enter in a new customer term. When entering new customers, this term will be applied unless you over-ride it.
- Default Customer Group: If you are using customer groups for special pricing, or other purpose, you can select a default group by entering the name (or a portion of the name) to bring up a drop-down of possible matches. Click on the Add button to enter a new customer group.
- Default Invoice Note: You can select a note that will auto-fill in the notes area for an invoice. It might be a seasonal greeting, or any other message (perhaps your company vacation schedule).
- Default Category for Invoices: In order to speed up Invoice entry, you can set a default Sales Category for Invoices. If you DO select one, then when you begin an invoice, that is the Category that will be pre-selected.
- Default Category for Sales Receipts without Invoice: In order to speed up Sales Receipt entry, you can set a default Sales Category for Sales Receipts w/o Invoices. If you DO select one, then when you begin a Sales Receipt, that is the Category that will be pre-selected.
- Click General Sales Tax Info to enter information specific to sales taxes and how they are applied. Please see the end of this topic for more information.
- Click the Save button to save your changes.
- Click Customer Page Customizer to bring up that screen (if you have this add-on). Please see Customer Page Customizer in the Related Topics Section at the bottom of this screen for more information.
General Sales Tax Info
If you selected General Sales Tax Info on any of the tabs your screen should looks similar to the following: 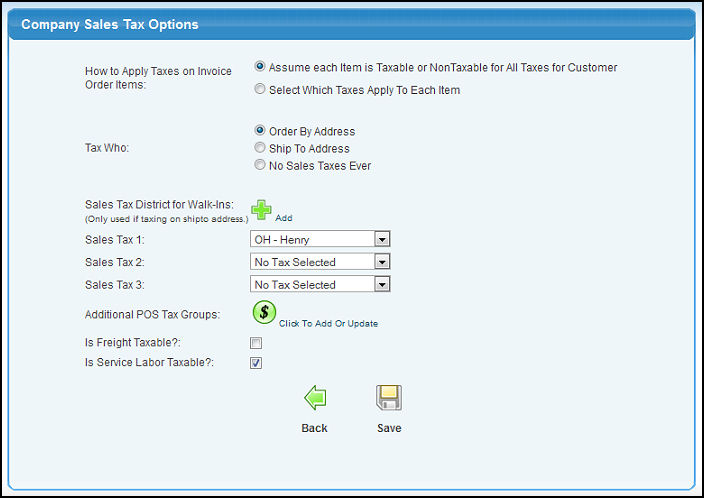
- How to Apply Sales Tax to Invoice and Order Items: You have the choice to tax all items on an invoice according to the taxes attached to the Company or to individually tax each line item on the invoice or order.
- Tax Who: Select to tax on the basis of the Order-by Address, the Ship-To Address, or to never apply sales taxes.
- Sales Tax Districts for WALK-INS: NOTE: These tax districts are only used if the "Tax Who:" field is set to Ship-To Address. You may select up to three(3) tax districts from the pull-down boxes. If you need to add a district, click the
 Add button. Add button.
- Additional POS Tax Groups: This will appear if you have the POS Tax Groups add-on activated. It allows you to create a set of sales taxes and a default inventory location and then assign those settings to users. Selecting
 Click To Add Or Update will bring up a screen similar to the following: Click To Add Or Update will bring up a screen similar to the following:
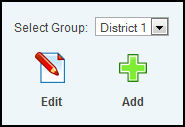
- To edit an existing group, select it from the drop-down menu and click
 Edit. Edit.
- To add a new group, click Add.
- Whether adding or editing, your screen should look similar to the following:
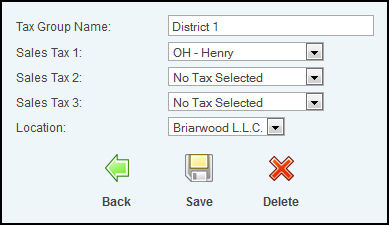
- Tax Group Name: Enter the name of the tax group.
- Sales Tax 1-3: Select up to 3 sales taxes for the group.
- Location: Choose a certain inventory location for the tax group to apply or select None.
- Click Save to save.
- Click
 Back to return to the previous screen without saving. Back to return to the previous screen without saving.
- If editing, click
 Delete to delete the tax group. Delete to delete the tax group.
- Is Freight Taxable?: Check the box if it IS taxable.
- Is Service Labor Taxable?: Check the box if it IS taxable.
- Click the Back button to return without saving to the main Company Options page.
- Click the Save button to save changes.
|