Enter New Service Type Orders.
- From the Main Menu, select Orders -> Service Orders -> New Order.
- Your screen should look similar to this:
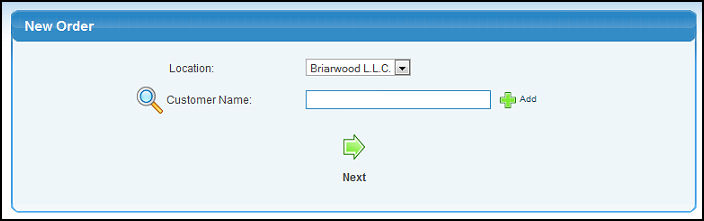
- Enter Data in the following categories:
- Location: Select ship FROM default location from the pull-down list. You can over-ride this for specific items on an order. NOTE: if you only have ONE location, this selection will not appear.
- Customer Name: Enter Customer Name (or any portion of the name) to bring up a drop-down of possible matches. If you want to search by phone, zip code, etc., use the
 Lookup button for detailed searches. NOTE: To Add a New Customer, Click on the Lookup button for detailed searches. NOTE: To Add a New Customer, Click on the  Add button next to the customer number entry. For help about adding customers, see that section, or click on the link at the bottom of this Help page. Add button next to the customer number entry. For help about adding customers, see that section, or click on the link at the bottom of this Help page.
- Click on the
 Next button to continue with this order. Next button to continue with this order.
- Your screen will change to look like the following:
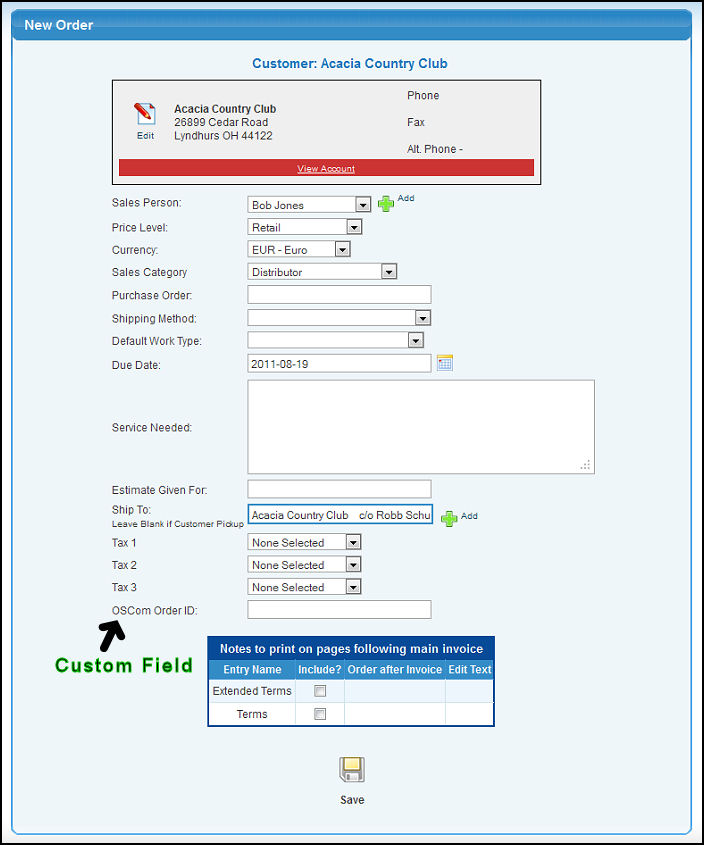
NOTE: At the top of the screen will be the customer information and status. You can EDIT the customer information by clicking on the  Edit button, or look more closely at their current status by clicking on VIEW ACCOUNT. Edit button, or look more closely at their current status by clicking on VIEW ACCOUNT.
- Enter data into the following categories:
- Sales Person: Select sales person from the pull-down list. Click Add to create a new sales person.
- Price Level: Select from the pull-down list which price level to use for the parts ordered.
- Currency: Choose currency for the order, which will also be the currency the order is paid in. This field will only appear if Multi-Currency is activated.
- Sales Category: Select a Sales Category for this Order from the pull-down list.
- Purchase Order: Enter any customer supplied PO.
- Shipping Method: Select a Shipping Method from the pull-down list.
- Default Work Type: If work types have been set up in Admin -> Setup Service -> Service Types, it can be selected from the drop down menu.
- Due Date: You can either enter the date manually or click
the
 Calendar button to bring up a calendar. Calendar button to bring up a calendar.
- Service Needed: Enter a complete description of the service required.
- Estimate Given For: If an estimate of the cost of doing this service was given, enter that here.
- Ship To: If this order will contain an item to be shipped, enter the ship-to address (or a partial address) to bring up a list of possible matches. The default ship-to will be pre-entered. If the customer will pick up the order this field should be blank. Click on the Add button to create a brand-new ship-to address for this customer
- Tax1/Tax2/Tax3: Choose up to three taxes, if any, that are applicable to this order.
- Payment Method: Select from the pull-down list. Examples:
Credit Card, Open Account, Check, etc.
- Notes to Print on pages following Main Invoice: If you have entered standardized notes, you can select any or all of those notes to appear on the Invoice. After you have selected one of these notes, you will be able to click on an EDIT button to change any of the text for just THIS transaction. The standard text will remain the same. The ORDER AFTER Invoice is to indicate which text appears first, which next, etc.
- Click the
 Save button to save the order. Your screen should look similar to the following: Save button to save the order. Your screen should look similar to the following:
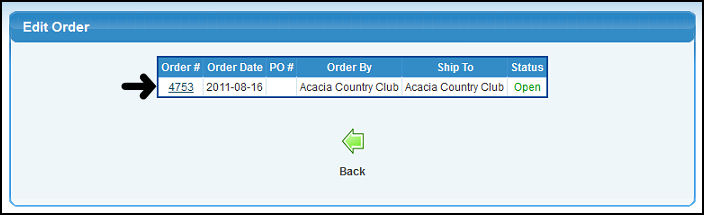
- Click on the order number to add or edit order information.
- Click
 Back to return to the add service order screen. Back to return to the add service order screen.
- If clicking on the order number you will be taken into service order edit mode. Please see Edit Service Order in the Related Topics section at the bottom of this screen for more information.
|