This is the third screen you see when beginning a new print order. It contains stock details for the order.
- From New Print Order - General Job Info (screen2), if you selected NEXT, your screen should look similar to this:
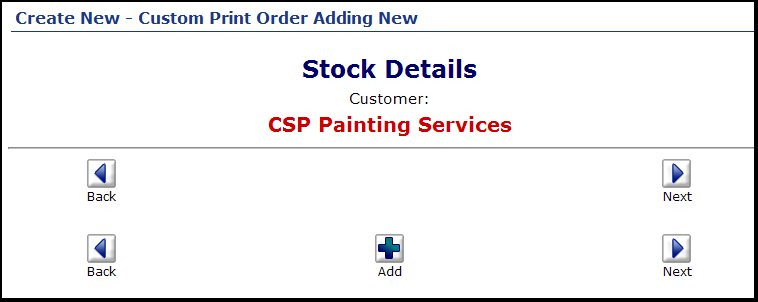
- The first time you come to this screen, there will be nothing but buttons. To create a stock entry for this order, click on the
 Add button at the center bottom of the screen. This will change your screen to look as follows: Add button at the center bottom of the screen. This will change your screen to look as follows:
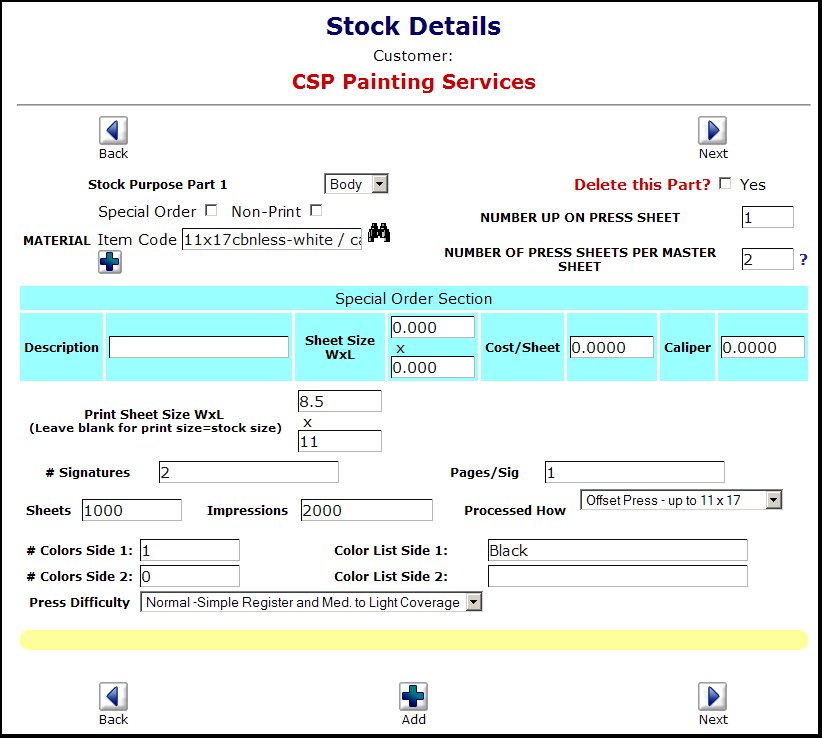
- Stock Purpose Part x: The x will be replaced by the number of the stock -- you can have many stocks on a single order. Select a purpose from the drop-down (these purposes are created in the setup area).
- Special Order: If the stock is NOT going to draw from your inventory stock (or is a second process on a previously selected stock and you don't want to charge for the stock again), check this box.
- Non-Print: If you are going to do a non-print function on this stock, check this box -- it will cause a different set of machine families to appear in the "Processed How" box below.
- Material Item Code: If you want to pull the stock from inventory, enter the part number (or use the lookup button to find the stock in your inventory).
- Number up on Press Sheet: How many of the same image will print on a single press sheet.
- Number of Press Sheets Per Master Sheet: How many press sheets can be cut out of a single stock sheet.
- Special Order Section: Use this area (in light blue) to define stock if it is NOT coming from inventory. Also be sure you check the checkbox for Special Order above. Skip this entire section if you are getting the stock from inventory.
- Description: Description of the stock.
- Sheet Size WxL: Width and Length of the stock sheet.
- Cost/Sheet: Your Cost per Sheet (it will be marked up).
- Caliper: Thickness of a single sheet.
- Print Sheet Size WxL: Leave this field blank for "Number of Press Sheets Per Master Sheet" = 1. Width and Length of the press size of the sheet.
- # Signatures: For booklets, newletters, etc. enter how many signatures are being produced. For other work, enter a 1.
- Pages/Sig: For booklets, newsletters, etc. enter the number of pages per signature. For other work, enter a 1.
- Sheets: This entry will default to what the system thinks is the correct quantity based on the original quantity, signatures, etc. If you change values for signatures, etc. this is automatically change also.
- Impressions: Do not worry about putting something in here immediately. It will auto-fill based on number of colors on each side, and the machine it is being printed on.
- Processed How: Select a Machine Family from the drop-down list. The list you see will be different if you checked the Non-Print box above.
- # Colors Side 1: How many colors (including black) are on side one.
- # Colors Side 2: How many colors (including black) are on side two.
- Color List Side 1: Which colors are being used for side one.
- Color List Side 2: Which colors are being used for side two.
- Press Difficulty: Select a difficulty level. This can be referenced under Machine Family Setup to determine the rate of speed of the press for different difficulty levels.
Click on the  Next button to return to the previous screen. Next button to return to the previous screen.
Click on the Add button to bring up another set of entries for another stock.
Click on the  Next button to continue with order entry. Next button to continue with order entry.
|