This is the second screen you see when beginning a new print order. It contains general information about the order.
- From New Print Order - Order By & Type (screen1), if you selected NEXT, your screen should look similar to this:
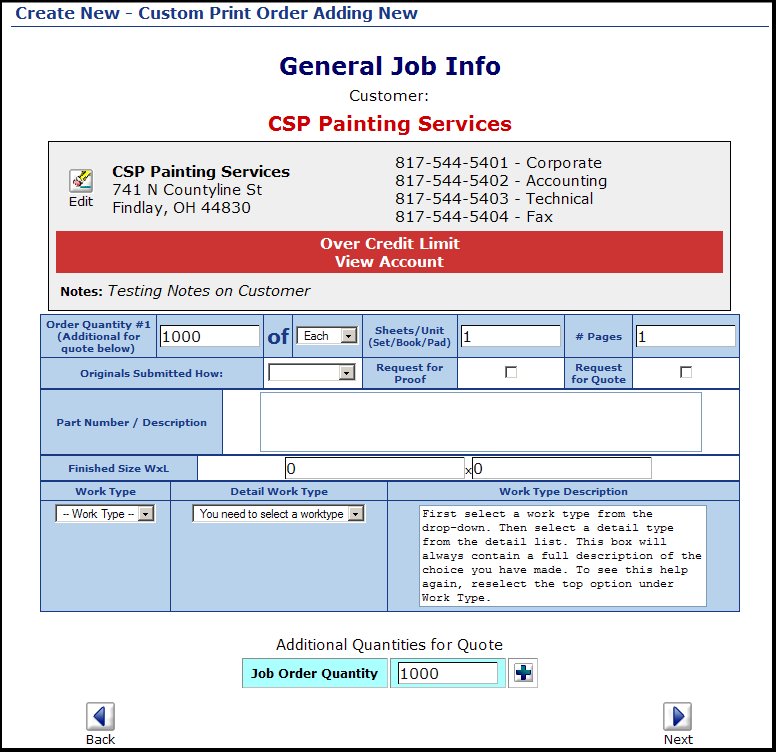
- Customer Information: At the top of the screen will be displayed the address, phones, etc. for the customer selected. You can click on the
 Edit button to change any of the customer information. Also, if the customer is over their credit limit, or the are past due, you will see a red bar in the customer area. You can click on the "View Account" words to bring up the customer account to see why they are in this condition. This is intended as a warning so you will not accept more work from an overdue customer. Also in this area are any notes attached to the customer file. Edit button to change any of the customer information. Also, if the customer is over their credit limit, or the are past due, you will see a red bar in the customer area. You can click on the "View Account" words to bring up the customer account to see why they are in this condition. This is intended as a warning so you will not accept more work from an overdue customer. Also in this area are any notes attached to the customer file.
- Quantity: This is the CUSTOMER quantity and will fill in automatically from screen 1 entries. Of: allows you to pick a unit name (sheet, each, form, etc.) from the drop-down list.
- Sheets/Unit: For 3-part forms you might want to enter a 3 here.
- # Pages: If you are doing booklets, newsletters, etc. you will want to enter the number of pages.
- Originals Submitted How: Select from the drop-down. This field is informational only.
- Request for Proof: Check this box if the customer wants a proof.
- Request for Quote: Check this box if the customer wants a quote.
- Part Number/Description: This is the complete description of the piece to be produced. *** This is a required field ***.
- Finished Size WxL: Enter width in the first box, length in the second box.
- Part Number/Description: This is the complete description of the piece to be produced
- Work Type Selections If you are using work types to pre-define general types of work, you will select that here. NOTE: If this screen does not display correctly, it may be that you need to enter at least one work type in the setup area!
- Work Type: Select a type from the drop-down list. When you do so, the Detail Work type selections will change to reflect the work type selected.
- Detail Work Type: Select a detail type from the drop-down list. Notice that the Work Type Description changes to display any details you entered about this work type.
- Additional Quantities for Quote: You can enter as many quantities as you want for your quote. Do so, by changing the quantity in the box and clicking on the small
 Add Button. The quantity will display below the input box, allowing you to enter another quantity in the input box, until you have entered all the quantities desired. For Order entry, skip this section. Add Button. The quantity will display below the input box, allowing you to enter another quantity in the input box, until you have entered all the quantities desired. For Order entry, skip this section.
Click on the  Next button to return to the previous screen. Next button to return to the previous screen.
Click on the  Next button to continue with order entry. Next button to continue with order entry.
|