Enter vendor invoices and distribution amounts if not brought into payables automatically by one of the other modules.
- From the Main Menu, select Payables -> Vendor Bills -> New Vendor Bill .
- Your screen should look similar to this:
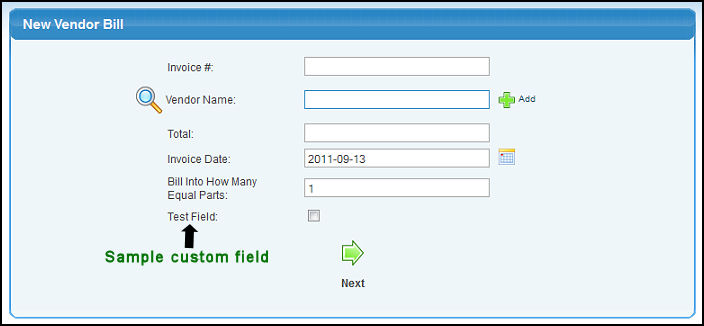
- Enter data in the following categories:
- Invoice #: Number provided by the vendor (printed on the vendor invoice).
- Vendor Name: Enter Vendor Name (or any portion of the name) to bring up a drop-down of possible matches. If you want to search by phone, zip code, etc., use the
 Lookup button for detailed searches. To add a new Vendor, click on the Lookup button for detailed searches. To add a new Vendor, click on the  Add button. For instructions on adding a new vendor, see the Vendor Add/Update section in the Related Topics section at the bottom of this Help screen. Add button. For instructions on adding a new vendor, see the Vendor Add/Update section in the Related Topics section at the bottom of this Help screen.
- Total (invoice total). Including shipping and tax.
- Invoice Date. You can either enter the date manually or click on the
 Calendar button to select the date from a calendar. Calendar button to select the date from a calendar.
- Bill Into How Many Equal Parts: Enter the number of payments you want to make on this invoice total.
- To continue adding the new bill, click on the
 Next button. Your screen should look similar to this: Next button. Your screen should look similar to this:
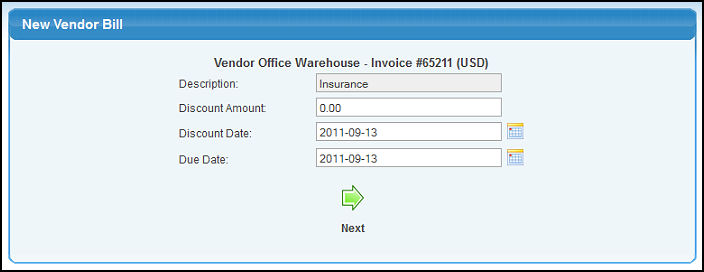
- Enter data in the following categories (Note: if the vendor information for defaults and terms are set correctly, you may need to change nothing here):
- Description. What the invoice is for (or some uses like to use the vendor name here).
- Discount Amount, if any.
- Discount Date. The date you must pay the invoice by to receive a discount. You can either enter the date manually or click the Calendar button to select the date from a calendar.
- Due Date. The date the invoice is actually due. You can either enter the date manually or click the Calendar button to select the date from a calendar.
- To continue, click on the Next button. Your screen should look similar to this:
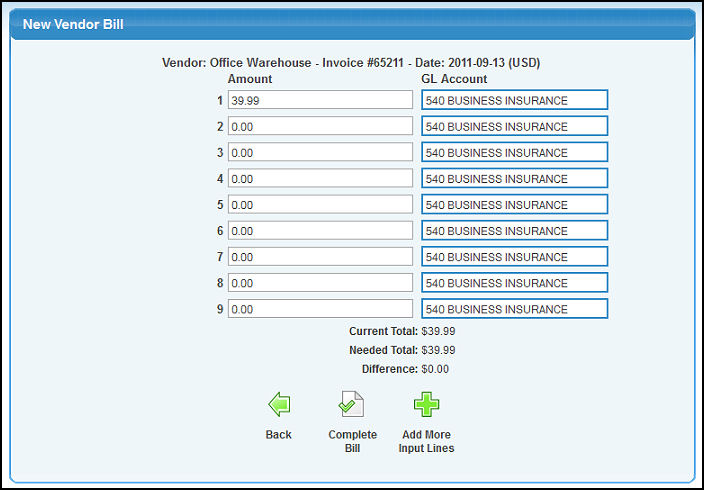
When you first enter a new bill, you will see 9 lines for possible distribution entries. The GL account will be the default one. You can fill in amounts in as many of these as you like. You will NOT see the COMPLETE BILL button until you have entered amounts equal to the original invoice total entered.
- Enter data in the following categories:
- Amount: Either enter the full amount of this invoice or the amount for this GL account.
- GL Account: Enter in the account name (or a portion of the name) to display a drop-down of possible matches.
- To add more lines for distributions, click on the Add More Input Lines button.
- To return to the previous screen WITHOUT SAVING your changes, click on the
 Back button. Back button.
- To finalize the bill, the entries must be balanced (Difference = 0.00). Click on the
 Complete Bill button. You will receive a Confirmation screen similar to this: Complete Bill button. You will receive a Confirmation screen similar to this:

- This screen will display for a moment, then automatically return to the Bill Add screen.
|