List of Purchase Order numbers. You can also Receive a PO, Edit a PO or Print a PO from links on this report.
- From the Main Menu, select Reports -> Payables -> Purchase Order Lists.
- Your screen should look similar to this:
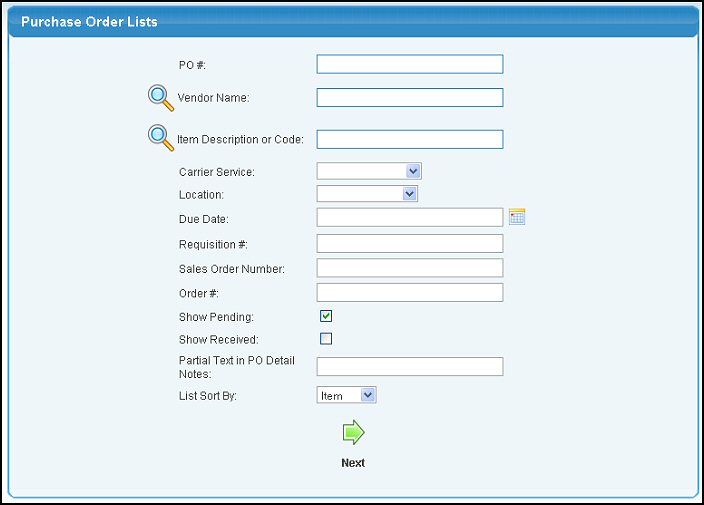
- Enter search data in one or more of the following categories:
- PO #: Enter the PO # if you just want to see that PO. Leave BLANK to see all POs.
- Vendor Name: Enter Vendor Name (or any portion of the name) to bring up a drop-down of possible matches. If you want to search by phone, zip code, etc., use the
 Lookup button for detailed searches. Leave BLANK to see all vendors. Lookup button for detailed searches. Leave BLANK to see all vendors.
- Item Description or Code: Enter an item name or code (or partial name or code) to bring up a list of possible matches. If you want to search by category, website, etc., use the Lookup button for detailed searches. Leave BLANK to include all items.
- Carrier Service: If list is for a specific carrier, select one from the pull-down list.
- Location: If you do not have multiple locations, you will not see this field. To limit the list to a specific location, select from the pull-down list.
- Due Date: To limit the list to POs with a specific due date, you can either enter the date manually or click the
 Calendar button to select the date from a calendar. Calendar button to select the date from a calendar.
- Requisition #: Enter a specific Requisition# to limit the report to that number.
- Sales Order Number: Enter a specific sales order number to limit the report to that number.
- Order #: To limit the report to a specific vendor order number, enter it here.
- Show Pending: Check this box if you want to see PENDING POs.
- Show Received: Check this box if you want to see RECEIVED POs.
- Partial Text in PO Detail Notes: Enter words (or parts of words) to search for in the Detail Notes.
- List Sort By: Select how you want to sort the report from the pull-down list.
- To view the Purchase Orders meeting your criteria, click on the
 Next button. Your screen should look similar to this: Next button. Your screen should look similar to this:
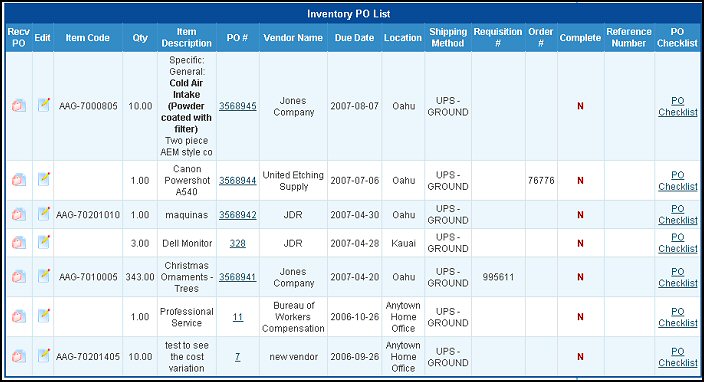
- Using the Order pull-down list at the top, you can change the sort order of the list.
- To UPDATE the PO, click on the
 Edit button. See the Update Purchase Order topic in the Related Topics section at the bottom of this Help screen. Edit button. See the Update Purchase Order topic in the Related Topics section at the bottom of this Help screen.
- To RECEIVE items on a PO, click on the
 Receive PO button. See the Receive Items on PO topic in the Related Topics section at the bottom of this Help screen. Receive PO button. See the Receive Items on PO topic in the Related Topics section at the bottom of this Help screen.
- To return to the Purchase Order List screen, click on the
 Back button. Back button.
- To export the report in a Microsoft Excel® format, click on the Export button in the Quick Links section of the footer at the bottom of the page.
- To PRINT a copy of the PO, click on the Purchase Order Number.
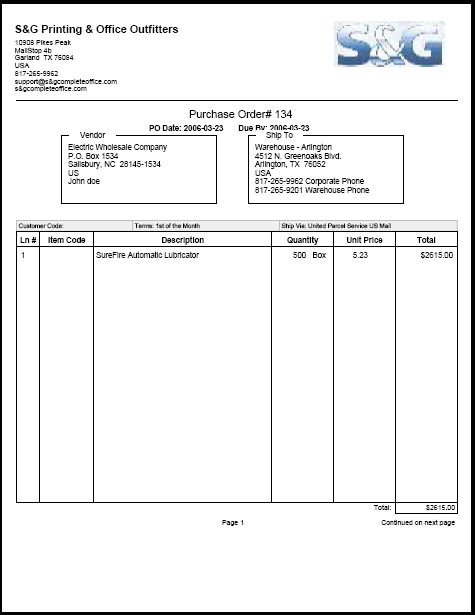
SAMPLE PO PRINT
|