This administrative utility allows you to configure NolaPro to accept credit card payments from two gateways: Authorize.net and PSiGate. For other gateways, a Manual gateway can be created and processed offline. You will first need to create an account with one of these processors in order to get the information necessary to complete the NolaPro credit card configuration.
Setting Up the Credit Card Processor Account in NolaPro
Be sure to read the "Enabling Credit Card Processing in Setup-Receivables-> Company Options" at the end of this Help Topic.
To set up your credit card account in NolaPro, go to Admin -> Setup Receivables -> Credit Card Options
To edit an existing Credit Card Account, select an account from the pull-down list in the Accounts field.
To Add an account, select the Processor of the account you want to add and click on the  Add New Account button. Add New Account button.
You will see a screen similar to this for an Authorize.net account:
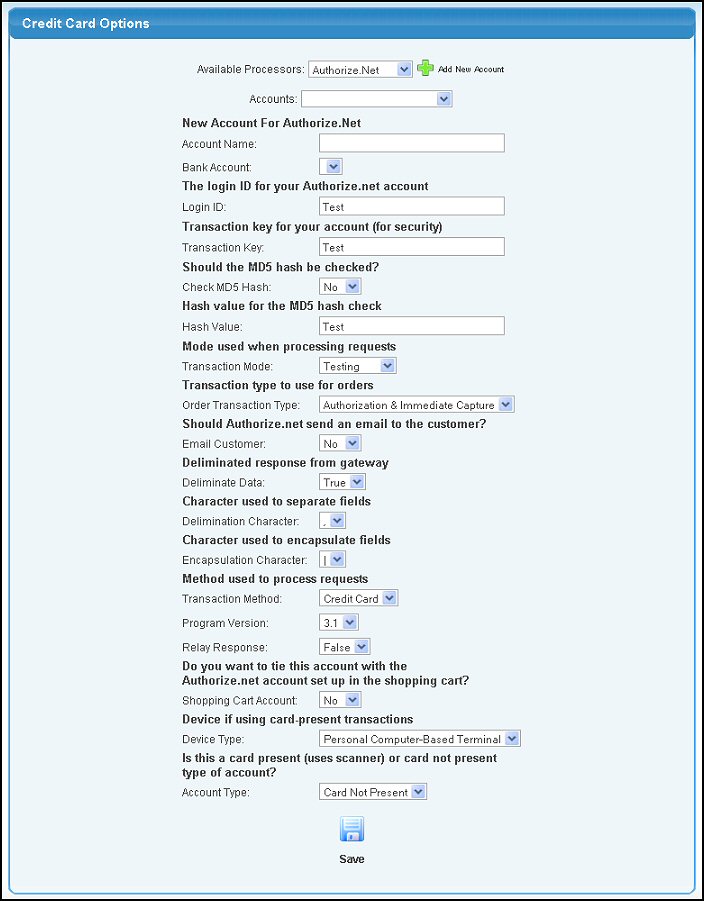
Enter the following information
- Account Name: - Enter a unique name for this processor account (we suggest you include the processor in the name for clarity).
- Bank Account: - Select the Bank Account where these transactions will be withdrawn and/or deposited. This is the Bank Account where the transactions will appear in the Bank Reconciliation screen.
- Login ID: - Login name provided by Authorize.net
- Transaction Key: - A code supplied by Authorize.net that is used to verify that transactions actually came from you.
- Check MD5 hash - Yes or No. Authorize.net will send back a code that NolaPro can check to verify that the response actually came from Authorize.net (recommended).
- Hash Value - A keyword entered here and in your Authorize.net account that is used for security purposes.
- Transaction Mode - Select Testing or Production. Switch to production mode when you are ready to run actual transactions.
- Transaction Type - At this time NolaPro only supports authorization and immediate capture (AUTH_CAPTURE).
- Email Customer: - Whether Authorize.net should send email receipts to customers.
- Deliminate Data: - Authorize.net requires this field be set to True.
- Delimination Character: - Authorize.net requires this field to be set to a comma(",").
- Encapsulation Character: - Authorize.net requires this field to be set to a vertical bar("|").
- Transaction Method - Only credit card transactions are supported by NolaPro at this time.
- Program Version: - NolaPro supports Authorize.net Version 3.1 at this time.
- Relay Response: - Authorize.net requires this field to be set to False.
- Shopping Cart Account: - Select whether you want this credit card processing account to be used for the Shopping Cart account, or do you want a separate account for internal use.
- Device Type: If you are using card-present transactions, choose a device type from the drop-down menu or choose unknown.
- Account Type: Indicate if this is a Card Present or Card Not Present Account.
Click the  Save button to save configuration settings. Save button to save configuration settings.
You will see a screen similar to this for a PSiGate account:
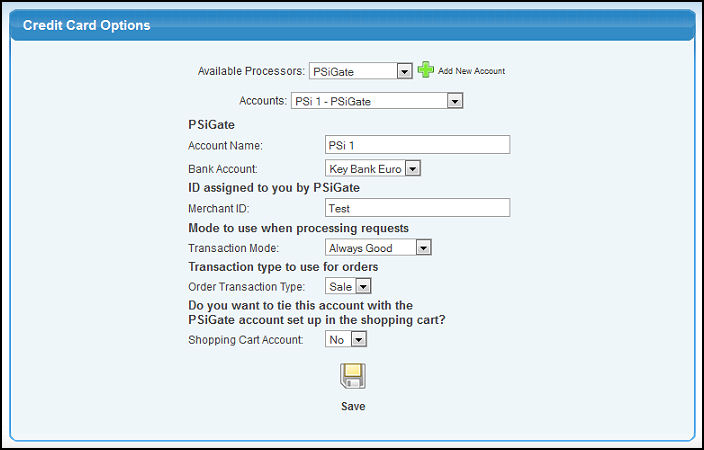
Enter the following information
- Account Name: - Enter a unique name for this processor account (we suggest you include the processor in the name for clarity).
- Bank Account: - Select the Bank Account where these transactions will be withdrawn and/or deposited. This is the Bank Account where the transactions will appear in the Bank Reconciliation screen.
- Merchant ID - ID provided by PSiGate
- Transaction Mode - Always Good, Always Duplicate, Always Decline, or Production. Switch to Production mode when you are ready to run actual transactions.
- Order Transaction Type: - Only Credit Card Sales are supported by NolaPro at this time.
- Shopping Cart Account: - Select whether you want this credit card processing account to be used for the Shopping Cart account, or do you want a separate account for internal use.
Click the Save button to save configuration settings.
You will see a screen similar to this for an Manual account:
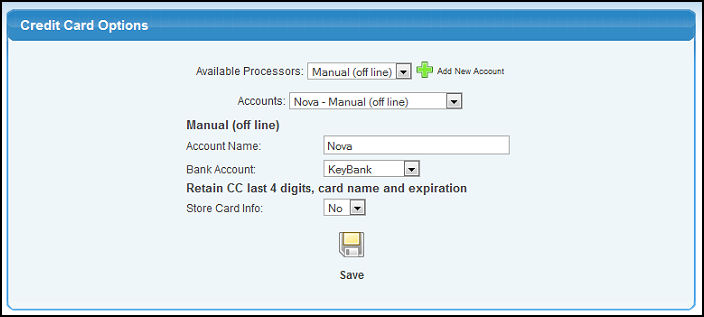
Enter the following information
- Account Name: - Enter a unique name for this processor account (we suggest you include the processor in the name for clarity).
- Bank Account: - Select the Bank Account where these transactions will be withdrawn and/or deposited. This is the Bank Account where the transactions will appear in the Bank Reconciliation screen.
- Store Card Info: Select whether you want the system to store the last 4 digits of the credit card, the card name and expiration date. NOTE: This will NOT store the entire credit card number!
Click the Save button to save configuration settings.
Enabling Credit Card Processing in Setup Receivables-> Company Options
Once you have created the account in Admin -> Setup Receivables -> Credit Card Options, be sure to set your default credit card processor for your company to this account. You do this by going to Admin -> Setup Receivables -> Company Options. The default selection is to use manual (off-line) processing.
1) You will see a screen similar to this:
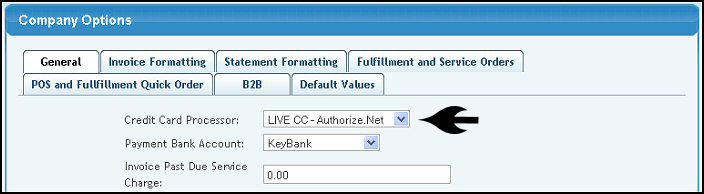
2) Select your credit card processor account created above from the pull-down list and Save your changes.
|