Before entering time on service orders, you need to fill in Service Types, Service Classes and Service Order Labor Rates (under Admin -> Setup - Service). You also need to mark which employees work as service employees, and which vendors are sub-contract for service order work. The employee and vendor designations must be done AFTER the service types and classes are entered.
- From the Main Menu select Orders -> Service Orders -> Log New Time.
- Your screen should look similar to this:
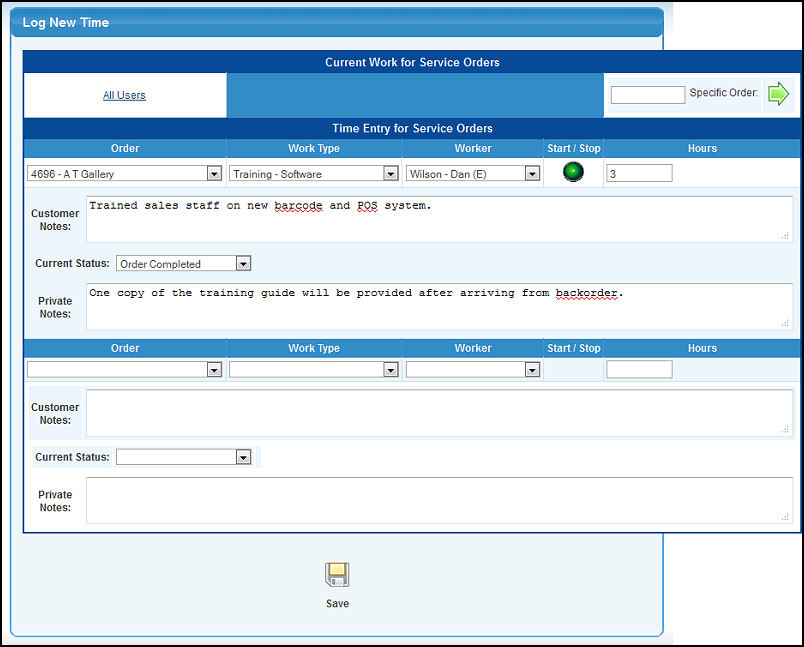
- There are two possible sections to this display: Current Work and Time Entry. You will only see the Current Work section if work has been started but not marked as finished.
CURRENT WORK:
- When this screen first appears, the Current Work section will show ONLY work that YOU entered as started -- even if you started the work for someone else. If you want to change this so you can see work started and not finished for ALL workers, click on the "All Users" in the upper left corner of the current work area.
- If you want to see all work for a Specific (open) Order, enter the order number in the box to the right and click the
 Next button to change the display. To switch back to ALL orders, erase the entry in the Specific Order box and click the Next button again. NOTE: If you arrived at this screen from the Service Order Edit screen, the specific order will already be filled in. Next button to change the display. To switch back to ALL orders, erase the entry in the Specific Order box and click the Next button again. NOTE: If you arrived at this screen from the Service Order Edit screen, the specific order will already be filled in.
- To COMPLETE a time entry that was started but not ended (shows a red stop-light), you can either click on the stop-light or enter the total hours directly.
- You can also enter NOTES under each time entry to explain what was done, discovered, etc. These notes will pass on to the invoice.
- Be sure to click on the
 Save button at the bottom of the screen to retain your changes. Save button at the bottom of the screen to retain your changes.
TIME ENTRY:
- Order: Select the order from the drop-down list. NOTE: If you have specified a specific order under Current Work section, then that is the only order you can select. To be able to select ANY order, erase the order number from Specific Order in the upper right corner and click the Next button.
- Worktype: Select the Worktype from the drop-down list (these are created under Admin -> Setup - Service -> Service Types). This name will appear on the invoices.
- Worker: Select the worker from the drop-down list. This will be either an employee or a sub-contractor. Employee names are followed by (E) and subcontractor names by (C). Employees must be designated as Service Workers in Employee Add/Update.
- Start/Stop: Once you have selected an order, a worktype and a worker, a green light will appear in the start/stop column. Clicking on the green light STARTS the clock on work for this order and changes the light to a red light. To STOP the clock, click the red light and the elapsed time will appear in the hours column. NOTE: If you are going to leave or shut down your computer after STARTING the clock, be sure to click on the SAVE button to record the start time in the database. That way, the next time you return to this screen, you can end the time (it will show in the CURRENT WORK section).
- Hours: If you use the start/stop lights to calculate the time, you do not need to enter hours. However, if you want to just enter the time spent rather than have the clock track it, you can enter the hours here.
- Customer Notes: Enter an explanation of work done or any other information you wish. These notes will appear on the final bill.
- Current Status: You can also set the status of the order. This status will show on the Open Orders List. The list of status names is created in Admin -> Setup - Service -> Service Status Options.
- Private Notes: Notes can be entered which will NOT show on the invoice, but will appear when editing the order.
- If you run out of space for entries, need to shut down your computer, or close the program, be sure to click on the Save button to save your entries.
|