Update Exemption Allowances, Maximum Taxable Wage amounts and other general information about tax.
- From the Main Menu, select Payroll -> Tax Tables -> Edit Tax Type.
- Your screen should look similar to this:
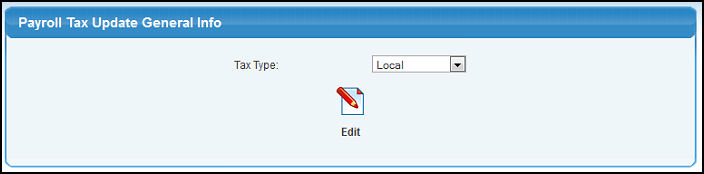
- Select Local, City or Additional as the Tax Type from the pull-down list.
- To edit the selected Tax Type, click on the
 Edit button. Your screen should look similar to this: Edit button. Your screen should look similar to this:
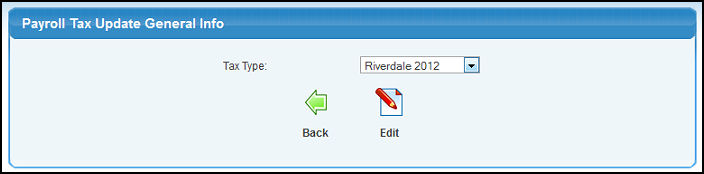
- Select the Local, City or Additional Tax for the year you want to edit from the pull-down list. Be sure to select the appropriate year.
- To return to the previous screen and select a different Tax Type, click on the
 Back button. Back button.
- To edit this Local, City or Additional Tax, click on the Edit button. Your screen should look similar to this:
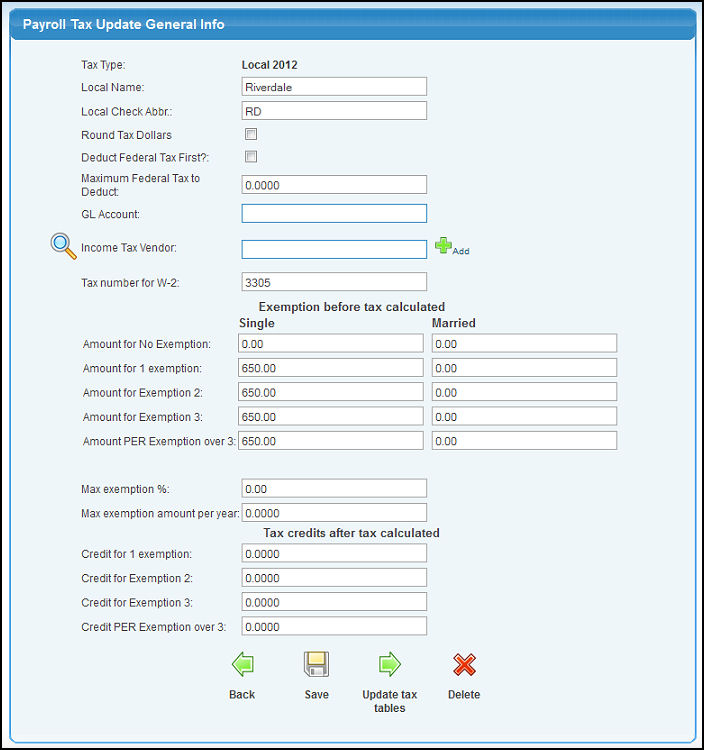
- Edit any or all of the necessary data in each category.
- Name: Enter the Name of tax district. This name will appear on tax forms.
- Check Abbr: Since there may not be room for the full name on checks, etc. this abbreviation is what will show on pay stubs.
- Round Tax Dollars: Check this box if your City or Local tax laws require rounding of the calculated tax amount to the nearest dollar.
- Deduct Federal Tax First?: Check the box if you should deduct Federal tax from the total pay before calculating this tax.
- Maximum Federal Tax to Deduct: If you checked the above box (Deduct Federal Tax First), then enter the maximum federal tax to be deducted from wages. Leave this a zero if there is no maximum.
- GL Account: Enter the name of the Payables account into which this tax will accrue until paid to the tax district. USING THE AUTO-LOOKUP FEATURE on GL Account Numbers - Enter the GL Account, Name or any portion of the number, name or description to see a drop-down list of matching account numbers. Highlight the account to enter it into the field. A space bar will bring up ALL accounts valid for this field, HOWEVER this is not recommended due to limitations on the length of the list that can be viewed.
- Income Tax Vendor: This is the Vendor who you pay this tax to. Enter Vendor Name (or any portion of the name) to bring up a drop-down of possible matches. If you want to search by phone, zip code, etc., use the
 Lookup button for detailed searches. By selecting the vendor, the payroll taxes for this district will generate an entry into Payables automatically for the amount accrued. This occurs when writing checks. NOTE: To Add A New Vendor, click on the Lookup button for detailed searches. By selecting the vendor, the payroll taxes for this district will generate an entry into Payables automatically for the amount accrued. This occurs when writing checks. NOTE: To Add A New Vendor, click on the  Add button and follow direction under Add/Update Vendor. Add button and follow direction under Add/Update Vendor.
- Tax number for W-2: Tax id number to show on W2, etc.
- Exemption amounts for each filing status (up to 4 exemptions, above 4 uses the 4th amount): Enter the amount per exemption for each filing status. This is the amount to be deducted from wages prior to calculating tax.
- Max. exemption %: If your tax district only has a ceiling on allowable exemption amounts up to a certain percentage of total wages, enter that percentage here.
- Maximum exemption amount per year: If your tax district has a ceiling on allowable exemption amounts up to a certain maximum amount per year, enter that maximum here.
- Credit amount for exemptions (up to 4 exemptions, above 4 uses the 4th amount): Enter the amount of the credit (a reduction of tax calculated) per exemption.
- To return to the previous screen WITHOUT SAVING your changes, click on the Back button.
- To delete this Local or City Tax, click on the
 Delete button. Delete button.
- To save the Local or City Tax, click on the
 Save button. You should see a screen similar to this: Save button. You should see a screen similar to this:
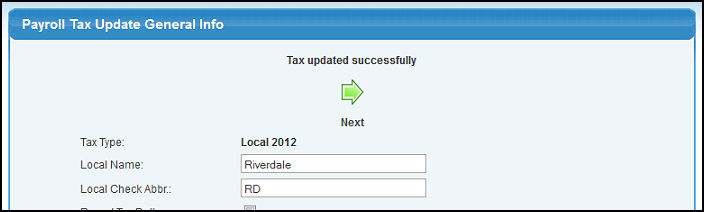
- To go to the Tax Table Edit section, click on the
 Next button. Your screen should look similar to this: Next button. Your screen should look similar to this:
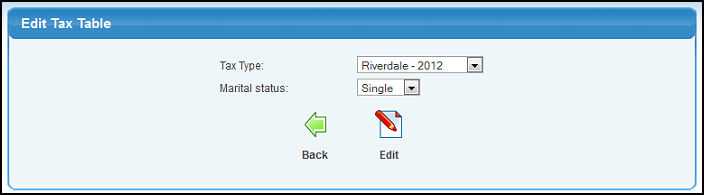
- Tax Type: The tax will already by selected for you based on your previous screen.
- Marital Status: Select the Marital Status you wish to edit from the pull-down list.
- Deduction Allowance table: Check this box if you need to enter a Deduction Allowance Table for this tax.
- To return to the previous screen WITHOUT editing the tax tables, click on the Back button.
- To edit this tax table for the selected Marital Status, click on the Edit button.
- Your screen should look like this:
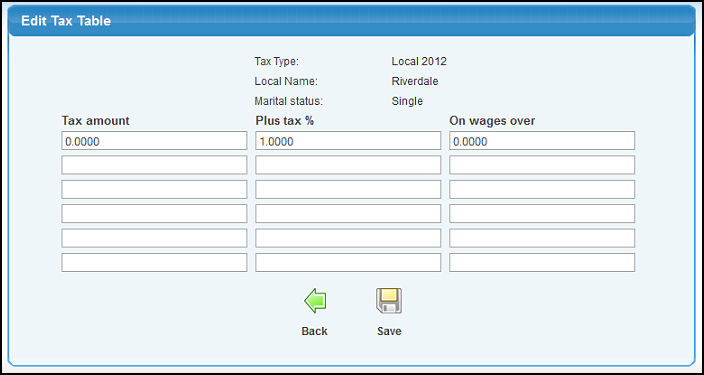
- Enter the following values from the tax bracket tables provided by your taxing authority.
- Tax Amount: Enter the amount of tax for this bracket.
- Plus Tax %: Enter the percent (i.e. 5% = 5.0) for this bracket.
- On Wages Over: Enter the upper wage ceiling for this bracket.
- To return to the previous screen WITHOUT SAVING the changes, click on the Back button.
- To save your changes, click on the Save button.
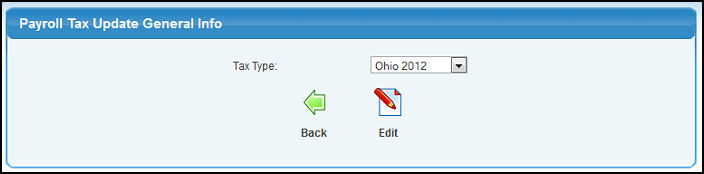
- Select the State Tax Type for the appropriate year from the pull-down list. Be sure to select the year you want to update.
- Click on the Edit button. Your screen should look similar to this:
- Select the state you view to edit from the pull-down list.
- To return to the previous screen, click on the Back button.
- To edit the tax information for the state you selected, click on the Edit button. Your screen should look similar to this:
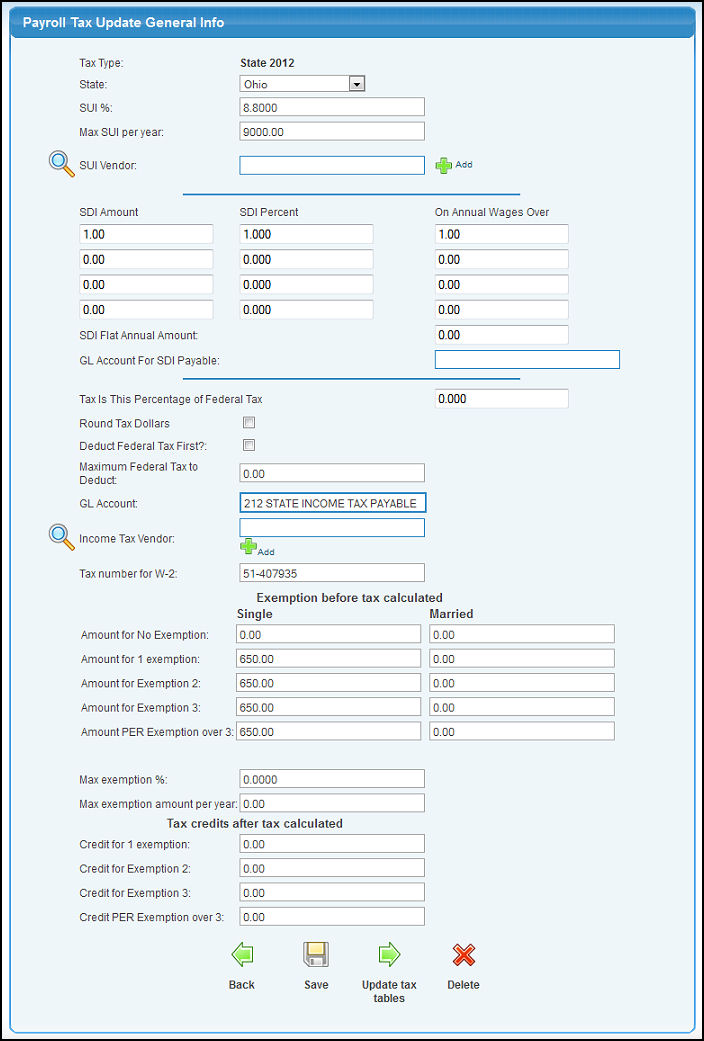
- Enter data in the following categories:
- State: Select the State from the pull-down list.
- SUI%: Enter the State Unemployment Insurance(SUI) percentage to be multiplied times wages to calculate tax.
- Max SUI per Year: Maximum wages on which SUI is to be calculated.
- SUI Vendor: This is the vendor who you pay this tax to. Enter Vendor Name (or any portion of the name) to bring up a drop-down of possible matches. If you want to search by phone, zip code, etc., use the Lookup button for detailed searches. By selecting the vendor, the payroll taxes for this district will generate an entry into Payables automatically for the amount accrued. This occurs when writing checks. NOTE: To Add a New Vendor, click on the Add button and follow directions under Add/Update Vendor.
- SDI Amount/SDI Percent/On Annual Wages Over: If State Disability Insurance is applicable to your state, it can be entered here. Four rows are available to enter in the SDI amount, percent and annual wages.
- SDI Flat Annual Amount: The annual wage limit for SDI.
- GL Account For SDI Payable: Enter the account name (or partial name) to bring up a list of possible matches.
- Round Tax Dollars: Check this box if your State tax laws require rounding of the calculated tax amount to the nearest dollar.
- Deduct Federal Tax First?: Check the box if you should deduct Federal tax from the total pay before calculating this tax.
- Maximum Federal Tax to Deduct: If you checked the above box (Deduct Federal Tax First), then enter the maximum federal tax to be deducted from wages. Leave this a zero if there is no maximum.
- GL Account: Enter the name or number of the Payables account into which this tax will accrue until paid to the tax district. USING THE AUTO-LOOKUP FEATURE on GL Account Numbers - Enter the GL Account, Name or any portion of the number, name or description to see a drop-down list of matching account numbers. Highlight the account to enter it into the field. A space bar will bring up ALL accounts valid for this field, HOWEVER this is not recommended due to limitations on the length of the list that can be viewed.
- Income Tax Vendor: This is the Vendor who you pay this tax to. Enter Vendor Name (or any portion of the name) to bring up a drop-down of possible matches. If you want to search by phone, zip code, etc., use the Lookup button for detailed searches. By selecting the vendor, the payroll taxes for this district will generate an entry into Payables automatically for the amount accrued. This occurs when writing checks. NOTE: To Add A New Vendor, click on the Add button and follow directions under Add/Update Vendor.
- Tax number for W-2: Tax id number to show on W2, etc.
- Exemption amounts for each filing status (up to 4 exemptions, above 4 uses the 4th amount): Enter the amount per exemption for each filing status. This is the amount to be deducted from wages prior to calculating tax.
- Max. exemption %: If your tax district only has a ceiling on allowable exemption amounts up to a certain percentage of total wages, enter that percentage here.
- Maximum exemption amount per year: If your tax district has a ceiling on allowable exemption amounts up to a certain maximum amount per year, enter that maximum here.
- Credit amount for exemptions (up to 4 exemptions, above 4 uses the 4th amount): Enter the amount of the credit (a reduction of tax calculated) per exemption.
- To return to the previous screen WITHOUT SAVING your changes, click on the Back button.
- To DELETE this State Tax, click on the Delete button.
- To save the State Tax, click on the Save button. You should see a screen simliar to this:
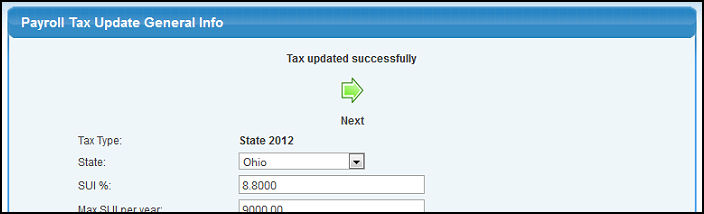
- To go to the Tax Table Edit section, click on the Next button. Your screen should look similar to this:
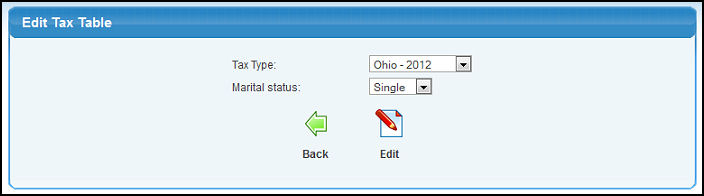
- Tax Type: The tax will already by selected for you based on your previous screen.
- Marital Status: Select the Marital Status you wish to edit from the pull-down list.
- Deduction Allowance table: Check this box if you need to enter a Deduction Allowance Table for this tax.
- To return to the previous screen WITHOUT editing the tax tables, click on the Back button.
- To edit this tax table for the selected Marital Status, click on the Edit button.
- Your screen should look like this:
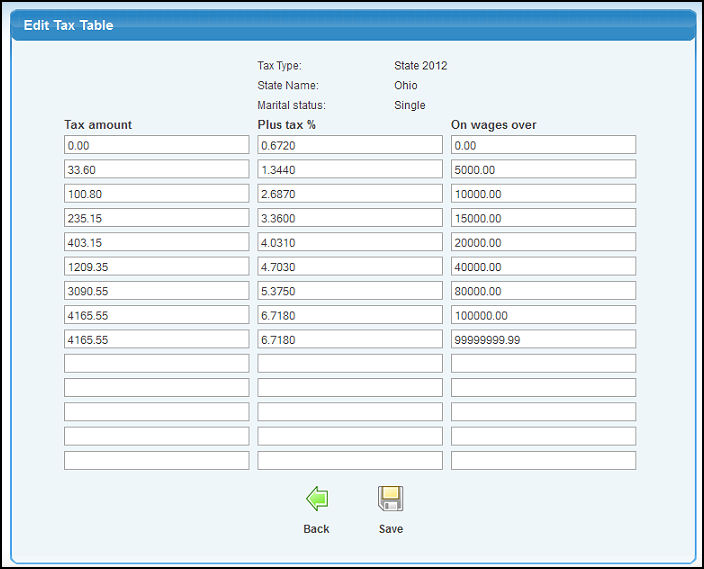
- Enter the following values from the tax bracket tables provided by your taxing authority.
- Tax Amount: Enter the amount of tax for this bracket.
- Plus Tax %: Enter the percent (i.e. 5% = 5.0) for this bracket.
- On Wages Over: Enter the upper wage ceiling for this bracket.
- To return to the previous screen WITHOUT SAVING the changes, click on the Back button.
- To save your changes, click on the Save button.
- Select the Federal Tax Type for the appropriate year from the pull-down list. Be sure to select the correct year you want to update.
- Click on the Edit button. Your screen should look similar to this:
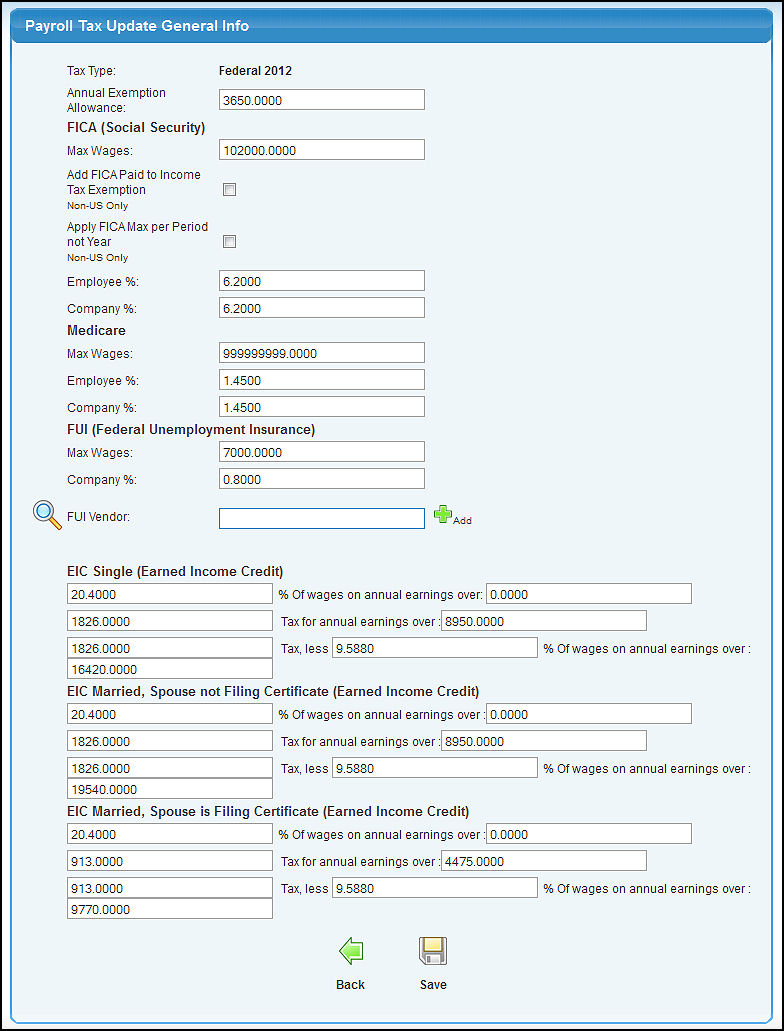
- Enter data in the following categories:
- Annual Exemption Allowance: Amount to be deducted from YEARLY wages PER EXEMPTION claimed.
- FICA (Social Security):
- Max Wages: Maximum wages on which Social Security Tax is calculated.
- Add FICA Paid to Income Tax Exemption: This option is for non-U.S. users only. Checking this box will add the FICA paid to income tax exemption.
- Apply FICA Max per Period not Year: This option is for non-U.S. users only. Check this box to apply the max FICA wages per pay period instead of for the year.
- Employee %: Percentage of wages deducted from employee pay for Social Security Tax.
- Company %: Percentage of wages employer contributes to Social Security Tax on each employee.
- Medicare:
- Max Wages: Maximum wages on which Medicare Tax is calculated.
- Employee %: Percentage of wages deducted from employee pay for Medicare Tax.
- Company %: Percentage of wages the Employer contributes to Medicare Tax on each employee.
- FUI (Federal Unemployment Insurance):
- Max Wages: Maximum wages on which Federal Unemployment Tax is calculated.
- Company %: Percentage of wages the Company contributes for FUI/FUTA (Federal Unemployment Insurance).
- FUI Vendor: This is the Vendor who you pay this tax to. Enter Vendor Name (or any portion of the name) to bring up a drop-down of possible matches. If you want to search by phone, zip code, etc., use the Lookup button for detailed searches. By selecting the vendor, the payroll taxes for this calculation will generate an entry into Payables automatically for the amount accrued. This occurs when writing checks. NOTE: To Add A New Vendor, click on the Add button and follow direction under Add/Update Vendor.
- EIC Single (Earned Income Credit): This is for low-income families to receive a tax credit on federal income tax. It is a credit that is applied AFTER the regular income tax is calculated. Enter the percentages and amounts as noted by the "___" below:
- ____ % of wages on annual earnings over $___.
- $___ Tax for annual earnings over $___.
- $___ Tax, less __% of wages on annual earnings over $____.
- EIC Married - Spouse Not Filing Certificate: This is for low-income families to receive a tax credit on federal income tax. It is a credit that is applied AFTER the regular income tax is calculated. Enter the percentages and amounts as noted by the "___" below:
- ____ % of wages on annual earnings over $___.
- $___ Tax for annual earnings over $___.
- $___ Tax, less __% of wages on annual earnings over $____.
- EIC Married - Spouse is Filing Certificate: This is for low-income families to receive a tax credit on federal income tax. It is a credit that is applied AFTER the regular income tax is calculated. Enter the percentages and amounts as noted by the "___" below:
- ____ % of wages on annual earnings over $___.
- $___ Tax for annual earnings over $___.
- $___ Tax, less __% of wages on annual earnings over $____.
- To return to the previous screen WITHOUT SAVING your changes, click on the Back button.
- To save the Federal Tax, click on the Save button.
|