|
|
When you receive a bill from a vendor, you can transfer items received on Purchase Orders to the Accounts Payable system for bill payment. This process provides a double-check because you cannot include on a bill a greater quantity of an item than was received.
- From the Main Menu, select Payables -> Purchasing -> Completed PO to AP.
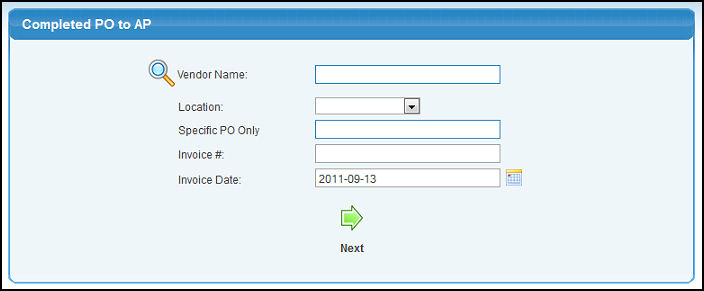
- Your screen should look similar to this:

- Enter data in ALL of the following categories:
- Vendor Name: Enter Vendor Name (or any portion of the name) to bring up a drop-down of possible matches. If you want to search by phone, zip code, etc., use the
 Lookup button for detailed searches. Lookup button for detailed searches.
- Location: Select the location from the pull-down list.
- Specific PO Only: To search for a specific PO, enter the number here.
- Invoice #: Enter the invoice number appearing on the vendor bill.
- Invoice Date: Enter the date on the vendor bill. You can either enter the date manually or click the
 Calendar button to select the date from a calendar. Calendar button to select the date from a calendar.
- To continue, click on the
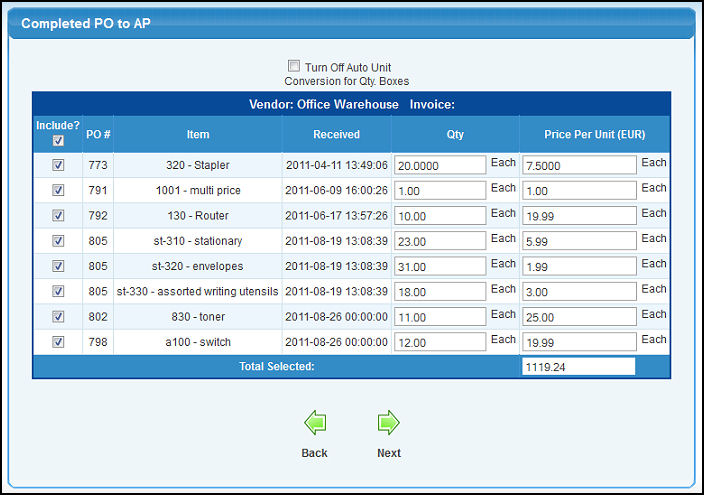
 Next button. Your screen should look similar to this: Next button. Your screen should look similar to this:

- Verify the data in the following categories:
- Include? box: To include this line item on the bill, click on the Include?
- Qty: Change the Quantity of items received, if necessary.
- Price Per Unit: Change the Price Per Unit, if necessary.
- When all items appearing on your bill have been selected, click on the
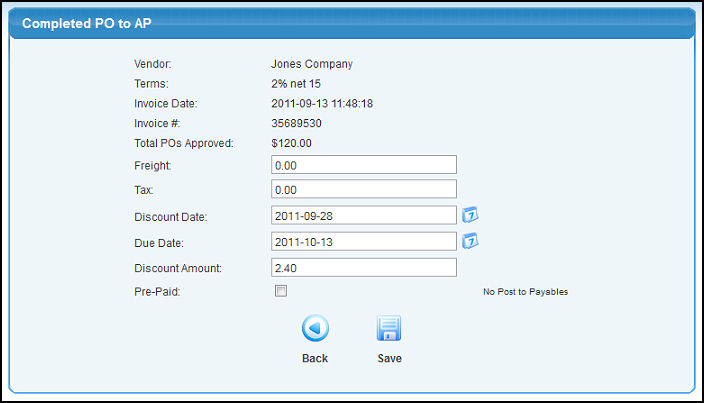
 Next button. Your screen should look similar to this: Next button. Your screen should look similar to this:

- Enter data in the following categories:
- Freight: This is how much you were charged for shipping the items.
- Tax: This is the amount of tax you were charged.
- Discount Date: This date will auto-calculate based on the vendor terms. You can either enter the date manually or click the
 Calendar button to select the date from a calendar. Calendar button to select the date from a calendar.
- Due Date: This date will auto-calculate based on the vendor terms. You can either enter the date manually or click the
 Calendar button to select the date from a calendar. Calendar button to select the date from a calendar.
- Discount Amount: This amount will automatically be calculated based on the vendor terms, but you can change it to match the bill.
- Pre-Paid: A pre-paid bill, will post as completed and will not show up as needing to be paid. Check the box if pre-paid.
- To return to the list, WITHOUT GENERATING AN INVOICE, click on the
 Back button. Back button.
- To complete the bill, click on the
 Save button. This bill will now show up in Payables. Save button. This bill will now show up in Payables.
- You will see a confirmation screen similar to this:

- To return to the Completed PO to AP screen, click on the
 Back button. Back button. | |
|

 Lookup button for detailed searches.
 Next button. Your screen should look similar to this:

 Back button.
 Save button. This bill will now show up in Payables.