|
|
This is part of the employee setup. If an employee has any special deductions that apply only to this employee, they need to be entered here. Typical examples of such deductions are garnishments, donations to United Way, Christmas club, etc.
- From the Main Menu, select Payroll -> Employee Deductions.
- Your screen should look similar to this:
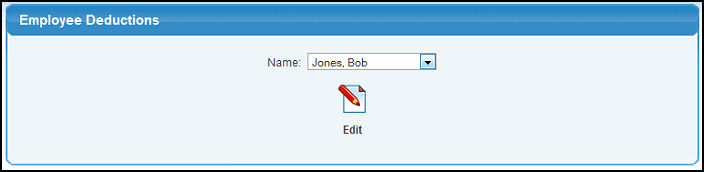
- Select the Employee Name from the pull-down list.
- To continue, click on the
 Edit button. Your screen should look similar to this: Edit button. Your screen should look similar to this:
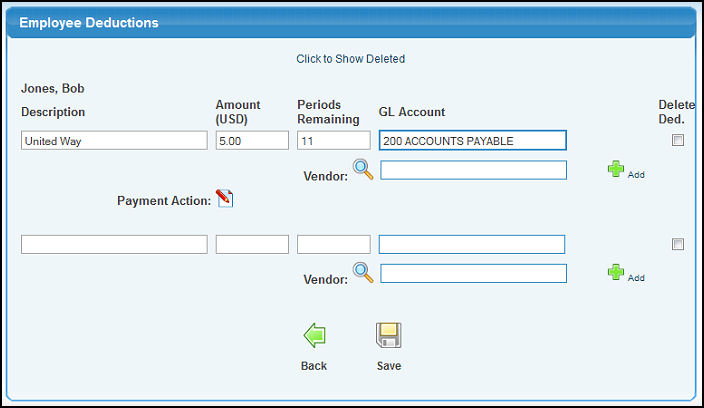
- Edit data in the following categories:
- Description: Enter a description for this deduction (this will show on the check stub, so keep the description short in length).
- Amount: Enter the amount of the deduction per pay period.
- Periods Remaining: If you want the deductions to end after a given number of times being deducted, enter the remaining number of deductions here. Enter a "-1" to keep the deduction going until manually removed.
- GL Account: Enter the GL Account for this deduction. USING THE AUTO-LOOKUP FEATURE on GL Account Numbers - Enter the GL Account, Name or any portion of the number, name or description to see a drop-down list of matching account numbers. Highlight the account to enter it into the field. A space bar will bring up ALL accounts valid for this field, HOWEVER this is not recommended due to limitations on the length of the list that can be viewed.
- Delete Deduction: To delete this deduction, place a check in this box.
- Vendor: Select a vendor to be paid the amounts deducted.
- Payment Action: Only seen when editing, this is how you can set up what happens to the amount -- does it create a payables entry? And if so, what information is to print on the description of the payable? Clicking on this button, brings up the following screen:
VENDOR ASSOCIATED
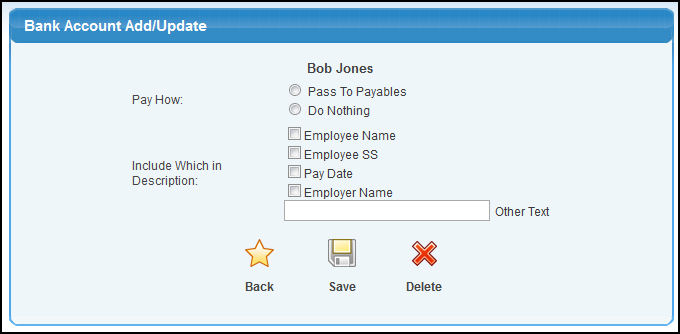
- Pay How: Select if you want to create a payables bill or do nothing (meaning you will manually handle the bill entry).
- Include Which in Description: Select which of the standard information you want to show on the description of the payables entry, or enter your own text.
- When done, you can
 Delete the information, Delete the information,  Save the information, or click on the Save the information, or click on the  Back button to close the window without saving any changes made. Back button to close the window without saving any changes made.
NO VENDOR ASSOCIATED
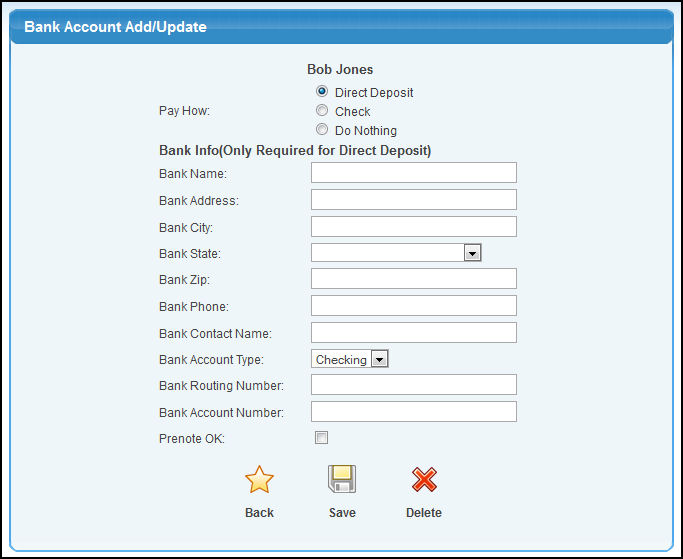
Use this option to split employee pay into more than one bank account (such as part of their pay going into checking and part going into savings or part as direct deposit, part as a check).
- Pay How: Select if this part is to be Direct Deposit, Check or nothing.
- Bank Info (Only Required for Direct Deposit): Enter the back Account information needed to create a direct deposit to this account.
- When done, you can Delete the information, Save the information, or click on the Back button to close the window without saving any changes made.
- To return to the previous screen WITHOUT SAVING your changes, click on the
 Back button. Back button.
- To save the employee deduction, click on the Save button.
- Repeat these steps if the employee has more deductions.
| |
|