Define currencies when using the Multi-Currency Add-On.
From the Main Menu, select Admin -> Admin Setup -> Currency New/Edit.
Your screen should look similar to this:
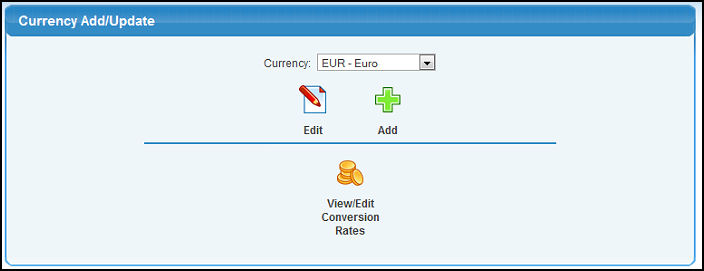
Currency: If editing, choose a currency and click Edit.
Click Add to create a new currency.
Whether adding or editing, your screen should look similar to the following:
Name: The name of the currency.
Code: If adding, enter an abbreviation for the currency.
Symbol Before Amount: To have the currency symbol appear before the amount, enter it here.
Symbol After Amount: To have the currency symbol appear after the amount, enter it here.
Decimal Places: The number of decimal places you would like to display for this currency.
Unit Decimal Places: The number of decimal places you would like to display for unit values.
Decimal Symbol: The decimal symbol for this currency.
Thousands Separator: The thousands separator for this currency.
Currency Trading Account: This is the account to record the profit/loss from variations in currency. Enter an account name or number (or partial name or number) to bring up a list of possible matches. Click Add New GL Account at the bottom of the screen to create a new account.
Active: Check this box to make the currency active.
Click Back to return to the previous screen without saving your changes.
Click Save to save your changes.
Click Update All Existing Transactions With This Currency only if you were previously using a currency other than US Dollars. This will set all your existing transactions to this currency.
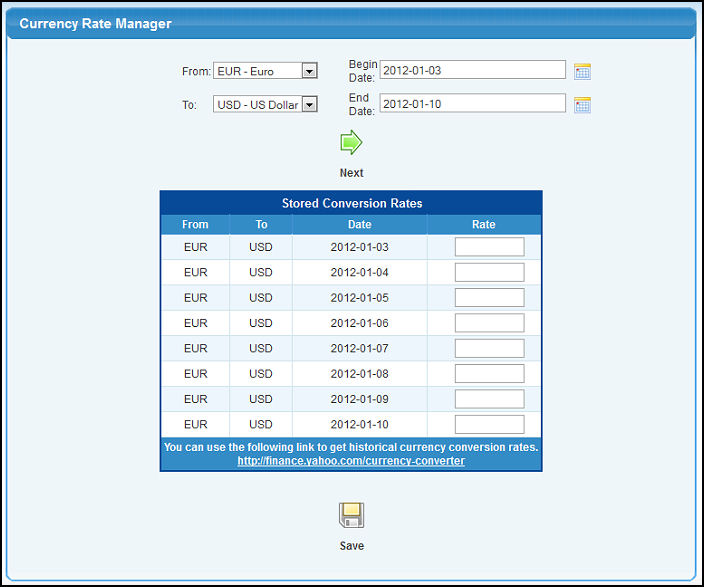
If you clicked View/Edit Conversion Rates or went to Admin -> Setup Admin -> Currency Rates, your screen should look similar to the following:
Note: This section is only if you want to manually enter your currency conversions. Otherwise they will be automatically downloaded.
From/To: Select the currency you would like to convert from and to from the drop-down menu.
Begin/End Date: Click the calendar button to select the date ranges to enter currency conversions.
Click Next to continue and your screen should look similar to the following:
Rate: Enter the conversion rate for the given day.
 Edit.
Edit. Add to create a new currency.
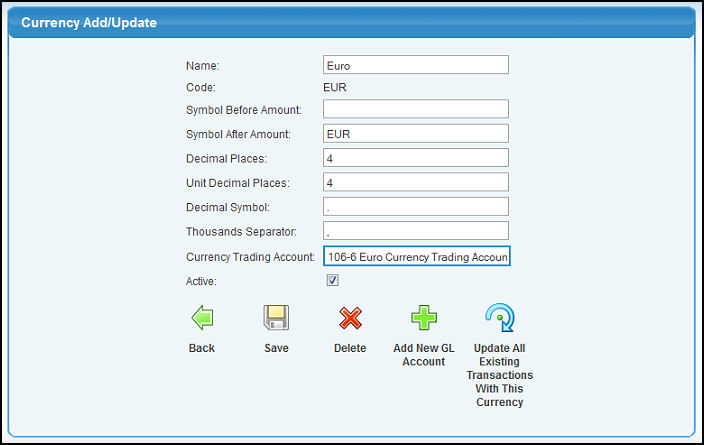
 Back to return to the previous screen without saving your changes.
 Save to save your changes.
 Update All Existing Transactions With This Currency only if you were previously using a currency other than US Dollars. This will set all your existing transactions to this currency.
 View/Edit Conversion Rates or went to Admin -> Setup Admin -> Currency Rates, your screen should look similar to the following:
 calendar button to select the date ranges to enter currency conversions.
 Next to continue and your screen should look similar to the following: