NolaPro-osCommerce
Integration Quick Start Guide
The NolaPro-osCommerce Bridge allows
you to pass over customer, order and payment info from osCommerce
orders into the NolaPro accounting system.
Follow these steps to get your systems
set up:
Install NolaPro and complete
the initial setup. If you already have NolaPro installed, update to
the latest version.
Purchase and activate the
osCommerce Tie-In add-on. Go to https://store.nolapro.com and
search for the keyword osCommerce or look under the category
Admin category in the Add-ons section. After you get your activation code go to Tools -> Add-ons and submit your code.
Go
to Tools -> osCommerce and enter in
default values for osCommerce info coming into NolaPro. 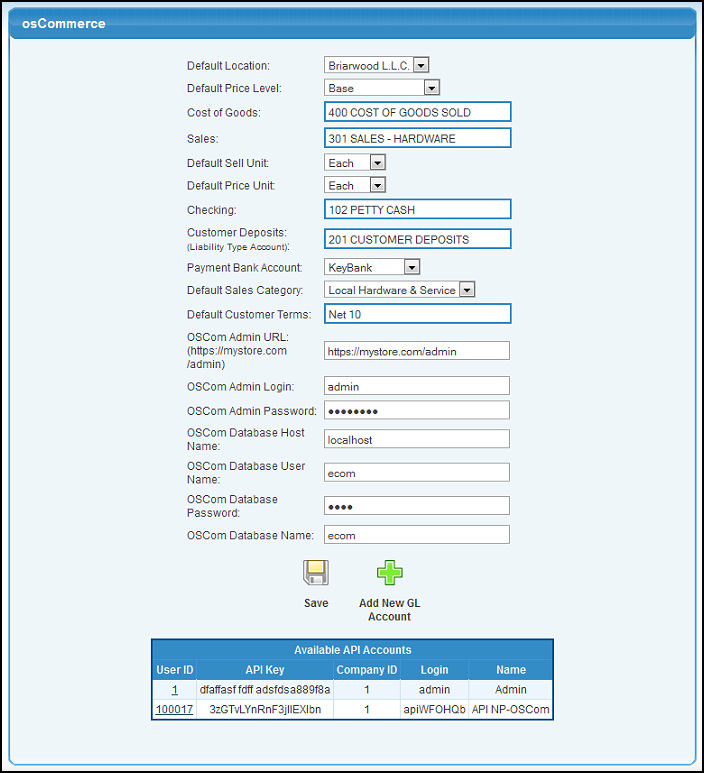
The
Default Location, Price Level, Cost of Goods Sold account and other
values will be applied to all orders coming in from your osCommerce
site.
You can fill in the OSCom URL, login info and database info
if you want to update your osCommerce inventory levels when you
receive products on PO inside NolaPro. If you fill in this info
NolaPro will also update the osCommerce order status when you ship
an order from inside NolaPro.
Verify that the file
nolapro/api/app/config/database.php points to your NolaPro database.
Open this file up in a text editor. Make sure the values for
'host', 'login', 'password' and 'database' point to your NolaPro
database properly.
Move the folder
nolapro/oscom/nolapro inside your osCommerce code (just the folder
called nolapro with two files in it). It should go in your catalog
directory so it is at the same level as your admin, includes,
images, etc. folders.
Open up the file npapi.php from
the catalog/nolapro/ folder. At the very top of the page put in
values so that your osCommerce site can talk to the NolaPro API.
You can get this info by going to Tools ->
osCommerce in NolaPro and look in the Available API
Accounts section at the bottom of the page. You'll need the User
ID, API Key and Company ID along with the URL for your NolaPro site.
Be sure to add the /api/rest/ to the end of your NolaPro URL. It
should look something like: http://demo.nolapro.com/api/rest/.
Open up the osCommerce file
called checkout_process.php. Add in the NolaPro bridge code so that
it is in the following position:
//
send emails to other people
if
(SEND_EXTRA_ORDER_EMAILS_TO != '') {
tep_mail('',
SEND_EXTRA_ORDER_EMAILS_TO, EMAIL_TEXT_SUBJECT, $email_order,
STORE_OWNER, STORE_OWNER_EMAIL_ADDRESS);
}
//
+++++ NolaPro
+++++++++++++++++++++++++++++++++++++++++++++++++++++++++++++
include_once('nolapro/nolapro.php');
nolapro_save_order($order,
$cart, $insert_id, $customer_id, $order_totals, $payment);
//
+++++ End NolaPro
+++++++++++++++++++++++++++++++++++++++++++++++++++++++++
//
load the after_process function from the payment modules
$payment_modules->after_process();
$cart->reset(true);
Run through some test orders to
make sure the bridge is functioning properly. If you would like to
view the inputs and outputs of the API, go to Admin -> Admin Setup ->
System Settings and turn on NolaPro API Logging. To view the API
Logs go to Tools -> API Log Viewer.
If
you would like to link your osCommerce inventory items with
inventory items inside NolaPro, create entries for each item in both
osCommerce and NolaPro. In the osCommerce Admin section go to
Catalog and then click a Category to bring up a list of your items.
Click on an item to see a preview of it. Look at the web address
for the page. The end should look something like:
categories.php?cPath=24&pID=37. The part pID=37 is the
osCommerce product ID. Open up the equivalent item in NolaPro by
going to Inventory -> Inventory Items -> Edit Item. Towards the bottom
of the page enter in the osCommerce product ID from the URL in the
box called OSCom Item ID (the number 37 for this example).
osCommerce orders going into NolaPro will now draw down your NolaPro
inventory.
If
you have an osCommerce sales tax that you would like to match up
with a sales tax inside NolaPro, you will need to do something
similar to the above. In osCommerce go to Locations/Taxes -> Tax
Rates. Click on your tax. The URL should look something like:
tax_rates.php?page=1&tID=1. The tID=1 is the ID number for your
tax. In NolaPro go to Admin -> Setup Receivables -> Sales Taxes. Add
or Edit a tax and then put your osCommerce tax ID (1 in this case)
in the field labeled OSCom Tax ID. Be sure that the tax rates match
in NolaPro and osCommerce. One nice thing about setting up your
sales taxes this way is that NolaPro will keep a running total for
taxes payable that you can draw back down when you make a tax
payment.
|