|
|
Customize your input screens in a number of areas, by adding your own fields.
- From the Main Menu, select Tools -> Custom Fields Editor. Your screen should look similar to the following:

- Select the area where you want to add or edit your own custom fields, and click on the
 Next button. Your screen should look similar to this: Next button. Your screen should look similar to this:
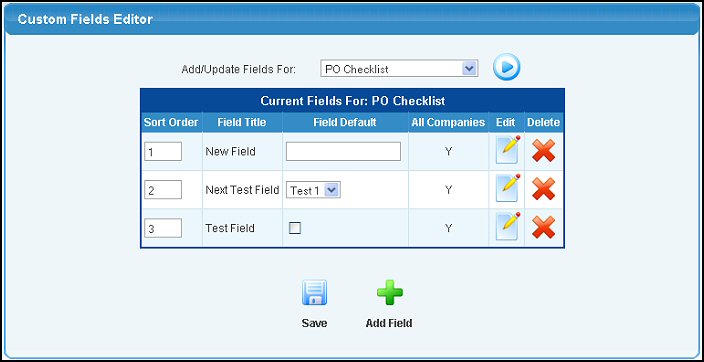
- To create a custom field, click on the
 Add Field button. Add Field button.
- To edit an existing field, click on the
 Edit button next to the listing. Edit button next to the listing.
- To delete an existing field, click on the
 Delete button next to the listing. Delete button next to the listing.
- To change the order in which the fields are displayed on your input screen, you can enter numbers in the SORT ORDER column (lower numbers are displayed first). You must then click on the
 Save button to retain the changes for sort order. Save button to retain the changes for sort order.
- To change the DEFAULT ENTRY for a particular field, you can enter a value, or check a box on the column marked FIELD DEFAULT. You must save after making any modification to these values if you want to retain the changes.
If you selected to EDIT or ADD an entry, your screen will look similar to this:
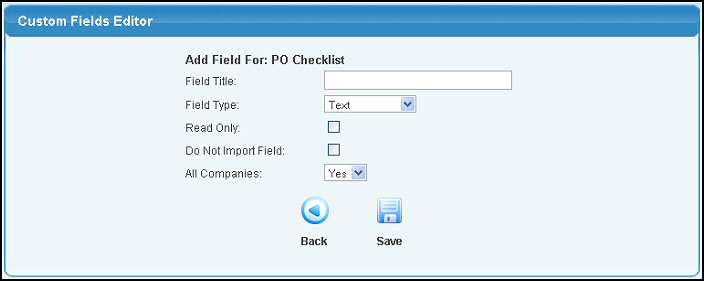
- Field Title: This will become the user prompt on the input screens.
- Field Type: Select the type of input expected from the drop-down list.
- Checkbox: The user will be checking a box.
- Text: The user will be typing something in.
- Select: The user will be given a list of options from which they can choose.
- Radio: Will display user choices as radio buttons.
- Date: Will require a date type input with a calendar pop-up to help.
- Heading: Only povides a way to separate groups of inputs into logical groupings if you have lots of inputs for one screen.
When selecting a type that requires options to be entered, the screen display will change to allow for input of these options. We will cover entering those values shortly.
- Read Only: For a display field that you do not want the user to be able to change, only view, check this box..
- Do Not Import Field: For some of the imports, custom fields will show up on the import list. If you do NOT want to import these fields, check this box.
- All Companies: If you are set up as a multi-company, then this question determines whether this added field will be appearing on, for instance, the customer screen for each company, or just for this one company. If just for this one company, change the selection to NO.
- Click on Save to retain any changes, and click on
 Back button to return to previous screen without saving changes. Back button to return to previous screen without saving changes.
- If you selected a Select type on the Field Type question, your screen will change to look similar to this:
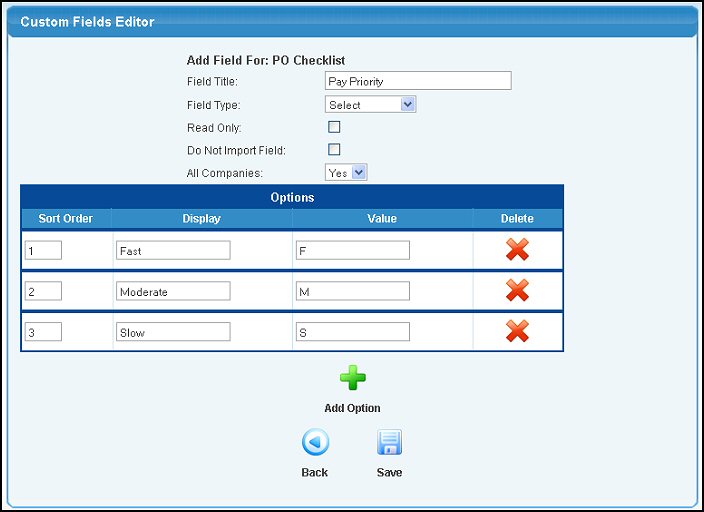
- Sort Order: The order in which the items appear for the user in the drop-down box.
- Display: This is the text that will appear in the drop-down box.
- Value: This must be a unique value (no duplications within this select box) that will be associated with this choice.
- Clicking on the Delete button will delete the particular entry line you are on.
- To add another item to the selection list, click on the Add Option button.
| |
|