Edit entries you made via New Journal Entries as well as those automatic entries created by Receivables, Payables, Payroll, Inventory, etc. You may want to do this to correct for a wrong account being debited or credited.
- From the Main Menu, select Ledger -> Journal Entries -> Edit Journal Entries.
- Your screen should look similar to this:
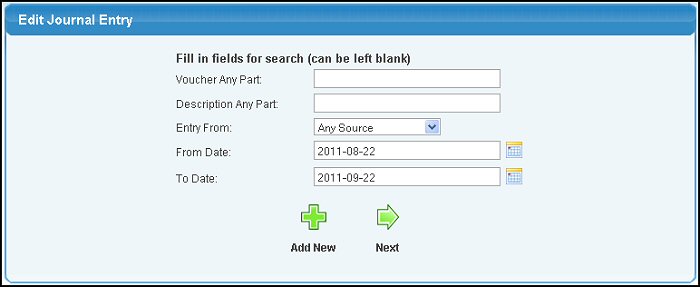
- Enter information in the following categories to narrow your search:
- Voucher: Enter the voucher number (or any part of the voucher) in the Voucher box. You can leave the box empty if you are not searching for a particular voucher.
- Description: Enter the description (or any part of the description) to find matching vouchers to edit. You can leave the box empty if you are not searching for a particular description.
- Entry From: If you want to only search in one source, choose the specific source module from the Entry From pull-down list. This is the module which the original entry was made.
- Date Range: Use the From Date and To Date boxes to enter the year, month and date range you would like to search. You can either enter the date manually or click the
 Calendar button to bring up a calendar. Calendar button to bring up a calendar.
- To add a new journal entry, click the
 Add New button. Add New button.
- To display the entries matching your selections, click the
 Next button. Next button.
- Your screen should look similar to this:
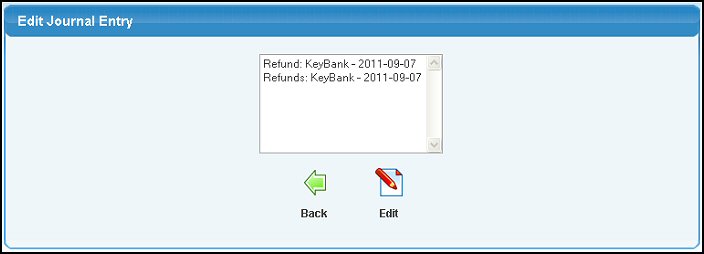
- To return to the previous screen, click the
 Back button to take you back to the selection screen. Back button to take you back to the selection screen.
- Select the Voucher you would like to edit, then click on the
 Edit button. Edit button.
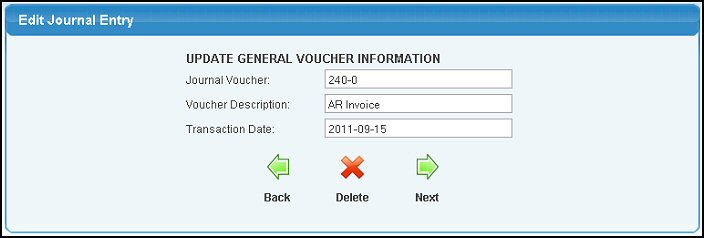
- You can change the information in any of these boxes:
- Journal Voucher: A voucher is a transaction-processing record that documents approvals, payment amounts and physical shipment or receipt. (Hint: Use Check Number, Invoice Number, etc. as Voucher)
- Voucher Description: This information is to help you remember what it is for and to explain it to others.
- Transaction Date: The transaction date for the voucher will populate here.
- To return to the previous screen WITHOUT SAVING your changes, click the Back button.
- To DELETE the voucher, click the
 Delete button. Delete button.
- To save this screen and continue to the General Ledger and amounts screen, click the Next button.
- Your screen should look similar to this:
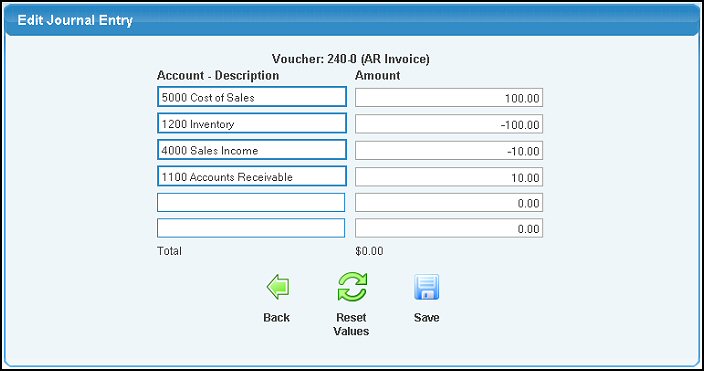
- Update the Account and Amount boxes. Here is where you can change which account(s) and the amount(s) that need to be changed.
- To return to the main screen WITHOUT SAVING your changes, click the Back button.
- To restore the original values if an error was made entering data, click the
 Rest Values button. Rest Values button.
- To SAVE the edited Journal Entry, click the
 Save button. Save button.
For help determining whether your entries should be negative or positive, it helps some people to view an account as increasing or decreasing. Here is a chart to help:
| Account | Increase | Decrease |
|---|
| Assets | Debit (+) | Credit (-) |
|---|
| Cost of Goods Sold | Debit (+) | Credit (-) |
|---|
| Expenses | Debit (+) | Credit (-) |
|---|
| Liabilities (ie: payables) | Credit (-) | Debit (+) |
|---|
| Capital/Equity | Credit (-) | Debit (+) |
|---|
| Retained Earnings | Credit (-) | Debit (+) |
|---|
| Sales & Adjustments | Credit (-) | Debit (+) |
|---|
| Other Income | Credit (-) | Debit (+) |
|---|
|