|
|
Create checks for payment without first entering a bill.
- From the Main Menu, select Payables -> Checks -> Manual Checks.
- Your screen should look similar to this:

- Enter data into the following categories:
- Invoice #: Invoice Number from bill or invoice being paid.
- Vendor Name: Enter Vendor Name (or any portion of the name) to bring up a drop-down of possible matches. If you want to search by phone, zip code, etc., use the
 Lookup button for detailed searches. To ADD a new vendor, click on the Lookup button for detailed searches. To ADD a new vendor, click on the  Add button to the right of the Vendor Name box. Add button to the right of the Vendor Name box.
- Total: Amount to be paid (before discount if there is one).
- Discount Amount: Amount of discount taken.
- Pay How: Select method of payment from the pull-down list. NOTE: Credit card, ACH, EFT selections for reference only. No automatic processing will take place. You will need to process the credit card transaction file separately.
- Payment Date: This will be the Check Date. Defaults to current date, but can be changed. You can either enter the date manually or click the
 Calendar button to select the date from a calendar. Calendar button to select the date from a calendar.
- Checking Account: If you have MORE THAN ONE checking account defined for payables, select the one you want from the pull-down list. (you will not see this prompt if you have only one checking account.)
- To continue, click on the
 Next button to continue with the entry. Your screen should look similar to this: Next button to continue with the entry. Your screen should look similar to this:
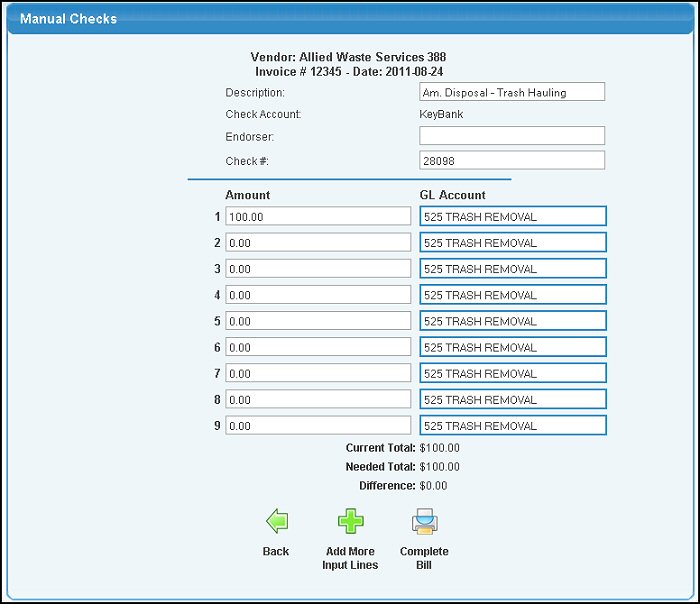
- Enter the data into the following categories:
- Description: This defaults to the standard description for items purchased from this vendor.
- Check Account: This defaults to the account chosen on the previous screen.
- Endorser: The name of the person who will be signing the checks (defaults to standard endorser for this checking account).
- Check #: Defaults to next check number for this checking account. You can override this number.
- Amount: Enter distribution amounts (amounts for each different expense account). This defaults to the usual expense account for purchases from this vendor.
- GL Account: General Ledger Account for amount entered on this line.
- If you need to distribute the check to more accounts than you have input lines, click on the Add More Input Lines button at the bottom of the screen.
- To exit WITHOUT actually writing the check, click on the
 Back button. Back button.
- To save the entries and print the check, click on the
 Complete Bill button. Your screen will now look like this: Complete Bill button. Your screen will now look like this:
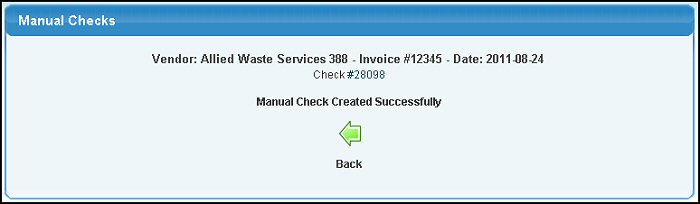
- To print the check, click on the Check number to print the check.
- To return to the Manual Checks screen, click on the Back button.
NOTE: If you later void the payment, this entry will show up in the unpaid bills. To delete the bill completely use Payables -> Vendor Bills -> Edit Vendor Bill. | |
|