Enter/update sales receipts for which no invoice is entered --- or if you are on a CASH system, enter all receipts here.
- From the Main Menu select Billing -> Invoices -> New or Edit Non-Invoiced Sales. Your screen should look similar to this if choosing Edit:
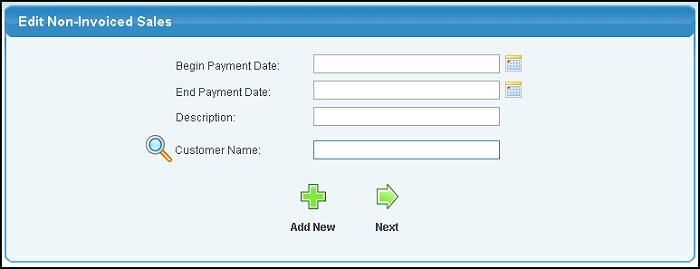
- Begin/End Payment Date: Choose a beginning and ending payment date to search by. Selecting the
 calendar button to the right will bring up a calendar or you can enter the date in YYYY-MM-DD format. calendar button to the right will bring up a calendar or you can enter the date in YYYY-MM-DD format.
- Description: Search using a description entered for the sale.
- Customer Name: Enter a customer name (or partial name) to bring up a list of possible matches.
- If choosing
 Next and there are multiple results, your screen should look similar to the following: Next and there are multiple results, your screen should look similar to the following:
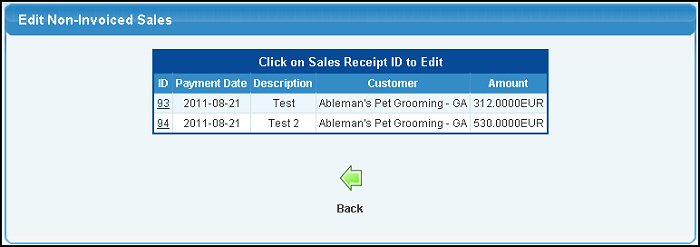
- Clicking on the ID number will bring up more information for the sale, producing a screen similar to the following. If you selected
 Add New on the first screen or New Non-Invoiced Sales from the main menu this is also the screen that will appear: Add New on the first screen or New Non-Invoiced Sales from the main menu this is also the screen that will appear:

- Customer Name: Enter Customer Name (or any portion of the name) to bring up a drop-down of possible matches. If you want to search by phone, zip code, etc., use the
 Lookup button for detailed searches. To add a customer, click on the Add button. Lookup button for detailed searches. To add a customer, click on the Add button.
- Currency: This field will appear if multi-currency is activated. Choose currency for invoice. Invoice payment must also be in this currency.
- Description: Description of sale (customer name, or item sold, or whatever might help later on when trying to track down a sale).
- Sales Category: Select a Sales Category from the pull-down list.
- Payment Date: This default to current date, but you may change it. Click on the Calendar button to help with date selection.
- Taxable Sale Amount: You will need to separate taxable from non-taxable portions of a sale so that your sales tax reports are accurate. Enter the taxable amount here (pre-tax).
- Tax-Exempt Sale Amount: Enter any non-taxable sales amounts here.
- Exempt Reason: If you entered non-taxable sale amounts, you will need to indicate the REASON why this sale is exempt. Select the reason from the pull-down list.
- GL Sales Account: This will default to the standard sales account but you can enter an account name (or partial name) to bring up a list of possible matches.
- COGS Amount: Enter the Cost of Goods Sold amount.
- GL Account for COGS: GL Account for Cost of Sales amount entered on previous line.
- Sales Tax 1-3: Select applicable tax(es).
- Tax Amount 1-3: Amount of tax for tax districts selected.
- Tax Group: This field will appear if your company is set up to use VAT/GST taxes and have groups defined. If so, choose a tax group from the drop-down list.
- Paid How: Select whether payment was check, cash, credit card, or other. When payment is by credit card, it is assumed that this was processed separately to the bank.
- Account Deposited To: This will default to your usual deposit GL account for posting to GL, but can be changed.
- Click
 Save to save the sale. Save to save the sale.
- If editing, click
 Back to return to the previous screen without saving. Back to return to the previous screen without saving.
- If editing and the sale has not been included in a bank deposit, click
 Delete to delete the sale. Delete to delete the sale.
NOTE: If this receipt has already been included in a bank deposit, the bottom of the above screen will appear as follows:
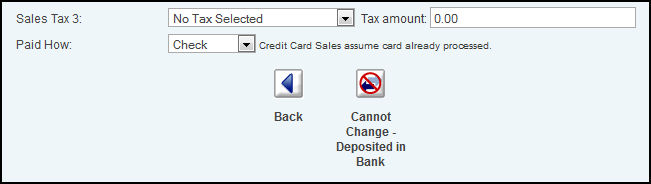
If you need to make changes to this receipt, you must first void the deposit, make the change, and re-do a corrected bank deposit.
|