|
|
Create Invoices from orders entered via Shopping Cart, or from Fulfillment/Service (Inventory) Order Entry section.
- From the Main Menu, select Orders -> Item Orders -> Orders --> Invoices. Your screen should look similar to this:
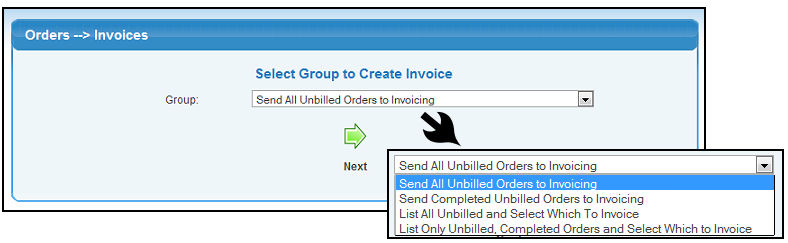
- Select one of the invoice creation entries or one of the list entries using the Group pull-down list.
- Send All Unbilled Orders to Invoicing. NOTE: This sends
all of the unbilled orders (both complete and partial shipments) to invoicing.
- Send Completed Unbilled Orders to Invoicing. NOTE: This sends only the completed unbilled orders to invoicing.
- List All Unbilled and Select Which to Invoice. Creates a list of all your unbilled orders and provides a checkbox to select if this one should be billed now. Any checked when you click on
 Invoice Now button will have an invoice created. Invoice Now button will have an invoice created.
- List Only Unbilled Completed Orders and Select Which to Invoice. Creates a list of all your completed unbilled orders. You can click on the Order Number to view the order. There is a checkbox next to each to check if this one should be billed now. Any checked when you click on Invoice Now button will have an invoice created.
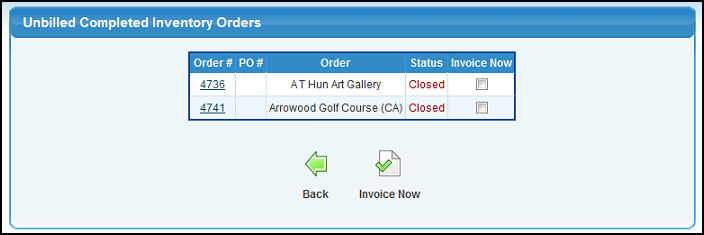
- To return to the Orders --> Invoices screen, click on the
 Back button. Back button.
- Selecting one of the SEND ORDERS.. options then clicking the
 Next button (or from one of the list options, checking off some invoices and clicking the Invoice Now button). Your screen should look similar to this: Next button (or from one of the list options, checking off some invoices and clicking the Invoice Now button). Your screen should look similar to this:
- Click on the Back button to return to the Orders ==> Invoices screen.
OR
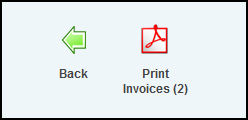
- Click on the
 Print Invoices button to display a PDF file containing all the invoices created. NOTE: The number in the parenthesis indicates how many invoices were created. Print Invoices button to display a PDF file containing all the invoices created. NOTE: The number in the parenthesis indicates how many invoices were created.
- Click on the Back button to return to the Orders ==> Invoices screen.
- If you had some invoices that had a very small balance either over or under, you will see the bottom box, which allows you to force these invoices into a CLOSED status rather than leaving them open. If you do, the balance will create a new line entry on the invoice called Invoice Adjustment for the difference.
- Check any boxes for invoices you want to force into a closed status.
- Click on the
 Save button to finish the status change. Save button to finish the status change.
| |
|