|
|
Enter/Update standard posting accounts and other information to be used by Accounts Payable when passing data to the General Ledger.
- From the Main Menu, select Admin -> Setup - Payables -> General Setup.
- Your screen should look similar to this:
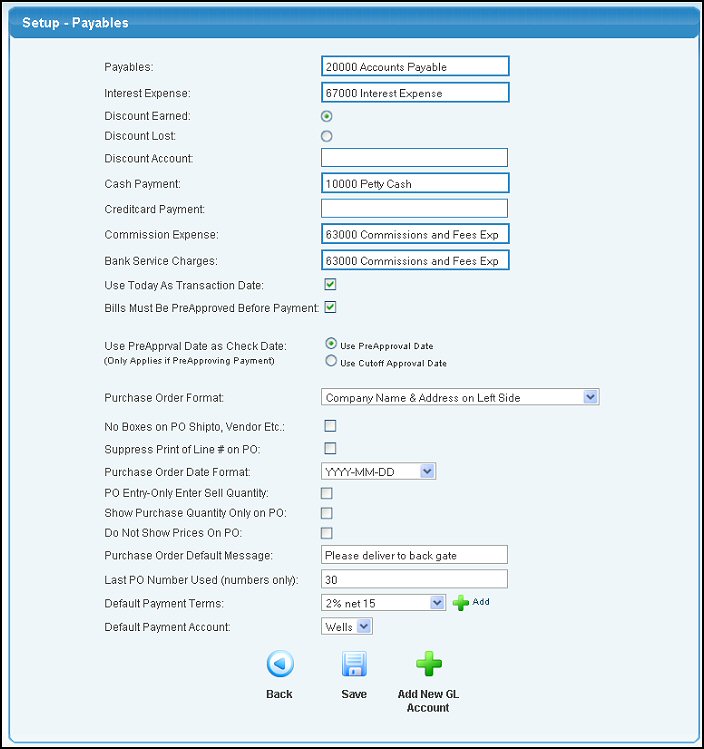
USING THE AUTO-LOOKUP FEATURE on GL Account Numbers - Enter the GL Account, Name or any portion of the number, name or description to see a drop-down list of matching account numbers. Highlight the account to enter it into the field. A space bar will bring up ALL accounts valid for this field, HOWEVER this is not recommended due to limitations on the length of the list that can be viewed.
- Edit data in following categories:
- Payables: Enter the GL payables account (bills post into this holding account until they are paid).
- Interest Expense: Enter the GL Interest expense account (used when you add interest to an overdue bill when paying.)
- Discount Earned or Discount Lost: Check the appropriate box. When using Discounts Earned, you are making the assumption that your will NOT pay by the discount date, so the discount amount is posted in full when the bill is received and is only reduced from discounts earned if you do NOT pay within the discount period. When using Discounts Lost, you are making the assumption that you WILL pay by the discount date, and discounts are only accrued when you lose the discount due to late payment.
- Discount Account: Enter either a discounts earned or lost GL Account (depending on prior question).
- Cash Payment: Enter the GL CASH account that will be charged when a cash payment is made.
- Credit Card Payment: Enter the GL account that will be charged when a credit card payment is made.
- Commission Expense: Select your GL account expense account that will be used to track Commissions Expense.
- Bank Service Charges: Enter the GL account that will be used for bank service charges.
- Use Today as Transaction Date: If you check this box, General Ledger transactions will have the current date on them. If it is NOT checked, then the transaction date will be the invoice date, or the check date, etc.
- Bills Must Be PreApproved Before Payment: Check this box if you want to set up a pre-approval process for payment of bills. This changes how bills can be paid.
- Use PreApproval Date as Check Date: If you have the pre-approval process box checked above, then you need to decide which date to use on any checks written: The pre-approval date, or the Cutoff approval date.
- Purchase Order Format: Select the format from the pull-down list that you want to use for your Purchase Order printing. The choices are Standard Print, Suppress Header for Preprints (choose this if you are using pre-printed forms), Company Name and Address on Left Side, Company Name and Address on Right Side with Logo, Standard Print with LONG Item Codes.
- No Boxes on PO Shipto, Vendor Etc.: Check this box if you do not want boxes to show around the PO Shipto, Vendor, etc.
- Suppress Print of Line # on PO: Check this box if you do not want to print the line number on the purchase order.
- Purchase Order Date Format: Select how you would like the date format to appear by selecting an option from the pull-down list.
- PO Entry - Only enter Sell Quantity: You can enter the sell (usage) unit quantity or the price unit quantity if you leave this box unchecked. Otherwise it will be your sell (usage) unit quantity.
- Show Purchase Quantity Only on PO: If you want the PO to only show the quantity of purchase units, check this box.
- Do Not Show Prices On PO: If you do not want to show prices on the PO, check this box.
- Purchase Order Default Message: Message to print at the bottom of every Purchase Order. NOTE: Only Purchase Orders created after this message is entered will display the message.
- Last PO Number Used (numbers only): This number will be used when suggesting to you what the next PO number will be -- which can be over-written at PO entry time.
- Default Payment Terms: New Vendors will automatically be setup with these Terms, which can be overidden. To ADD a new Terms record, click on the
 Add button to the right of the input box. Add button to the right of the input box.
- Default Payment Account: Select the payment account to be used by default when making payments. This will come up pre-selected as the checking/payment account to use when writing checks/making payments.
- To save your changes, click on the
 Save button. Save button.
- To add a New GL Account from this screen, click on the Add New GL Account button.
- To redraw this screen WITHOUT SAVING your changes, click on the
 Back button. Back button.
| |
|