Use this screen to enter in the different types of shipping
carriers you use. Examples: UPS or Federal Express.
From Main Menu, select Admin -> Setup Receivables -> Shipping Carriers or Admin -> Setup - Payables -> Shipping Carriers.
Your screen should look similar to this:
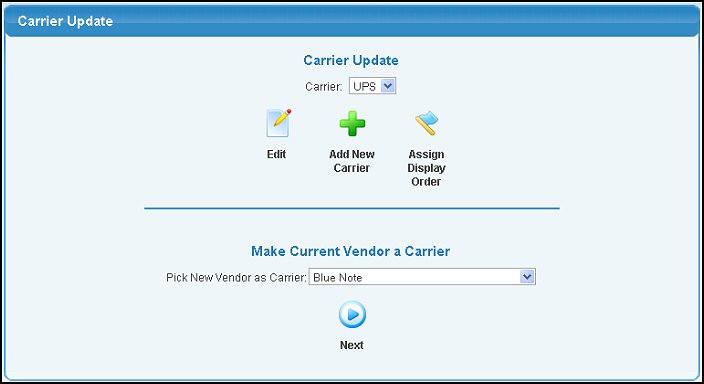
- To assign the order the carriers will display, click the
 Assign Display Order button. You should see a screen similar to this: Assign Display Order button. You should see a screen similar to this:
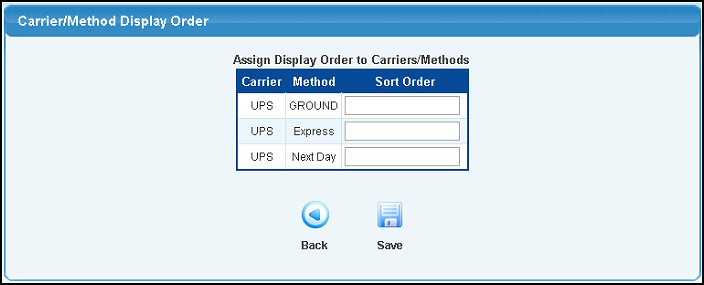
- Enter the position in the list you want the carrier to display in the Sort Order column.
- Click the
 Back button to return to the Edit Shipping Carrier/Methods screen without saving any changes. Back button to return to the Edit Shipping Carrier/Methods screen without saving any changes.
- Click the
 Save button to save your changes. Save button to save your changes.
- To Edit, Select the Carrier from the top pull-down list then click the
 Edit button. Edit button.
- To ADD a carrier who is NOT entered as a vendor in this system, simply click on the
 Add New Carrier button. Add New Carrier button.
- To ADD a carrier who IS already entered as a vendor, select that vendor from the drop-down list on the bottom portion of the screen, and then click the
 Next button. Next button.
Your screen should look similar to this:
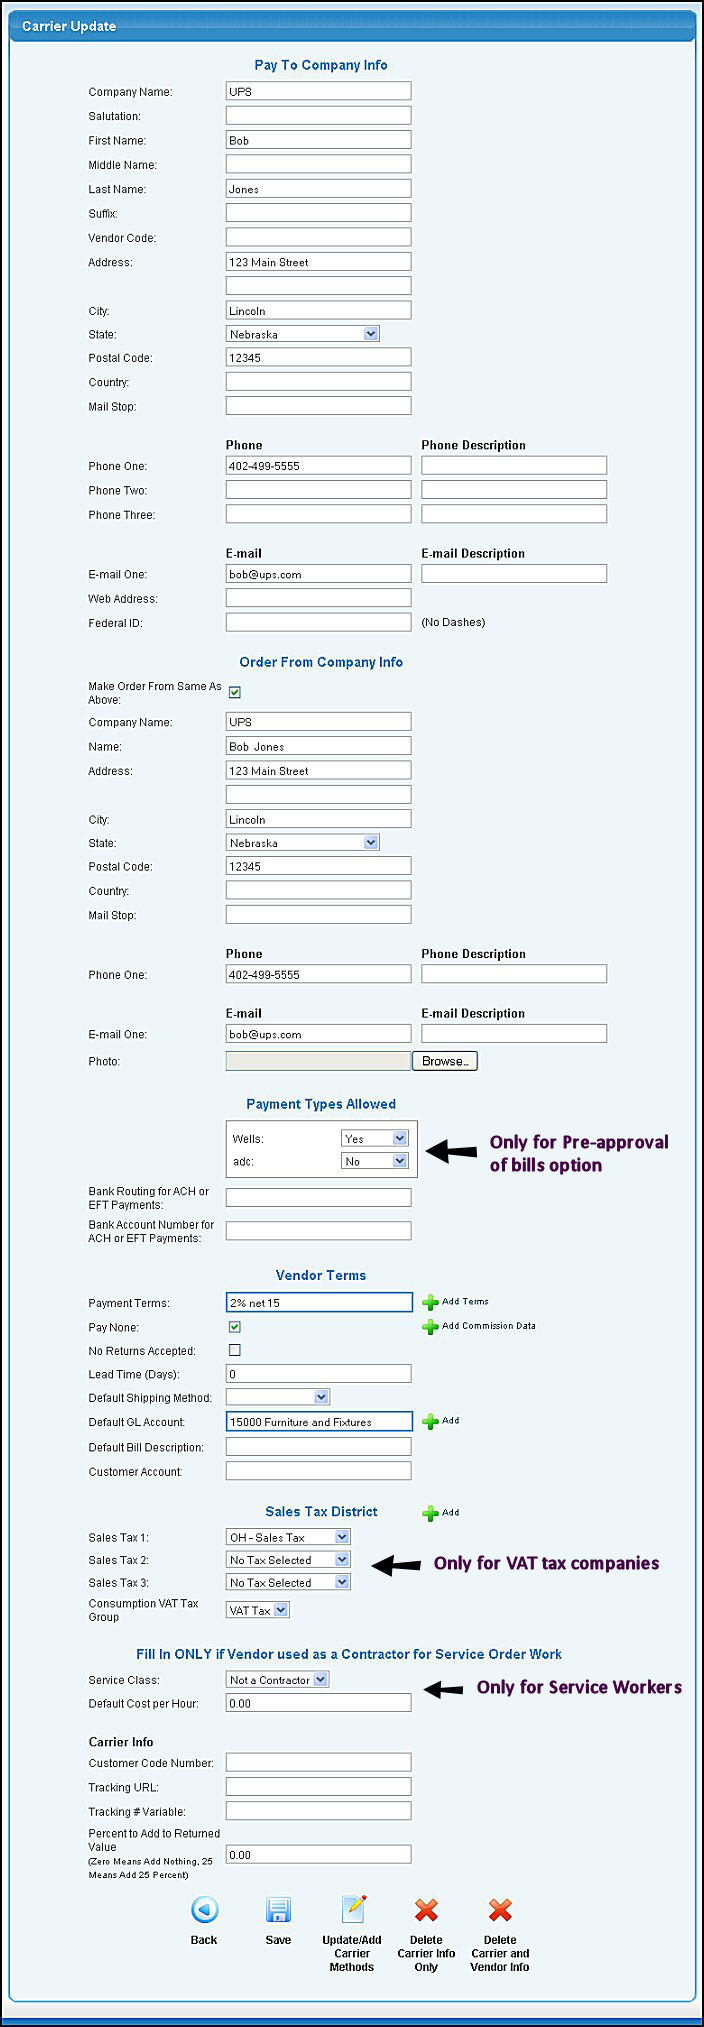
Enter the information in the following categories:
- Company Name: The name of the Carrier Company
- Salutation: Salutation for Contact Name
- Name (First, Middle, Last, Suffix): Contact Name
- Vendor Code: Enter the code for this Vendor in your Accounts Payable system.
- Address: Two lines are provided for the complete address.
- City: Carrier's City
- State: Select a state from the drop-down menu.
- Postal Code: Zip code or Postal Code
- Country: The country the vendor is located.
- Mail Stop: If the vendor is a large concern that uses internal mailing, you may need to include a mail stop in order for mailings to reach the right person.
- Phone and Description: Three phone numbers can be entered for this vendor. Because of that, a description field is provided for each phone so you can tell what its use is (warehouse, office, fax, etc.)
- E-mail and Description: Vendor email and perhaps under the description a note about WHO the email belongs to.
- Web Address: If the vendor has a web-site, enter that here.
- Federal ID: For tax information you will need the vendor federal tax ID number.
- Order From Company Information: If this is to be the SAME as already entered in the upper portion, check the "Order From same as above" box. If the name and address you order from is DIFFERENT from the PAY TO information, then enter that information here. Only ONE phone number entry is provided in this section.
- Photo: For the purposes of the SHOPPING CART you can attach a vendor BRAND image that can show on the Shopping Cart display. If you have entered one for this vendor, it will display towards the top of this screen. Use the BROWSE to find a copy of the image locally and upload it to your server.
- Payment Types Allowed: If you select pre-approve payables to be paid, then this will limit your selections for this vendor as to method of payment.
- Bank Routing for ACH or EFT Payments: If you pay this vendor by ACH or EFT (NolaPro does not do this at present), you can record their banking info here.
- Bank Account for ACH or EFT Payments: If you pay this vendor by ACH or EFT (NolaPro does not do this at present), you can record their banking info here.
- Payment Terms: Select the USUAL terms extended to you by this vendor. These terms can be over-ridden during individual bills entry.
- Pay None: This is a payables function. You can check this box if you want to place all of this vendors bills on HOLD - - not to be paid.
- No Returns Accepted: Check this box if you will not accept returns from this Carrier.
- Lead Time (Days): Enter the number of days ahead of shipment you must notify the carrier.
- Default Shipping Method: Select the default shipping method for this carrier from the pull-down list.
- Default GL Account: The USUAL GL Account used for indicating what expense type this purchase is.
- Default Bill Description: The USUAL Description for this bill. Some people like to use the vendor name for this because then it shows on the journal entries.
- Customer Account: The account number assigned by this vendor to your company.
- Vat Taxes: If this company is a VAT tax type of company, then you will see the different sales taxes, and you can select which one applies to this vendor.
- Consumption/VAT Tax Group: If this company is a VAT tax type of company, then you can select a Group for the taxes (for reporting purposes).
- Service Class: Service Classes, together with Service Types are used to determine default hourly rates for work on service orders.
- Default Cost Per Hour: Input the default cost per hour.
- Carrier Information:
- Customer Code Number: Customer code used when accessing the vendor web-site for tracking and freight information.
- Tracking URL: The IP address of the Vendors direct access web site for freight information.
- Tracking Number Variable: The field name to pass along with the URL to query a specific shipment.
- Percent to Add to Returned Value: If you would like to add a percent to Returned Value, enter it here.
Click the Save button to save changes.
If you are EDITING, click the  Delete Carrier Info Only button to delete the Carrier Information Only. The Vendor information will remain in the Accounts Payable system. Delete Carrier Info Only button to delete the Carrier Information Only. The Vendor information will remain in the Accounts Payable system.
If you are EDITING, click the Delete Carrier and Vendor Info button to delete both the Carrier Information AND the Vendor information stored in the Accounts Payable system.
Click the Back button to return to previous screen without saving the changes.
If you are EDITING, click the Update/Add Carrier Methods button. Your screen should look similar to this:
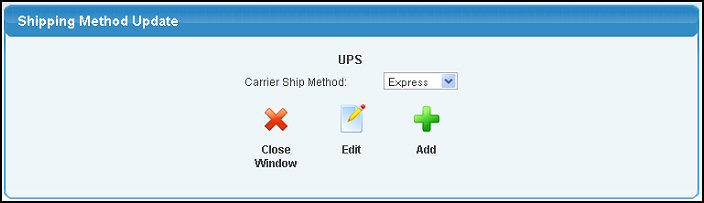
To return to the previous screen WITHOUT saving changes, click the  Close Window button. Close Window button.
Select a shipping method from the drop-down list then click on the Edit button, or click on the Add button to create a new method.
Your screen should now look similar to this:
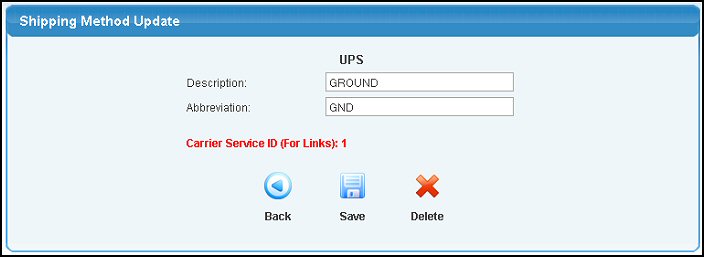
Description: The name of the method (2nd Day Air, etc.)
Abbreviation: The brief name of the method used when accessing the carrier web-site.
Click the Save button to save your changes.
If you are EDITING, click the Delete button to delete this Shipping Method from this Carrier.
Click the Back button to return to the Carrier Edit screen. Be sure to click Save to keep your changes.
|